Pages

Showing posts with label Pretty Cards to Make and Give. Show all posts

Sunday, August 14, 2022

Elegant Card with Tonic Studios Verso Dies


Elegant Card with Tonic Studios Verso Dies


Hi everyone!

Today's card features a Verso die set from Tonic Studios.  This is an old set.  I love Tonic Studios dies.  They really think through the process when creating their sets and usually the number of dies in a set is fabulous and includes mats which makes card creating easy.


This die set features some lovely filagree with tiny hearts.

I started with a standard A2 card base made with ivory cardstock. I normally use white cardstock but this die set felt old fashioned, so I opted for ivory instead. There are no layers in this card. I wanted the die cuts to stand out.

I used the two outer dies to cut some purple/pink mirror card. The inner die cut is of gold mirror card. The center die cut is from the same purple/pink mirror card.

I added a dark brown ribbon across the center of my card and layered everything else on top.
I added some brown and white pearls to decorate and a single blinged out flower for the center.
I haven't put on a sentiment, leaving that for when I send this card.


Thanks for stopping by,
Lis


Sunday, October 11, 2015

You Make Me Smile....


Hi all,

I want to make more cards with cut front panels so here's my first one.  This is not a new technique.  I really like it as it adds interest to a card.

Items used:
  • White border dazzles & Words (Hot Off the Press)
  • Bo Bunny Patterned Paper
  • Crinkle Ribbon in yellow from Really Reasonable Ribbon
  • White card base

The card size is A2 (4 1/4 x 5 1/2).  Before I cut the front panel, I added a full layer of paper and then another contrasting layer for the bottom 1/3 of the front panel.  Note - I added the postcards first before I added the blue third panel.

I cut the front panel freehand so I practiced a couple of times - because I only got one shot at it!  Although the dazzles were straight I was able to lay them down following the curve of my card without a problem, including the words.  These are pretty sturdy by very flexible.


Thanks for stopping by!
Lis

Thursday, October 1, 2015

Star Light Star Bright...


Today's card is a favorite of mine.  I love the fanciful children's rhyme and the blue glitter on this card.

Items used:
  • white card stock for card base
  • blue glitter tape
  • gold ripple holographic card from Hot off the Press
  • Star die & Rectangle Die from Frantic Stamper
  • Flourish Dies from Couture Creations (Frantic Stamper has these on sale!)
  • Message - computer journaled
  • Silver Vellum
You can get a better look at the silver vellum I used to back the cut out stars on the front of my card.


I used mounting tape (doubled) to attach the sentiment to the front of my card but only at the parts that actually touched. 
 
I used a few rhinestones to decorate the inside.
 
 
Thanks for stopping by!
Lis

Tuesday, June 30, 2015

To a Special Friend Card

Hi everyone!

Can you believe that today's NON-Christmas card uses Christmas papers?  I hate buying those beautiful papers and not being able to use them for more than Christmas.  One of the paper pads I bought for last Christmas has a pretty red and blue green color palette.  There were some designs that didn't shout holiday so those were the ones that I used.


I love how the white bow turned out This is paper twine that you can unroll (carefully) to get a 1-2 inch wide paper length.


I added some jewel brads to match the red dot pattern in the paper.  I cut off the prongs and adhered with glue dots.  The red dots are red glitter.  It doesn't show very well in the picture but in person the red dots are pretty.

I was thinking about spray coloring he bow but decided to leave it white.


Have a great week.

Lis

Sunday, June 28, 2015

A Pretty Lacy Card

Hi everyone!  I hope that your weekend was fun.  I can't believe that it's July 4th weekend coming up!  The year just keeps going by so fast!

Today's card combines lace, acetate and iris folding!


I started out with this acetate that I recently got that has a white flower design on it.  I thought it was so pretty.  I also had this piece of lavender shimmer card with a butterfly punched out.  I've had this for months trying to figure out what I wanted to do with it.  You know how you start a card with a specific idea in mind and then it just goes away?  Well, that's this butterfly.

I had some foils so I decided to do some iris Folding with the butterfly.  I didn't use a pattern (I probably should have).  I was going for colorful wings.
 
I went into my stash of misc stuff and pulled out a white paper doily and this gold foil  sticker lace.


I got the sentiment from a book of sentiments (die cut) from  Hunkydory (Paper Wishes).  They have a lot of relatives' names that you don't usually find like cousin, aunt nephew, etc.


You can see the layers really well.


Hope you enjoyed my card today.

Lis
 

Saturday, September 27, 2014

Thinking of You Card


I wanted to send my sister a card just to say hello.  I don't get much of a chance to speak withe her because she's in New York and I'm in California!  My sister loves nature and has a dark green thumb!  I also wanted to try out some watercolor pencils that I bought and I thought this rose would be just the thing.

I saw this pretty scrapbook paper with a line rose on the side and thought I'd use that. I roughly colored the rose and leaves with the pencils (dry) then used a paintbrush (comes with) and plain water to fill it in, blend and smooth.  It was very easy.

I love burlap -it has such an interesting texture (and I love the brown color) layered burlap on one side and  and added the Frantic Stamper dies branch and bird.


I added some green crepe ribbon to match the leaves.


Sunday, August 31, 2014

Yellow Pattern Note Cards


Sometimes I just want a simple and decorative notecard to send out.  I made these two matching note cards with that in mind. 

I used the lines in my background paper as guides for laying down coordinating paper on top.


I added some gold Border Dazzles (Hot off the Press) and some yellow ribbon as final touches.
 

Thanks for stopping by!
Lis

Saturday, August 23, 2014

Spring! a card


Hi everyone!  I have been enjoying the Spring weather out here in California.  It's been so nice and cool in the evenings.  It has inspired me to do a colorful Spring card!   pulled out all the stops for this cheery and colorful Spring card.  The card base is a lively dark pink with a mat of light pink edged in gold. I added a strip of matted purple (on dark pink!) and hung my banners from that. 
My "banners" were cut from the Frantic Stamper labels. I cut the sides off each and one end.  I also embossed them with different springtime designs like flowers and leaves.  I used some glimmer paper in lavender and lime and an orange patterned paper. (If you were reading this without having seen the picture, I wonder what you'd be thinking right now!  "She's lost it!"?)
I got my banners onto my card and felt it needed a little more. So, I added some flowers with white pearls in the centers.  I decided on bakers twine in purple and a strip of white doily Dazzles at the bottom of the card.  In all, the card really only took me about ten minutes!  I love these inspired moments!
Thanks for stopping by!  Lis


Sunday, June 29, 2014

Follow Your Dreams Card


Today's card uses the following materials: (I thought this would be easier.)
To attached the gold glossy swirl, I used small glue dots.  I placed the glue dots at the end of each swirl.  I did not glue the "vines" down.  This worked just fine and the swirl is secure.
 
Because the panel card die cut has about a 1/4 edge on it, I used red liner tape around the edge and then used a liquid glue -placing dots on the leaves - to glue it down.  All the other parts of the card were either glued down with regular double sided tape or glue dots.
 
The majority of the card uses muted colors. I decided to use flowers with a it more color to make them really pop.


The Tropical Leaf Card Panel Die was incredibly easy to use.  Normally with this kind of intricate die, I spend time having to  pop out all the bits of paper stuck in the die with a pin.  Not so with this die, a couple of soft raps on the table and CLEAN!!  Wonderful!
 
I hope you enjoyed today's card.  Please let me know if this format works better for you!
 
Lis


Saturday, March 1, 2014

Lavender Lace Card with Suede Paper

Hi everyone!

I am so excited about my new laptop!  It's taking some getting used to, especially the typing.  I've not used a laptop very much.  My old computer just is old old old and SLOOOWWW....you know what I mean! So, this will be better I think.  How did you like my very first videos?  I was overjoyed with them - even though they are just beginner!  I hope to start doing videos where I give a card picture, the list of materials and you can watch the video and follow along and make the card.  what do you think? (I am getting better with my camera work and feedback from all of you! So a big THANK YOU! for that!)

I made a card for my mother in law (Ive been divorced for over 14 years now but she was always so nice and I consider her a good friend.  She is the most wonderful person!  So, I made her a card.  I am not the greatest remembering birthdays and anniversaries.  I always seem to be late with holidays too.  I'm trying very hard to change this but its difficult with my lifestyle being so busy.


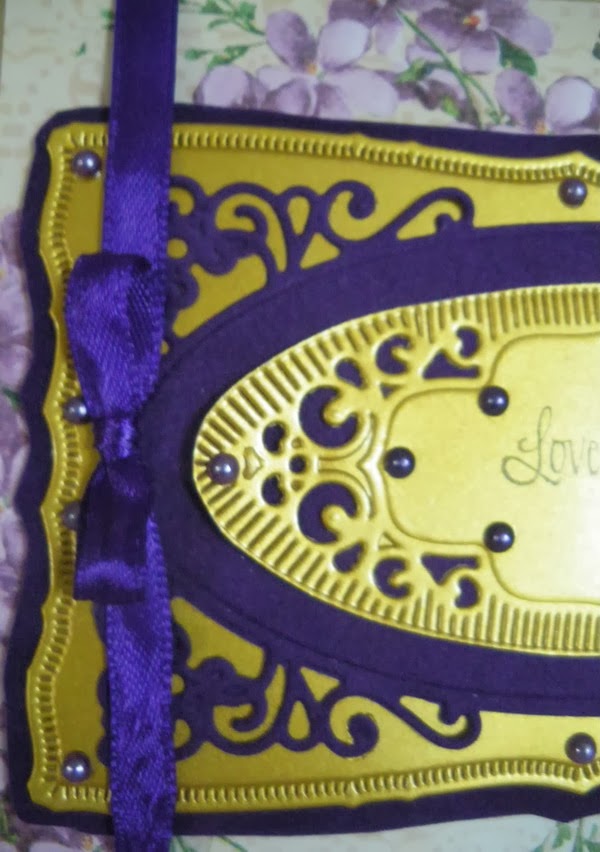
 I chose a very feminine lilac flower design for my base and edged that in gold. This was mounted on a white card base (A2).  I use the fancy rectangles from Spellbinders to cut gold glossy rectangle and purple suede layers.  I used a purple ribbon and two shades of purple pearls to embellish. I also added a lavender heart shaped pearl.


You can see below that I mounted the layers onto my card using mounting tape to give it some dimension.


Thank you for stopping by.  Come back again as I develop my blog with videos!

Lis

Tuesday, February 25, 2014

Cat Willow Card


Cat Willow Card
by Lis Whiting

I used two stamped and colored cat willows for my card. Both were matted to dark brown card stock. To accommodate both stamped images I used a 5 1/2 x 5 1/2 inch sized card. I used some very lovely Authentique papers (collections listed below).  I punched a border for the bottom of my card and decorated it with red crystals. 

I punched a leafy vine out of green foiled cardstock and used that as decoration at the top of my card.  I added a butterfly as a final touch.  This tamp would look good cropped to a square and tiled on a card also!


Tuesday, February 4, 2014

Pink and White Punched Hearts Card


Pretty Spring Valentine
by Lis Whiting

This month;s challenge is a shape challenge!  And the shape is a heart!  I love making cards so I decided to make some 3-d embellishments in the shape of hearts for my card.  The embellishments are very easy to make.  Choose any heart shaped punch.  Choose your paper and make four (4) punches with it.  This technique works best if the right and left sides are about the same (lop-sided or unbalanced punch-outs will work but it will take a little but more fussiness to put them together).  Take your four punches and put them one on top of the other in a pile.  Fold them in half. You can fold vertically (which is most popular for hearts) but you CAN fold them horizontally or even diagonally if you want to.  Experiment!  Remember that the thicker your paper the more you want to fold carefully.  The goal is to have all folded exactly the same. 

  • Now take the first two punches. Put glue stick on the back side of ONLY HALF of the one punch and match it to the same back side of the second punch.  Glue together.   
  • Take the glued piece in your left hand, and place glue stick on the back of the second punch. Take the third punch and match the back of this to the second one. Glue together.
  • Do the same for the third and fourth punch.
You should now have four punches glued together with half the back of punch one and four without glue. Lay these flat where you want them on your card and fan out.  Add glue to the back and attache to card.


I also used a Frantic Stamper lattice die and die cut the edge or my card and laced some ribbons through it to finish.


Products used:

Tuesday, January 21, 2014

Buttons Card


Travel Buttons
by Lis Whiting


I haven't used buttons as an embellishment lately so I decided today was the day! I have these really cool silver buttons and thought they would go well with the Family Is BoBunny Collection that I'm using for my cards right now.

I started with an ivory card base and added some silver glossy as a mat. Then I chose Drama and Nuts for my patterned papers.  I added a strip of tissue tape on which I used some smooch glitz.  I have to say that this glitz is really sparkly and bright!  I painted it right over the tape, let it dry and added it to my card.  Here are two pictures of it so that you can really see the sparkliness of this smooch!


I arranged some white, silver and some glittery buttons along the edge of my card and moved them around until I was happy with their position.  Then I glue dotted each one down.
For the roses I twisted two together by their wires, cut the wires to about 1 1/2 inches.  I spread the wire ends, about 1/2" from the end. I laid the roses down and glued the buttons on top of the rose wires with glue dots so all are secure, hiding the wires.


Even though the roses are dipped in gold, I think they are a beautiful pop of color against this silver card.


To finish my card I took a label and cut it in half and adhered with mounting tape.

Thanks for stopping by!

-Lis

Friday, January 17, 2014

A Hearty Birthday Wish


My sister's birthday is coming up this week and I wanted to make her a few very special cards.  She loves the Victorian style so I chose Anna Griffin paper and a pretty Happy Birthday sentiment.  I used two oval dies (comes from a doily set by Hot Off the Press - their line is called Paper Artist.  I like these dies = they cut nicely.)  The doily is cut from grey suede paper.

I didn't even cover the front of my card (ivory card base).  I punched a pattern from gold card and added it to the bottom of my card.


For the inside of my card, I added the Anna Griffin paper and edged it in gold.  I added my little sentiment tag.  On the left I added some transparency and covered the glue dots I used with white lacy Dazzles.  I added a swirl of bling to finish.

Here is a close up of my little tag.  Its so pretty.

Thank you as always for stopping by and adding your comments which I always read and appreciate.

Lis