Pages

Showing posts with label Valentine's Day Cards. Show all posts

Sunday, February 14, 2016

Love You Card

Happy Valentine's Day everyone! 

Today's card is al about the love!

 
Items used:
  • Anna Griffin flower die cuts
  • Tonic Art Nouveau oval die
  • Couture Creations Swirly flower
  • Bird punch by Tim Holtz and Sizzix
  • Crinkle ribbon in rose
  • Love you Tag - Kaiserkraft
  • Papers Kaiserkraft
  • Lavender and gold satin foil card
  • Spectrum Noir Alcohol Pens in blue and pink
  • Spectrum Noir Blending Ink and Pen
My card size is 5 1/8 x 6 7/8 inches.  I tend to have odd card sizes sometimes.  I will see a nice embellishment and make the card around it, adjusting the size.

To make the birds, I"
  • :punched out two birds using silver glitter paper/card
  • selected two alcohol pens - one in a darker blue and one in a pretty pink
  • dabbed the pink color on first then the blue (I didn't use a stroke or brush stroke.)
  • took the Spectrum Noir Blender pen and blended the two colors.
I used the blender pen and fiddled with the colors until I got what I wanted.

Thanks for stopping by, Lis


Tuesday, February 9, 2016

With Love, a Valentine's Card

Hi everyone!  Here I am with another card for you!  Can you tell that I'm still in my pink phase?  No to worry, we can always change the color of our cards, can't we!

 
Items used:
  • Spellbinders ? ( I have a bad habit of taking my dies out of their packages and putting them in a storage container.  :=(
  • Prima flowers
  • Hot Pink Crinkle ribbon
  • Pink satin foiled card
  • Pink card
  • White shimmer card
  • Patterned card (brown with gold newsprint)-Kanban
  • White pearls
  • "Ooh La La" acetate - Jolee's
  • Black "with Love" - Hot off the Press Tiny Word Dazzles in Black
The dies made this card fairly easy to do.  Each die cut piece was layered onto the one below with mounting tape.

Although the dies are intricate they are pretty large so it wasn't a problem die cutting the materials I'd chosen.

I love this little acetate sentiment.  I got them at Jo Anns.  They come in a pack (you get a lot!) and the theme is Paris and France (my favorite).

 
I decided to use the smallest die to add a sentiment.


I hope you enjoyed my card!  Thanks for stopping by!


Lis

Sunday, February 7, 2016

Happy Valentine's Day Card

Hi everyone!

Hope your weekend was great!  Today I have a Valentine's card that I made for you.


Items used:
  • Diamond Design Pink ribbon from Really Reasonable Ribbon.com
  • Tim Holtz Glitter Dust, Mahogany Distressed Glitter glue
  • Pink Doily - heart shaped
  • Happy Valentine Dies
  • Pink shimmer card with embossed dot
  • Pink satin foil card embossed Rose pattern (Anna Griffin)
  • Three Cherubs - Tim Holtz Seasonal Stickers
  • Flowers - Anna Griffin
  • White Pearls - Michaels
This card started where I work.  One of the supervisors there brought in these red and pink hert shaped doilies and we all took one to decorate and post on a board.  So, I made a card out of mine (yes, I took it home first!)

I really enjoyed using Tim Holtz new Distress Glitter.  It has a beautiful antique-y color and sparkles A LOT!  I cut out my words onto pink card.  Then I used a liquid glue on the front to attach the glitter.

I put some glitter on the loops of the paper flower collage.  I added some mahogany glitter glue - although I don't know why.  It looks pretty good.


You can get a good view of the satin foiled card and shimmer card I used to mat my card.  I love using foiled card because it picks up the embossing swell.

I hope that you enjoyed my Valentine card!  Thanks for stopping by!


Lis

Thursday, February 12, 2015

Two Hearts Valentine's Day Card

Hi Everyone!

I wanted to share this Valentine's Day card that I made for my sister.  It's been a bit of a long road for us with my dad's passing.  But we have each other still and that helps.


For my card I used the latest Anna Griffin embossing folders and her heart die.  She made an embossing folder to emboss the pattern once the die cut was made.  Its very pretty. I like her style.  It's very Victorian French if there is such a thing).

I used shimmer papers in pink and red (quite suitable for the holiday!).  I did add a one inch strip of white shimmer paper with an embossed design on it. I decorated the edges with silver glitter border dazzles (Hot off the press).

I thought that the top heart needed a little dimension so I adhered it with foam tape after I edged it with a silver paint pen.

I added the triple pearl head pins as a finishing touch.

I've been looking on the web lately for more ideas for hat pins and corsage pins.  So, in the coming weeks, you will see what I've found!  So stay tuned!

Take care, Lis

Saturday, March 15, 2014

Jeweled Heart Card


Today's card is really dimensional and full of whimsy (at least I think it is).  I created a very simple design by die cutting a large heart out of holographic red fireworks card and gluing decorative plastic buttons on it.  I found them at Hobby Lobby.  Usually I don't go for this kind of decoration but these were just too colorful to resist!

The matted papers are gold glitter card and a very special paper from Graphic Products Corp called
Iridescent Paper and comes from Taiwan. (Check out their Italian Florentine Papers.)

I've been a big fan of GPC for many years. They are not well known to us but they have some lovely papers, many are handmade.  If you do decide to purchase anything, be sure to check the paper size.  Many of their products are sold as "parent sheets" which are the really big sizes...on the other hand you get a whole lot for 1.70.

I hope you enjoyed today's card and browsing through GPC.  One of my goals is to bring new finds your way as I come across them. I'm always exploring and sampling, looking for new exciting materials to use in my cards.

(I wanted to let you know that I don't get anything from the companies I mention  other than Frantic Stamper as a Design Team member.  I just thought it would be nice to pass along great information to others who like the kinds of things I like.)

Thanks for stopping by!

Lis

Sunday, February 23, 2014

Stacked Hearts

Hi everyone!  My card today is a quick and simple use of specialty papers.  Specialty papers (suede paper, holographic papers, florentine, glossies, foils, yuzen washi, handmades, the list goes on and on) don't get nearly the attention that they deserve. Being a paper fanatic, I am fascinated by paper, how it's made, the variety in the marketplace today, and oh the colors!

I think we don't know what to do with specialty papers sometimes. So, I put together a little card - simple and easy and I used specialty papers!

Most cards I make are sized A2. I don't know why, I just like that size.  I read once that poems and short stories challenge the writer because he/she had to work with fewer words.  Maybe I like A2 because it challenges me with smaller space to make that big statement.

I started with a plain red card for my card base.  I used a Frantic Stamper die of all over hearts and die cut a sheet of pain white card and glued this to my red card front to form the base of my card. I wanted a plain background to show off my papers.


I have some Punch Bunch punches in scalloped hearts of different sizes and used my specialty papers here.  From the top: blue holographic , white suede, purple holographic, mottled gold foil, red suede, and the bow is made from copper crochet ribbon.

I attached each heart using foam tape. I attached the bow with glue dots.  I also added some blingy swirls.

Try some specialty paper and see what you can come up with!

Lis

Saturday, February 15, 2014

Lock and Key Valentine's Card (using Perfect Layers Rulers)

Hi everyone and Happy Saturday!  Did you all have a great Valentine's Day?  I wanted to share one more card with you.  I made it using the Perfect Layers rulers, and Keys to My Heart Precision dies from Frantic Stamper Line.  I cut them from Burgundy suede paper (luscious!).  Enjoy!


Here are the Perfect Layers rulers that I used.  Mine have lasted probably 10 years or more!.  You can see on the left that the size of the margin or layer is listed.  You can do anything from as thin as 1/8 to as big as one inch (if you get the set of three - I have the set of two right now...but I'm thinking about it!).  The measurement in the upper right is the "edge" that you will use underneath.
All you do is butt or catch the piece you want to mat on the edge and cut.  Easy!


Here is the 7 inch set (which is new - I had to have them, they are working out really well for my cards!)  I placed my xacto knife in the picture so you could tell the size better.


 This is what the rulers actually look like. So , you can see what I mean by butting the edge of the ruler up against the piece you want to mat.  Then you just cut along the edge of the ruler and you automatically get the mat size you want! 


Don't think of this as only for mats.  It's a design tool. 
  1. You can use these rulers to create many designs on your cards using the matting system: rays, think about triangles and hexagons. 
  2. Remember that you can mat anything as long as the ruler catches the edge of what you are matting. This means you can mat punched edges.
  3. Experiment with HALF-mats or Quarter-mats (see my scrapbook page using Perfect Layers to get an idea on this)
I'll try to publish some more projects so that you can try them too. (I'm sorry about being so gabby on this product.  I just really love this product!)

Hope you enjoyed my card!

Lis

Friday, February 14, 2014

Happy Valentine's Day!


Hi everyone and Happy Valentine's Day to you! 

I made this card for my sister( I used a Frantic Stamper  heart die and cut it using gold glitter card stock.  I really love the lacy pattern it has).

I hope your day was full of chocolates and flowers and of course lots of love!

Lis

Tuesday, February 11, 2014

Elegant Blue Valentine


Elegant Blue Valentine (February Challenge)
by Lis Whiting

I've been using a lot of suede paper in my work lately.  Today's challenge card uses a royal blue suede paper and gold accents for a dramatic and elegant card.
I started with my base card which was white card stock. I thought this would really show off the blue suede paper.  Since I am working with an A2 card, I cut my suede paper to 4 inches x 4 3/4 inches. Then I used the Dazzling Diamond Border die from Frantic Stamper to die cut the border design at the bottom.  Then I used another die (also Frantic Stamper) to cut the window.  I really love this die!  I don't have to worry about making sure everything is straight because this one die cuts out all four windows with no problem! 
First, I turned over my blue suede paper and used Red Line Tape in 1/8 inch thickness (it fits perfectly between the window panes) to adhere a 3 inch x 3 inch piece of transparency to the back of the suede.
I used Bo Bunny and Carta Bella papers and punched 1 inch pieces (four) that I then glued to the back of the transparency - the pieces show through the front window. (I used the red line tape again). 
I attached the blue suede paper to my card and embellished with gold Dazzles stickers and a fleur de lis punch in gold foil.


Products used:

Tuesday, February 4, 2014

Pink and White Punched Hearts Card


Pretty Spring Valentine
by Lis Whiting

This month;s challenge is a shape challenge!  And the shape is a heart!  I love making cards so I decided to make some 3-d embellishments in the shape of hearts for my card.  The embellishments are very easy to make.  Choose any heart shaped punch.  Choose your paper and make four (4) punches with it.  This technique works best if the right and left sides are about the same (lop-sided or unbalanced punch-outs will work but it will take a little but more fussiness to put them together).  Take your four punches and put them one on top of the other in a pile.  Fold them in half. You can fold vertically (which is most popular for hearts) but you CAN fold them horizontally or even diagonally if you want to.  Experiment!  Remember that the thicker your paper the more you want to fold carefully.  The goal is to have all folded exactly the same. 

  • Now take the first two punches. Put glue stick on the back side of ONLY HALF of the one punch and match it to the same back side of the second punch.  Glue together.   
  • Take the glued piece in your left hand, and place glue stick on the back of the second punch. Take the third punch and match the back of this to the second one. Glue together.
  • Do the same for the third and fourth punch.
You should now have four punches glued together with half the back of punch one and four without glue. Lay these flat where you want them on your card and fan out.  Add glue to the back and attache to card.


I also used a Frantic Stamper lattice die and die cut the edge or my card and laced some ribbons through it to finish.


Products used:

Saturday, January 11, 2014

Journaling Notes - Rectangluar Gatefold Card - On Your Retirement


Welcome to Day 2 of using journaling sheets (Making Memories) for cards!  Today's card is a gatefold retirement card.

Measurements of my finished card: 6 x 4 1/4 inches

I got the paper I used from the journaling notebook on the right.


I chose the paper on the right for my gatefold Travel card.  I really loved the newspaper print and the stamp design border.

Hmmm....Once I cut both sheets to make a square/rectangle, I realized that I would have to cover the left side because they didnt mirror each other.  No problem!


I used one of the half sheets as a stencil and was able to recreate the stamp effect using a small circle punch I had.  The blue paper I used is from Authentique.

I attached my outside paper to my card base using regular old glue stick. 

I was going to do just one side with the blue and use the original pink/newsprint for the other side because I loved the pattern so much (especially the newsprint!).  Unfortunately the more I looked at it the stranger it looked so I decided to do both sides the same.  I also cut out a smaller rectangle of dark blue card for the center.  I mounted my chalkboard onto this (left side only) with Red Liner tape and decorated with cut pieces of washi tape.


I wanted the postage border to hand off the edge of my card. I should have covered this with another paper or colored the edges before I attached it to my card  (Distress stain? embossing powder? glitter?) but I didn't.
 For the inside of my card, I chose 7 Gypsies paper. They have a really neat paper pad featuring maps. I matted them on dark brown card.  I double matted the center (or larger) piece and used more of the blue Authentique paper.

EK Success has this design as a punch. I punched out from ivory card and matted to dark brown card to match.  I cut the mat by hand. (I've been practicing and its not actually that hard to hand cut a 1/.8 inch mat border around a shape.)


And here is the finished card!
 Here is the finished inside.  You can see the backside of the chalkboard that I adhered to the left side of my card.
 Close Up!

This is a close up of the right front of my card. You can see the dark blue card I used to add to the front and the pieces of washi tape I used to decorate.

I got these little chalkboards (3 x 2 inches) from some website that I cant remember. If you google mini chalkboards Im sure that you can find it.  You cant really see it here but the outside of the chalkboards are made of unfinished wood. There was a gold thread loop attached at the top that I cut off as this was originally intended as an ornament.

I used white embossing powder and a Versa Mark pen to write the words on my chalkboard.  I covered the edges with Dazzles Jewel gold borders.  I added the buttons and bling with glue.

I stamped the sentiment in Staz On black.  I had this clock embellishment which I added as a final touch.

I hope that you enjoyed my gatefold cards this weekend.  Thanks for stopping by!

Lis

Friday, January 10, 2014

Journaling Notes - Round Gatefold Card - Valentine


Today's card is a gatefold card using the Making Memories Spiral Bound Journaling Notes from Frantic Stamper.  The card turned out ok although I struggled a bit with the inside ...and the outside.  Apparently circles are harder to make round than I thought!

First I chose my sheet.  What was nice about this is that these pads provide 3-4 sheets for each pattern. So, a gatefold card seemed natural.

I chose a pretty red and ivory half circle.

I cut both sheets so that they formed a complete circle.
 I attached to a backing sheet of pink with dots from Authentique - Smitten Line in Cupid.

Then I took a pair of Fiskars design scissors (remember them? How many of you have a collection, raise your hand.  Me too!)  I love these scissors.  They are a little hard to begin with but worth the effort to use.)

When I finished cutting my pink scallop border, I cut the circle in half, following the edge of the circle journal halves.

Once I had cut a scallop of about 1/2 inch around the edge, I used an embossing folder (The Paper Studio) with a writing design going horizontally.  This is the first time that I've seen one like this.  It helps when I want to do larger areas.  I was able to line up the embossing folder so that both sides of my card would line up.


Once I finished embossing, I colored the raised embossed writing with Ranger Distress Ink Festive Berries.  I also edged the outside of my circle with it too.

Now for the inside!  At first I was going to use another circle for the inside...

After some difficulty with a round inside....

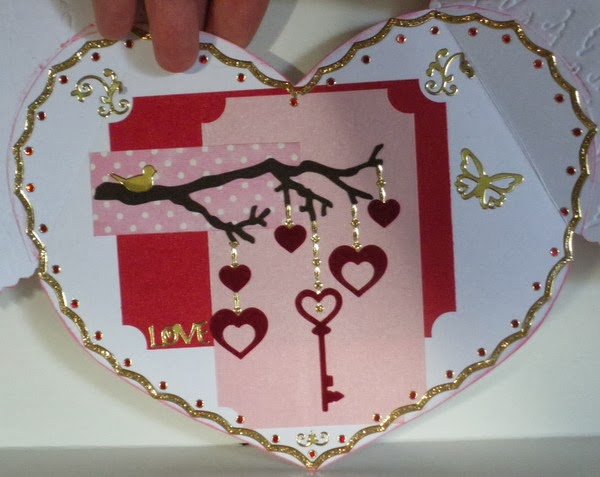
I settled on a heart shaped inside.  It fit better and I was able to work with it a bit easier.  You can see the two folded "wing" shaped folded edges.  That gets covered with red liner tape and attached to the front two pieces (the gate) of the card.

Now - TIP: do not attach your heart (inside of the card) UNTIL YOU HAVE FINISHED DECORATING IT.  I was so thrilled at getting a heart cut to fit that I immediately attached it with Red Liner Tape.  It was very difficult to cover the inside of the card with it attached to the front. If I had to do it again, putting my card together would be the last thing I did.

The card will open as you see below.

I really wanted pattern paper for my inside but couldnt do it because I couldnt recut the exact same heart shape SO I opted for some color blocked star dream paper (shimmer).  I used a pretty red and pink.  Since my card is round, I wanted the inside decorations to not be too "square".  I took a small circle punch and used it to punch the corners of the papers.  It created a really pretty tag-like design.

I used some Frantic Stamper dies: the tree branch which comes with some cute owls, keys and the hearts.  I cut them from red suede paper and hung them from the branch with Dazzles Jewel Borders in Gold.


This is the Frantic Stamper die I used for the front of my card, cut from gold glitter card.  I attached it only on the left side to allow the card to open from the center.  I attached the red bow in the same manner.

And here is my finished card!  As I said, it turned out quite nice!

This is the completed inside of my card.  I edged my card in more gold Dazzles and added some mini Jewel Dazzles tiny dots. Frantic Stamper carries these.

I hope you enjoyed today's card! Come back tomorrow for the second gatefold card!

Lis