Pages

Saturday, March 5, 2011

Show What You Think by Voting on My Posts with a Single Click!

Hi everyone!

In order to get some feedback on the projects that I am posting to my blog, I have added a quick and easy way for you to vote instantly by clicking on a choice at the end of each post.

Feedback is important to me.  Feedback tells me what YOU would like to see and what doesn't interest you.

To make it easier for you to leave feedback, I have added a Voting box.  There are three choices:
  1. Not for Me:  This means that you really don't like what you see in the post, it's not your style or taste.
  2. OK:   This means that while you may have looked at or even liked what you saw, it wasn't something that drew your attention or got you excited. The post didn't offer you a style, choice or information that you would go back and see again if you thought I would post something similar the next time.
  3. Love it!:  This means that you really liked what you saw.  The style of the piece was really good.  The information was interesting and not boring.  You would look for other projects on my blog that were like this one!
Each post has its own voting boxes.  Just click in the box that you feel represents your thoughts on the project or post.  My blog will count up the votes and I get to view the total number.

Easy!  (And thank you for taking the time to leave feedback!)

Four Simple Cards to Make

Hi everyone!  I wanted to share some cards that I made this week.  All are simple to make and require very little time and materials.

First up - my Dad's birthday Cards.  My dad just turned 94!  I made two cards just for him.


The base for this first card actually came from a pad that K& Company puts out.  The pad is already cut at the bottom and has a variety of papers in it including the one you are seeing below.  All I did was fold it in half, trim it a little and add some ribbon and bling.  Simple!

 The construction of the second card has only three parts to it.  First I embossed the sentiment in copper.  Then I used a corner punch to cut the corners (front and back).  I used Martha Stewart's Leaves on Branch Trim. This punch actually punches out a trim, not just a border.  I used glitter glues to color the cardstock.


For my next card, I used a beautiful flocked red damask paper from Doodlebug.  I punched the corners with a decorative corner punch fron Fiskars, added a silk ivory ribbon and bow and a chipboard butterfly from Dove of the East. The card took me about 5 minutes to make. (I took a couple of pictures because the flocked damask pattern is difficult to see.  But take my work for it, it's gorgeous!)


For my fourth card, I used Tim Holtz's Rosette die to create the rosette you see below. I used another Martha Stewart punch to create the border. To create the key embellisment, I used another of her punches (it has two little keys on it) to punch out some keys. I glued them one on top of the other and added a brad. the card base is pale blue and really allows the other paper to really pop.

So, a simple card: a base, a border (or a mat), an embellishment, you're done!

Friday, March 4, 2011

A Note About Faux Wax

If you decide to buy some faux wax, be sure that you are buying faux wax glue sticks and not just colored glue sticks.  There is a difference.

A Scrapbook Page! Lazy Day Ike

You may know that I have a kitty named Ike.  I took pictures one day of him (almost) sleeping in his favorite sunny spot.


I printed his picture a few times and then cut out strips with his eyes.  I used these as part of the border.  The strips also hid the saparations with the embossed border pieces (I could only emboss 5 inches at a time so I had to cut three strips to have one 12 inch long border strip.)


This is a trick I learned.  Take a ruler (or in this case I use a clear package) and put your letters on it.  Now you can move it around until you get the title where you want it.  When you are happy with the positon, press the letters down.  Be careful when taking away your ruler though or you may pull a letter out of position.

I hope you enjoyed this. Take care!~

Thursday, March 3, 2011

Just Shop! Card

Hi everyone!  Happy Thursday to you all!

Today I thought I would post a card using a finished chipboard embellishment. 

I always find it harder to use the finished pieces. I never seem to know where to fit it in.  I decided to use two different colors of ribbon, ivory and mauve.  I lined the outer edge of the chipboard with gold glitter glue.  The Tim Holtz tissue tape makes a great background on ivory cardstock.  It looks just like it was the paper, doesn't it?  Hope you enjoy this cute card!


PS: I am working on a COPIC post/project for next week so watch for it! (I have some silk ribbon ideas to share!)

Wednesday, March 2, 2011

Projects Coming Up: Copic Markers & Moulds and Moulding!

Hi everyone,

I thought I would let you all know what is coming up in the next week or two.

COPIC MARKERS:
I received a request to do some things with Copic Markers.  Copics have become really popular in the past year or so.  I have taken a copic class and will share with you what I know about these fabulous markers in my next post.

MOULDS & MOULDING:
This coming week I will be playing around with moulds, making moulds, using different materials for moulds and creating some cards with the moulds.

If there is something you would like to see, leave a comment!

See you next week! (how exciting!)

Scroll Heart Punch Embossed and Faux Sealing Wax(Kaarten met scroll heart punch)

Hi everyone!

Today's project:

As you can see, I used the scroll heart punch on gold glossy that was embossed.  The wider design allows the embossing to really show. I used a smaller design which also helped.


Now for something old but new:  Faux sealing wax

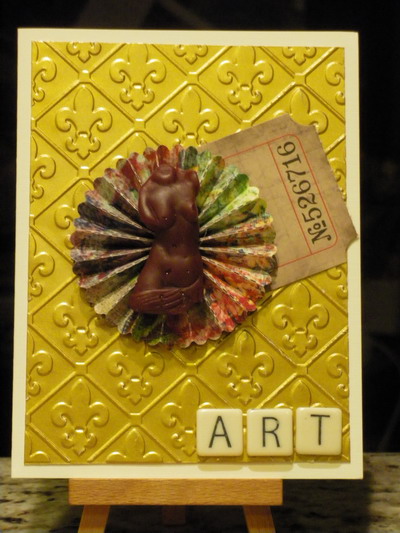
Did you notice the center of the card?  It is made from a hot glue gun faux sealing wax that is actually colored hot glue.

The faux sealing wax comes in sticks as you can see below.  There are many colors to choose from including metallic colors like gold and silver.
 I used a Krafty Lady Mould and my glue gun to add the faux wax (hot glue) to my mould. I let it cool and voila! ( I have added the Krafty Lady site to my favorite websites in case you want to look at her moulds.)

 You will notice that there are some pits in this result.  this comes from bubbles. I liked the look so I didn't do it over.  You have to be careful when adding the glue to the mould because it is very thick and so any bubbles do not easily rise to the top.

I added my moulded torso to the card below. I used Tim Holtz Rosette die also.  It came out very nice.


See you next week!


Monday, February 28, 2011

Final Martha Stewart Scroll Heart Punch tomorrow...

I will be posting my final project for the Martha Stewart Scroll Heart Punch Tomorrow.  Have you guessed what the other picture was yet?

If you would like to see something in particular, please leave me a comment.  It doesn't have to do with what is posted on the blog.

If you would like to know more about

  • all about embossing techniques ...
  • rubber stamping techniques and constructing a scene...
  • using different designs in different ways (like the scroll heat punch)...
  • image transfer techniques
  • designing cards
  • scrapbook page layouts
  • tools and machines you have and what they can do
  • materials like inks, papers, ribbons, metals & what you can and can;t do with each (paper is incredibly interesting) 
Designing and stamping with...
  • Stampscapes
  • Outlines
  • Some Assembly Required Stamps
  • Holly Berry House
Using popular images in new ways:
  • locks and keys
  • gears
  • houses and dolls
 And so much more....

Let me know!  I can come up with a post and a design that will be interesting and informative.


See you tomorrow!

Sunday, February 27, 2011

The Scroll Heart Punch used as a Stencil(Kaarten met scroll heart punch)

Say what?  Yes, as a stencil.  I used shrink plastic and punched a border. I used this as my stencil.  I didn't use regular transparency plastic because it is thinner and won't punch well at all.  You can use paper as a stencil but for this technique, we have to wash it and shrink plastic works well.

So, what did I stencil, you ask?  Well, take a look at project #1.


Here is how I created the border at the bottom of my card.
  1. I placed my stencil (made from the border punch) on a black piece of cardstock.
  2. I used Molding Paste and a spreader tool. (Artists and cake decorators use it.  It is bent at the handle)
  3. While holding the edge of the stencil on my paper, I spread molding paste over the stencil and paper, covering them both.  This is a little like icing a cake.
  4. I carefully removed the stencil and let the molding paste design dry. (This Molding Paste dried white and matte. It is also flexible and doesn't crack easily.  It does take color so I could have stamped it, or even used inks on it.)
  5. I replaced the stencil (now I used it as a mat to cover up the design).
  6. I sprayed Radiant Rain on the entire piece.
  7. I removed the stencil again and the result is what you see below.
(You will notice that part of the design has some spray on it.  This was not the fault of the stencil. The stencil worked perfectly and no spray got on the black paper.  I wanted to add some color on the right and sprayed without putting the stencil down first....duh!)

 I took this shot to give you an idea of the effect that Molding Paste has.  There is a depth to this design and creates a 3d effect.
 This is the Molding Paste that I used. Golden is well known among artists ans has great quality in all their materials.  While a CHA I took a class that used Speedball Molding Paste which seemed a little airier.  Liquitex also makes a Molding Paste I believe.

What ever Molding Paste you use, you should probably get the LIGHT one.  This means that its less heavy (less dense) than the others.
 Here is the Radiant Rain that I used.

Here are a couple of detail shots of Project #1.

For this part of the card, I used an embossing folder (Cuttlebug) and some gold glossy (The Paper Cut).


If you think about it, you have probably got MANY punches that you could also try this with.  Just think how many stencils you could have!


Thank you for stopping by.  I hope you enjoyed this card.

I was hoping to complete the second project but I ran out of time.  So, I will post tomorrow.  See you then!