Pages

Saturday, January 11, 2014

Journaling Notes - Rectangluar Gatefold Card - On Your Retirement


Welcome to Day 2 of using journaling sheets (Making Memories) for cards!  Today's card is a gatefold retirement card.

Measurements of my finished card: 6 x 4 1/4 inches

I got the paper I used from the journaling notebook on the right.


I chose the paper on the right for my gatefold Travel card.  I really loved the newspaper print and the stamp design border.

Hmmm....Once I cut both sheets to make a square/rectangle, I realized that I would have to cover the left side because they didnt mirror each other.  No problem!


I used one of the half sheets as a stencil and was able to recreate the stamp effect using a small circle punch I had.  The blue paper I used is from Authentique.

I attached my outside paper to my card base using regular old glue stick. 

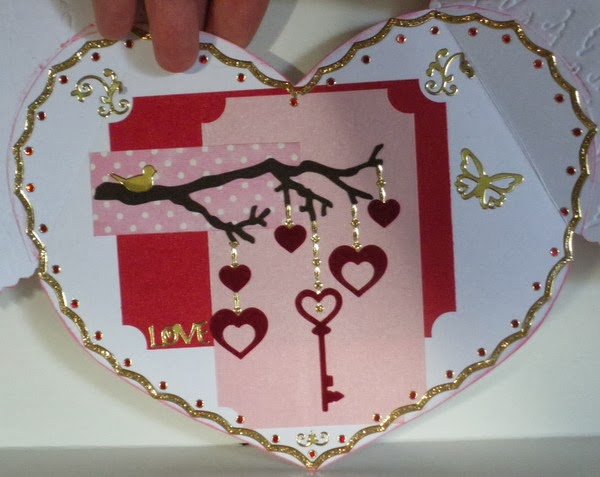
I was going to do just one side with the blue and use the original pink/newsprint for the other side because I loved the pattern so much (especially the newsprint!).  Unfortunately the more I looked at it the stranger it looked so I decided to do both sides the same.  I also cut out a smaller rectangle of dark blue card for the center.  I mounted my chalkboard onto this (left side only) with Red Liner tape and decorated with cut pieces of washi tape.


I wanted the postage border to hand off the edge of my card. I should have covered this with another paper or colored the edges before I attached it to my card  (Distress stain? embossing powder? glitter?) but I didn't.
 For the inside of my card, I chose 7 Gypsies paper. They have a really neat paper pad featuring maps. I matted them on dark brown card.  I double matted the center (or larger) piece and used more of the blue Authentique paper.

EK Success has this design as a punch. I punched out from ivory card and matted to dark brown card to match.  I cut the mat by hand. (I've been practicing and its not actually that hard to hand cut a 1/.8 inch mat border around a shape.)


And here is the finished card!
 Here is the finished inside.  You can see the backside of the chalkboard that I adhered to the left side of my card.
 Close Up!

This is a close up of the right front of my card. You can see the dark blue card I used to add to the front and the pieces of washi tape I used to decorate.

I got these little chalkboards (3 x 2 inches) from some website that I cant remember. If you google mini chalkboards Im sure that you can find it.  You cant really see it here but the outside of the chalkboards are made of unfinished wood. There was a gold thread loop attached at the top that I cut off as this was originally intended as an ornament.

I used white embossing powder and a Versa Mark pen to write the words on my chalkboard.  I covered the edges with Dazzles Jewel gold borders.  I added the buttons and bling with glue.

I stamped the sentiment in Staz On black.  I had this clock embellishment which I added as a final touch.

I hope that you enjoyed my gatefold cards this weekend.  Thanks for stopping by!

Lis

Friday, January 10, 2014

Journaling Notes - Round Gatefold Card - Valentine


Today's card is a gatefold card using the Making Memories Spiral Bound Journaling Notes from Frantic Stamper.  The card turned out ok although I struggled a bit with the inside ...and the outside.  Apparently circles are harder to make round than I thought!

First I chose my sheet.  What was nice about this is that these pads provide 3-4 sheets for each pattern. So, a gatefold card seemed natural.

I chose a pretty red and ivory half circle.

I cut both sheets so that they formed a complete circle.
 I attached to a backing sheet of pink with dots from Authentique - Smitten Line in Cupid.

Then I took a pair of Fiskars design scissors (remember them? How many of you have a collection, raise your hand.  Me too!)  I love these scissors.  They are a little hard to begin with but worth the effort to use.)

When I finished cutting my pink scallop border, I cut the circle in half, following the edge of the circle journal halves.

Once I had cut a scallop of about 1/2 inch around the edge, I used an embossing folder (The Paper Studio) with a writing design going horizontally.  This is the first time that I've seen one like this.  It helps when I want to do larger areas.  I was able to line up the embossing folder so that both sides of my card would line up.


Once I finished embossing, I colored the raised embossed writing with Ranger Distress Ink Festive Berries.  I also edged the outside of my circle with it too.

Now for the inside!  At first I was going to use another circle for the inside...

After some difficulty with a round inside....

I settled on a heart shaped inside.  It fit better and I was able to work with it a bit easier.  You can see the two folded "wing" shaped folded edges.  That gets covered with red liner tape and attached to the front two pieces (the gate) of the card.

Now - TIP: do not attach your heart (inside of the card) UNTIL YOU HAVE FINISHED DECORATING IT.  I was so thrilled at getting a heart cut to fit that I immediately attached it with Red Liner Tape.  It was very difficult to cover the inside of the card with it attached to the front. If I had to do it again, putting my card together would be the last thing I did.

The card will open as you see below.

I really wanted pattern paper for my inside but couldnt do it because I couldnt recut the exact same heart shape SO I opted for some color blocked star dream paper (shimmer).  I used a pretty red and pink.  Since my card is round, I wanted the inside decorations to not be too "square".  I took a small circle punch and used it to punch the corners of the papers.  It created a really pretty tag-like design.

I used some Frantic Stamper dies: the tree branch which comes with some cute owls, keys and the hearts.  I cut them from red suede paper and hung them from the branch with Dazzles Jewel Borders in Gold.


This is the Frantic Stamper die I used for the front of my card, cut from gold glitter card.  I attached it only on the left side to allow the card to open from the center.  I attached the red bow in the same manner.

And here is my finished card!  As I said, it turned out quite nice!

This is the completed inside of my card.  I edged my card in more gold Dazzles and added some mini Jewel Dazzles tiny dots. Frantic Stamper carries these.

I hope you enjoyed today's card! Come back tomorrow for the second gatefold card!

Lis