Pages

Showing posts with label Vellum. Show all posts

Wednesday, December 9, 2015

Season's Greetings! a card

Hi everyone!

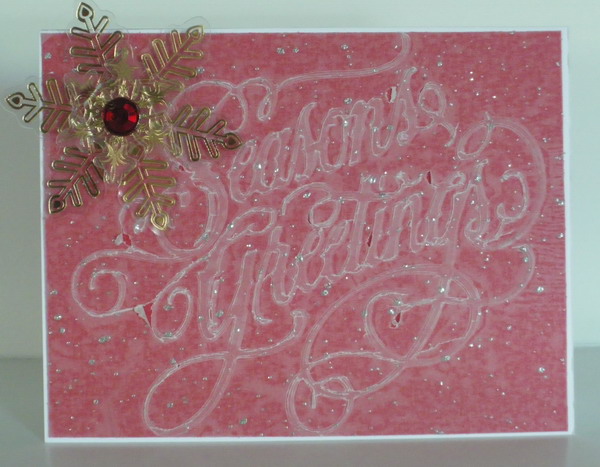
I've been working on my Christmas cards (finally). 


Items used:
  • white card stock for card base
  • red shimmer paper
  • white translucent vellum with silver sparkles on it
  • Embossing folder from Hot off the Press
  • acetate and gold foiled snowflakes
  • red crystal - Bo Bunny
I found some vellum in my stash that had silver glitter embedded on the vellum (not in it).  I also found some with red and blue so you'll be seeing that too.

I embossed the vellum and used the Sizzix repositionable glue sheet to back my vellum.  I added it to some red shimmer paper.  I had to rub the vellum somewhat to get a consistent color to come through.  I made sure not to rub off the sparkles!

I added two layers of snowflakes and a gem and done!

Thanks for stopping by!
Lis

Thursday, October 22, 2015

Wish, a Birthday Card

 
I am really using a lot of vellum lately.  In today's card I've embossed light green vellum for my card.

Items used:
  • Bo Bunny Patterned paper
  • Jute ribbon (Michaels)
  • Purple doilies (Michaels)
  • Vellum in light green, center piece with roses (paper and more, Hot off the press)
  • embossing folder Sizzix (Tim Holtz texture fades)
Thanks for stopping by!
Lis

Monday, October 19, 2015

Thinking of You Card

 
Today's card is a simple card design.

Items used:
  • white card stock for card base
  • purple vellum (paper and more.com)
  • Martha Stewart Beaded Border Punch
  • Lavender grosgrain ribbon with purple stitching
  • Gold Word Dazzles from Hot off the Press
  • Double stick adhesive tape

I took a 5 1/2 by 8 1/2 inch sheet of purple vellum and folded it in half to cover both the front and back of my card (like an overlay).  I punched the border design in the bottom front half of my card only. 
You're not going to believe this but I used plain old double stick adhesive tape to adhere my vellum piece to my card base.  I placed one strip on the top on each side of my card and added the vellum.  It doesn't show I guess because the purple is slightly less translucent.  At any rate I was pleasantly surprised.  (I did the tape thing on the back of my card and when I didn't see anything I added it to the front also.)

I added my ribbon and a sentiment and the card was done.  This is a nice card design for when I have to make a card quickly.

Take care, Lis
 

Sunday, October 18, 2015

Happy Everything! a Birth Card for Sister

I made today's card for my sister who has a birthday.
 
 
Items used:
  • navy card stock for card base
  • Blue border Dazzles (hot off the press)
  • Blue and gold striped paper (hot off the press)
  • blue vellum (the blue is a coating) (paper and more)
  • gold glossy for tags (EK Success tag punch)
  • white birthday word Dazzles
 
This card turned out really nice and has a nice line to it.  Did you notice the blue and gold paper?  Its from Hot Off the Press.  They are selling it now on clearance for 4.95 per pack of 25 sheets. You can beat that.  The gold is really gold and the blue is a rich cobalt.  its a very pretty paper (not card stock).
 
I used the vellum as a layer and tore it (probably the easiest thing you can do with vellum...LOL).  I used Sizzix repositionable sheet to add a layer of adhesive to the back so that you cant see it from the front.
 
 
Thanks for stopping by, Lis

Wednesday, October 7, 2015

Ferris Wheel - a Card


Today's card is a collage card.  Items' used are:

  • Vintage Clock die Sizzix
  • Hot off the Press
    • Blue Peacock paper
    • Vellum rose
    • Black Dazzles Stickers
  • Distress inks Ranger
    • Picked Raspberry to color roses
    • Walnut Stain, Vintage Photo, Brushed Pewter to color white ribbon
    • White diamond pattern ribbon from Really Reasonable Ribbon
  • Papers from Graphic 45 Worlds Fair Journaling Notes
  • Blue shimmer paper for the clock face

What I was most excited about for this card is that this was my first go at coloring or staining the white diamond ribbon I bought.  I love the pattern to this.  It really gives my card an elegant touch.  (If you are interested in looking at the colors go to www.reasonableribbon.com  The online store is really great. I've never had a complaint.  They've go this monthly ribbon club for $10 where you can get 6-7 different ribbons.  Its great for one's ribbons stash!)

Anyway, I used Ranger's Distress line of stains and some metallic silver.  It worked out quite well.  I was concerned that darker stains would not show the diamond pattern.
 
 
For the picture below, I used a small paintbrush and a Picked Raspberry ink pad to color the roses.  I sprayed a little plain water on a clean brush and went over them again to create a slight watercolor effect.  I edged the picture in Vintage Photo.
 
 
Thanks for stopping by!
Lis

Thursday, October 1, 2015

Star Light Star Bright...


Today's card is a favorite of mine.  I love the fanciful children's rhyme and the blue glitter on this card.

Items used:
  • white card stock for card base
  • blue glitter tape
  • gold ripple holographic card from Hot off the Press
  • Star die & Rectangle Die from Frantic Stamper
  • Flourish Dies from Couture Creations (Frantic Stamper has these on sale!)
  • Message - computer journaled
  • Silver Vellum
You can get a better look at the silver vellum I used to back the cut out stars on the front of my card.


I used mounting tape (doubled) to attach the sentiment to the front of my card but only at the parts that actually touched. 
 
I used a few rhinestones to decorate the inside.
 
 
Thanks for stopping by!
Lis

Wednesday, September 30, 2015

Paris Postcard


Hi everyone!

Today's card has a couple of interesting things on it. 

Items used:
  • Paris Postcard replica
  • Photo from Idea Ology Photo booth set
  • Blue sparkly ribbon
  • clear micro beads (for stamp)
  • double stick paper and clear glitter (Ranger) - see bottom of card
  • Other image cut from scrapbook papers
  • light blue vellum for mat

For the stamp:
I took some double stick tape and covered the stamp which was part of the postcard.  I covered the tape with clear micro beads.

For the bottom of the card:
I used some paper size double stick (paper) and cut it out and placed it on my card.  I sprinkled the clear glitter on it.  It looks really pretty and you can see the picture behind it.  This glitter gives a nice sparkle without being too opaque or overwhelming.  For those of you who grew up in snow like I did, it looks like sparkly snow in the moonlight.

Thanks for stopping by!
Lis

Tuesday, September 29, 2015

Be Fearlessly Authentic

Hi all!
 
Another collage card for you! 


Items used:
  • Flowers from Wild Orchid Crafts
  • Background paper (right) Anna Griffin
  • Background vellum left - www.paperandmore.com (this is a coated vellum on one side with a purple blue sheen)
  • Picture - Idea Ology
  • Jewel Brads (my stash - they are old)
  • frame that the picture sits on (Graphic 45 Journal Notes)
  • Ribbon comes from Really Reasonable Ribbon - This online site has many colors of the diamond design ribbon above. Its lovely to work with!
  • Distress Stain in Tarnished Brass
When I look at the old fashioned pictures that are so popular nowadays to use in crafts, I wonder who they were and what they were thinking the day they got their picture taken.  This woman is so beautiful and reminds me of my older sister.  The picture makes a great addition to a card.

You can get a better look at the purple vellum I used below.
 
 
Thanks for stopping by!
 
Lis

Monday, September 28, 2015

Birdie

 
Hi everyone!   I hope that you are cooler than I am here in California.  We've been having 100 + degree heat.  Of course we are a desert and this makes it rough sometimes, especially since we are in a drought. 
 
 
Today's card is a collage card of sorts.  This is a bit plainer than I usually make my collage cards, but sometimes simpler is better.


Items used:
  • Bird charm from Idea Ology
  • Roses from Prima
  • Purple 1mm burlap/jute ribbon from May Arts (you can get some at Really Reasonable Ribbon)
  • Other papers from Hobby Lobby
  • Dark Pink colored Vellum for mat (www.paperandmore.com - they have in smaller quantities and MANY colors)
I had a paper with pictures on it so cut one out and tore the edges, added Distress inks in Tea Dye and Picked Raspberry. I curled the corners. The paper was double sided with a dark brown which worked out perfectly.


Take care, Lis