Pages

Showing posts with label July 4. Show all posts

Sunday, July 3, 2022

Happy Independence Day! Card

 Happy Independence Day Card


Hi everyone,

I hope that you are enjoying a safe and fun July 4th weekend.  I stayed in (sort of) and enjoyed just sitting outside.

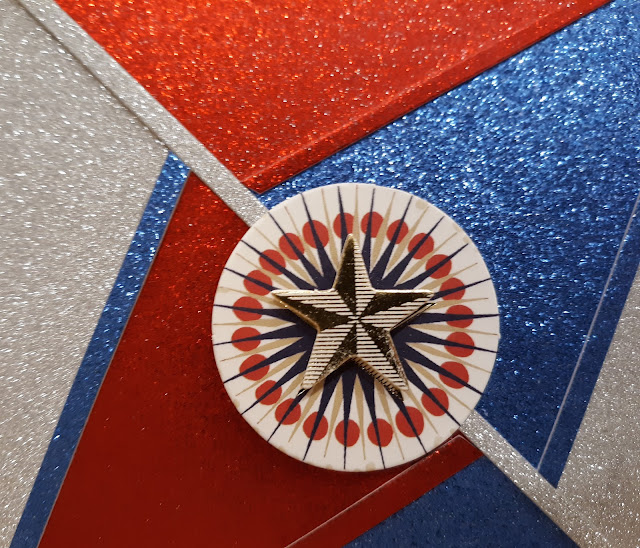
I always make traditional July Four cards for my sisters. This year along with those, I made this modern take on a July Fourth Card.


The card is 5 x 5 inches square and made from white cardstock, then matted with black cardstock.

I used red, blue and silver glitter paper (Scrapbook.com).
-I cut the three sheets to 4 1/2 x 4 1/2 inches.
-using my trimmer I cut each sheet from corner to corner creating 2 triangles
-I took each triangle and cut it into three smaller triangles.
-I used a piece of white card (4 1/2 x 4 1/2 inches) and double stick tape to cover it.
-I lined up each triangle and laid it onto the white cardstock, altering colors as I went.
- I cut three 1/8 inch strips of each glitter color (on cardstock).
   -I laid the silver strip first - from corner to corner
   -I added the blue and red strips next, trimming one end so that it was angled to fit the card center.
I completed with a single 3D sticker from Anna Griffin in the center.

I used a red and a blue triangle on the inside of my card. I printed out a couple of the lines from the song You're a Grand Ole Flag.


Thanks for stopping by!
Lis

Tuesday, June 21, 2022

One More July Fourth Card!

 July Fourth Card


Hi everyone!

 How is your day going? I hope well.  I post on scrapbook.com.  There have been some fabulous July 4 cards done which inspired me to create just one more card.  Here it is.


The dimensions and instructions can be found on my post from June 8th, 2022.


I love Paper Wishes (a dot com store). I've been buying from them for probably over a decade.  They sell sticker sets of sentiments (among other things).  That is where I got the sentiments below.


The eagle below is a Dresden die cut (also known as Victorian scrap). These die cuts are made from the original 200-year-old dies. I love collecting these and use them sparingly.  (Recently, I lost a whole folder of them.  I was so upset!)


One last look.


Thank you for stopping by, 
Lis


Wednesday, June 8, 2022

Happy July Fourth Card

 Happy July Fourth Card

Hi all,

I decided to release this card early to give you a chance to make one for yourselves!  Happy Fourth of July a little early.  I hope that you all have some fun things planned!


Here are the supplies I used. (I didn't use the red or silver glitter glue pictured.)

  • Flag
    • red cardstock
    • white cardstock
    • blue glitter cardstock or paper
  • Card Base
    • Base - white cardstock
    • 1st mat: blue glitter cardstock or paper
    • 2nd mat: red glitter cardstock or paper
    • 3rd mat: silver glitter cardstock or paper
  • Embellishments
    • Red, white and blue sequins
    • Red, White and Blue "drops" (they harden into shiny discs- see my card for examples)

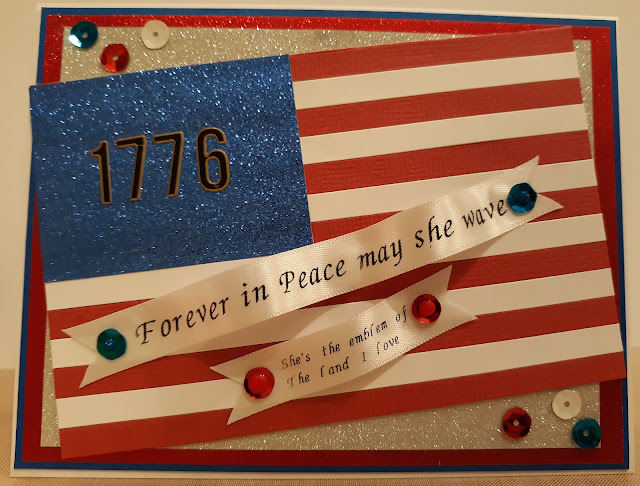
I used some of the lyrics from the song "You're a Grand Old Flag".

You're a grand old flag
You're a high-flying flag
And forever in peace may you wave
You're the emblem of
The land I love
The home of the free and the brave
Ev'ry heart beats true
Under red, white and blue
Where there's never a boast or brag
But should old acquaintance be forgot
Keep your eye on the grand old flag

      lyrics written by Mary Cohan & George M Cohan


Please see below for the measurements to make this card.

This card is a standard size A2 made with white cardstock, then matted with blue cardstock, then with red glitter paper, then with silver/white glitter paper.

I made the flag by cutting 1/4-inch strips of red and white cardstocks.
The American flag has thirteen stripes symbolizing the initial thirteen colonies. The top and bottom stripes are red. (I wanted to be accurate, or my sisters would not be happy.)
I cut a piece of white cardstock and covered the front in double stick adhesive. I layered the red and white stripes, being careful to lay the first one straight and to make sure that the other strips were tight against each other. 
  • My method was to start the strips from one side and work my way across the strip, adhering about one inch or so at a time, butting against the previous strip as I went.  This worked out well for me.

Once I was done, I cut the two flags out using my paper trimmer. I also trimmed the overhang on each side of the flag.

The American flag has a blue rectangle on it with stars, each representing a state. The blue background covers a total of 7 red and white bars.
I cut a piece of blue glitter paper so that it would be long enough to cover 7 bars. I had to fiddle with the width though as I wasn't sure of the measure. I think I got it close though.
I didn't opt to put stars on the blue field. I decided to add 1776 which is the year the colonies declared their independence from British rule.

I printed out the phrases I wanted to use on white ribbon and added them to each card. I used sequins on one card and crystal drops on the other. (Unfortunately, I didn't look up the lyrics and relied on my memory. So, I got a couple words wrong. I decided not to go back and change it.)

Measurements for this card:
  • The size of the completed card is A2 or 5 1/2 inches long by 4 1/4 inches high.
  • The Flag
    • When done: 5 inches long by 3 1/4 inches high
    • Cut red and white strips: each strip should be 1/4 inch wide by 5 1/2 inches long.  (Cut the strips a little longer than you need. You can trim them at the end.)
      • Red strips (not glitter) - 7
      • White strips (not glitter) - 6
    • Make sure that you start with a RED strip at the bottom and work your way up, ending again with a RED strip. (This way you won't be getting adhesive on you!)
    • The BLUE (glitter) part of the flag is 2 3/8 inches long by 1 3/4 inches high.
    • The numbers that I used for the "1776" came from a sticker pack. You can find different ones at Michaels.  
      • I will put a single GOLD STAR in the center of the blue field on the next card.
  • The Card Base
    • Card base (white cardstock): Take a piece of white cardstock 8 1/2 inches by 5 1/2 inches.  Fold in half to create a white card measuring 5 1/2 inches by 4 1/4 inches.
    • Card Layers:
      • Blue cardstock: 5 3/8 inches x 4 1/8 inches
      • Red glitter cardstock or paper: 5 1/4 inches x 4 inches
      • Silver (or white) glitter cardstock or paper: 5 inches x 3 3/4 inches
  • Embellisments
    • I used red, white and blue sequins on one card. I used Crystal Drops for the other card:
      • Red - Tonic Studios Red Berry
      • White - Tonic Studios Vintage Drops in Chalk White
      • Blue - Pops of Color in Royal Blue (sold by Scrapbook.com. It's their brand.)
    • Other possibilities:
      • Buttons, glitter and glue or glitter glue, paper flowers
  • The Sentiments
    • I was able to print onto white satin faced ribbon. White cardstock will also work very well.
    • Consider handwriting your sentiment.
Have Fun!


Hope that you enjoyed this patriotic card. Thanks for stopping by.
Lis

Saturday, July 4, 2015

Liberty, a card

Hi everyone and Happy Independence Day to the USA!


I used the following items for my card:
  • Frantic Stamper Precision Dies (Eagle, the word "America")
  • Chevron design embossing folder
  • Tim Holtz embossed cardstock - Seasonal Pack (pre embossed by company)
  • Red plaid ribbon, red and whit rhinestones
  • Card stock - white (for card base) and gold foil


I really like the font used for America.  Proud and strong.


I used the eagle die to cut a window in the embossed gold foil card.  I sanded the blue embossed card and then positioned it behind the open area so that some of the words showed through.

Thanks for stopping by!
Lis

Saturday, January 3, 2015

Americana Rooster


One of the many things I love is Americana.  I love using rustic reds and blues in my work. Today's Americana piece features a rooster, symbol of the farm (my parents families were both farmers).
I chose to use a combination of light blue plaid and blue foil (like a Williamsburg blue) for my card.  I used the sticker foil for the bottom inside and then did a cut away for the front of my card using a scallop edge. I added blue plaid ribbon and two ribbons from French General (EK Success).  Although the line is called "French General" it has some really pretty lace and ribbon that fit perfectly with my Americana theme.  The red buttons are also from the French General collection. 


I cut out my label using the Coved Labels from Frantic Stamper from a red stripe paper I had.  I outlined the label in silver and added it to my card with mounting tape.

I cut my rooster from Wood Veneer paper (by Arc Crafts-paper backed).  It cuts like a charm.  I used Distress Stain in Walnut (Ranger) to color my rooster and also used Vintage Photo (also Distress Stain) to edge it.  I threw water droplets on it and dried it again to create the worn look you see.  I attached it to my red stripe label with mounting tape.


Now my card is all ready to send to my dad in New York!

I hope you enjoyed my card today!
Lis

Friday, July 4, 2014

Happy Birthday America!

I am so thankful and proud to be an American.  My freedom is so precious to me.  Thanks to all previous and to come that have helped to make our country free.


Have a safe and happy 4th!
Lis


Monday, September 2, 2013

American Red White and Blue Card with Frantic Stamper Precision Dies


With Labor Day coming, I wanted to create some cards with the new Frantic stamper Mix and Match USA die set.  I love the set. It includes a Bald Eagle, a star, "America", a flag and USA with stars in a block. Just super!

I started out with a bright red card base ( 5 1/2 x 4 1/4 inches) in card stock (of course).  I added a navy blue piece of card stock (5 1/4 x 4 inches). I used the eagle die and cut out my eagle on this card stock.  I also cut out one in gold and one in silver.
To make my eagle:
  1. I turned my blue card stock over to the back side.
  2. I placed the gold eagle die cut in the space and taped it (kind of like iris folding with the folds)
  3. I used the silver cut out pieces from the silver eagle die cut I made to fill in the cut out spots in the gold eagle.  I taped these down too.
NOTE:  I took a brown Sharpie pen and colored the one silver piece over the nose (nares)

Once everything was taped down, I turned over my blue cardstock and there was my eagle! (I wanted to make my eagle stand out so I used gold, and the silver was to imitate the white feather on the head of a bald eagle.)

I cut a piece of Anthem Peace about 1 1/2 x 5 1/4 inches and added it to the bottom of the blue card stock.  Then I added some gold glitter photo corners to the top corners only. I adhered the blue card stock to my card base.

For my stars:
  1. I die cut three stars on a navy blue piece of card stock. (Note that these are shapes cut into the paper and not die cuts in the sense that they are little squares - yet!)
  2. I got out my 1 1/2 inch square punch and turned it over to the back side.
  3. I slid each of the cut out stars into my punch one at a time and punched them out.  I got about a 1/8 inch border.


  4. I edged the outside borders in gold. And I edged the inside star edges in gold also so they would stand out better.

I mounted my stars onto my card using a single square of mounting tape inthe middle of each star. (The card stock was stiff enough that I did not need to add any other mounting tape.)
I finshed my card by adding the word "America" (Included in the die set!) die cut in red foiled card stock to the bottom center of my card.

I hope you enjoyed my card today!

Lis

Tuesday, July 2, 2013

American Flag Card


I really love making July Fourth cards for my family.  My dad was in World War II in Italy and Africa, my uncles were in the Pacific and I can even trace my ancestors back to the Revolutionary War!  So Independence Day, Memorial Day - they mean a lot to me.

For today's card, I decided to use a bright red card stock for my card base and add a navy card stock for my mat.  I used Frantic Stamper's Mix and Match Dies - USA to die cut my flags and used the "America" die to cut my word out of gold fold paper.  I backed my flags in silver glitter card stock (the picture doesn't do it justice.  It REALLY sparkles!) One of the things I love about the flag die is that the area where there are supposed to be stars on the flag, they are really tiny little stars!  So cool!


I added a red ribbon bow and done!

Thanks for stopping by!

Lis

Monday, July 1, 2013

We the People ...a Card to Celebrate America

Hi all!  I wanted to share a July Fourth Card with you! Sorry for the glue patches.  I was so excited about this card I didn't wait for it to dry!)

I made today's card with Frantic Stamper's Mix and Match dies - USA (Eagle and the word die "America")

I embossed a silver shimmer card stock with a Cuttlebug folder (writing text) after I cut out the eagle.  I added a strip of patterned paper from one of Tim Holtz collections (I love the license plates here!), then added the word die cut in navy card stock.

Close Up!
The brown card stock section was created from one of Martha Stewart's deep edger punches and cut in half.

I created my eagle by:
  1. My card base is bright red.
  2. I used the die to punch out the die cut in silver (this left the outline in the silver card stock which was then embossed.
  3. I cut out another eagle in navy card stock.
  4. I attached the silver card stock to my card base with mounting tape.
  5. Then I added my navy eagle die cut with glue.  Becaue of the raised mat, the die cut is recessed.

Here is a better view of what it looks like.  This makes my eagle really stand out and look 3-D.

I'm glad that you stopped by today. Stop by again for more inspiration!

Lis

Wednesday, July 4, 2012

Uncle Sam Wants You! Card

Today's card features a famous icon...Uncle Sam!  There actually was an Uncle Sam who lived in Troy New York (I know this because I lived there too!)  This image was and still is used, amazing isn't it.


The Uncle Sam sticker is from K&Company (of course). The flowers on each side are Dazzles from Paper Wishes.


You can really see the 3-D sticker in this side view.  I also used gold Dazzle stickers (the gold lines) to further outline the card. 


You that you are enjoying all the red, white and blue cards this year!
Lis

Tuesday, July 3, 2012

American Flag Card

When I saw the K&Company stickers I knew I had to have some. (I try not to buy stickers because I always seem to have some leftover.  But I couldn't resist these.)

I started out with blue and red ribbon and added a red foil border.


As you can see, I only used one really BIG sticker, the FLAG!  It's such a cool sticker and it's 3-D. 


Close Up!


Thanks for stopping by!  Take care and hope to see you tomorrow!

Lis

Monday, July 2, 2012

USA with Banner Card

Today's card is really easy to make!

I started with a K&Company border.  I used two of the same borders, cut them up and then layered them to create a 3-D look.  I created two mini borders and placed them together to make faux rosettes. 


I added a second flag banner sticker to my card also.


Close up!

Aren't these letters cute?


I found some bakers twine in red, white and blue and used that in my buttons and to make a simple bow.

Hope you enjoyed this quick card. See ya tomorrow!

Lis

Sunday, July 1, 2012

USA With Stars! Card

Hi everyone!

I couldn't get away form those glitter stars (gotta love the bling!) so I made another card with bling!


Close Up!


See you tomorrow!

Lis