Pages

Showing posts with label Love Cards. Show all posts

Sunday, July 10, 2022

Love You Card

Love You Card


Hi everyone,

I hope that you are all doing well! 


This card is a standard 5 x 7 inches made with white cardstock.

  • I matted my card base with a dark green satin finish mirror card, then with a piece of Anna Griffin pattern paper. I think this came from the Pastoral collection.
  • Anna Griffin also made a set of border strips. I used one of them here and matted it with the same green card.
  • I used the Tonic Studios-Loaded Pockets-Oval Embroidery Hoop die set (middle one) and die cut the oval in a satin finish gold.
    • It is layered with a pale green pearlescent oval.
  • I used sentiment stickers from Paper Wishes (I cut two different ones apart to get the "love" and the "you".
    • I added them on the curve of the oval.
  • I used one of the AG 3 dimensional flowers and adhered this in the center of the die cut. I adhered this to my card with foam pads.
  • I made a bow with long tails from Vanilla Satin Ribbon (Tonic Studios). I attached it with glue dots.
    • I arranged the tails so that they would ruffle. I used glue dots on the underside of the tails to achieve this.
  • I used some dark green pearls from Hunkydory to decorate.
  • I used some clear drops from Cadence Liquid Jewelry on the oval and on the border strip.  
    • I realize that these drops are clear and hard to see but they do add some interest.


 Thank you for stopping by,

Lis

Sunday, May 29, 2022

A Love Card

 A Love Card


Greetings Friends! A happy Sunday to you all.


This is a standard size A2 card made with white cardstock.

I added some patterned paper and then used a die to create the cut-in design on the front (Paper Discovery). I backed this cut design using dark green specialty cardstock (Tonic Studios - Green Valley 6x6 pad), adhering it to the inside front of my card. I cut three flowers from rainbow mirricard and leaves from gold mirror card. I adhered them to my card, adding a bow to match.  I cut the sentiment from the same dark green specialty cardstock I used to back the cut out. I added some acrylic gems.

Here is a close up of the flowers. You can see some of the rainbow reflected in the flowers.


Thanks for stopping by! Lis

Friday, January 10, 2014

Journaling Notes - Round Gatefold Card - Valentine


Today's card is a gatefold card using the Making Memories Spiral Bound Journaling Notes from Frantic Stamper.  The card turned out ok although I struggled a bit with the inside ...and the outside.  Apparently circles are harder to make round than I thought!

First I chose my sheet.  What was nice about this is that these pads provide 3-4 sheets for each pattern. So, a gatefold card seemed natural.

I chose a pretty red and ivory half circle.

I cut both sheets so that they formed a complete circle.
 I attached to a backing sheet of pink with dots from Authentique - Smitten Line in Cupid.

Then I took a pair of Fiskars design scissors (remember them? How many of you have a collection, raise your hand.  Me too!)  I love these scissors.  They are a little hard to begin with but worth the effort to use.)

When I finished cutting my pink scallop border, I cut the circle in half, following the edge of the circle journal halves.

Once I had cut a scallop of about 1/2 inch around the edge, I used an embossing folder (The Paper Studio) with a writing design going horizontally.  This is the first time that I've seen one like this.  It helps when I want to do larger areas.  I was able to line up the embossing folder so that both sides of my card would line up.


Once I finished embossing, I colored the raised embossed writing with Ranger Distress Ink Festive Berries.  I also edged the outside of my circle with it too.

Now for the inside!  At first I was going to use another circle for the inside...

After some difficulty with a round inside....

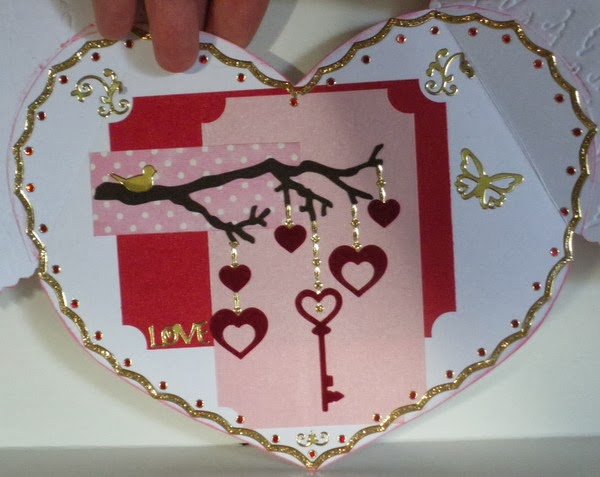
I settled on a heart shaped inside.  It fit better and I was able to work with it a bit easier.  You can see the two folded "wing" shaped folded edges.  That gets covered with red liner tape and attached to the front two pieces (the gate) of the card.

Now - TIP: do not attach your heart (inside of the card) UNTIL YOU HAVE FINISHED DECORATING IT.  I was so thrilled at getting a heart cut to fit that I immediately attached it with Red Liner Tape.  It was very difficult to cover the inside of the card with it attached to the front. If I had to do it again, putting my card together would be the last thing I did.

The card will open as you see below.

I really wanted pattern paper for my inside but couldnt do it because I couldnt recut the exact same heart shape SO I opted for some color blocked star dream paper (shimmer).  I used a pretty red and pink.  Since my card is round, I wanted the inside decorations to not be too "square".  I took a small circle punch and used it to punch the corners of the papers.  It created a really pretty tag-like design.

I used some Frantic Stamper dies: the tree branch which comes with some cute owls, keys and the hearts.  I cut them from red suede paper and hung them from the branch with Dazzles Jewel Borders in Gold.


This is the Frantic Stamper die I used for the front of my card, cut from gold glitter card.  I attached it only on the left side to allow the card to open from the center.  I attached the red bow in the same manner.

And here is my finished card!  As I said, it turned out quite nice!

This is the completed inside of my card.  I edged my card in more gold Dazzles and added some mini Jewel Dazzles tiny dots. Frantic Stamper carries these.

I hope you enjoyed today's card! Come back tomorrow for the second gatefold card!

Lis

Saturday, May 25, 2013

Silver Filigree Heart

Hi all and Happy Memorial Weekend.  Thank you to all who have served our great country.

I just got a new heart die from Sizzix. they are called Thinletts. I thought it wasn't going to be too impressive. When I got the package the dies themselves (this was a set) were inside a plastic envelope which was nice for storage.

It was a little difficult getting the first die cut out of the die.  I've read a tip about using waxed paper for the intricate dies. I may have to try that. These dies are getting more and more intricate and I'm starting to have some trouble with some of them.

Anyway, the die cut is pretty. I will try using transparency behind the next one and try out a stained glass look.

Close Up!
 I wrapped one of the leaf ends around the center of the bow.


Stop by again soon!

Lis


Saturday, May 18, 2013

Love Thoughts Card

I've seen some really beautiful shabby chic cards and scrapbook pages that have flower sprays.  I've not done a spray so I wanted to do one on a card.  I added a little bit of steam punk to it also.

I like how this card turned out.  There's a lot to see with the flowers and the brass charms I added.  I used some acrylic flowers as well as paper and ribbon flowers.


Close Up!

There;'s a lot of dimension to this card!


I loved adding all the different brass charms.

Most everything was glued to the card using a hot glue gun. I used pop dots (thick glue dots) for the heart, glasses and top hat because the charms were not flat on the back and I didn't think that hot glue would work well.

I was going to use an old photo on the gold glossy but decided to use this old typewriter stamp.  I slit the top and added embossed pink card stock with :love thoughts" in dazzles on it. (Isn';t the little gold heart cute?)

I ran across these Roman numerals (I think from Prima).  I love clocks, numbers and gears!

One last look!


I hope you enjoyed my card today!

Lis

Sunday, July 22, 2012

Love Banner Card

I have these punches from Epiphany Crafts.  They come with epoxy bubbles and are used to create embellishments. I must say that I'm hooked!  I especially love the banner punch.  I cant think of many punches out there on the market that are banner punches.  And you can use these just as punches.  Very cool!

To create my banner, I started out with a pretty pink patterned paper. I added the letters and then the bubble before I punched out the banner.

I added the banner to my tag which I attached to my card with mounting tape. I added random pink pearls along the bottom punched border.
 Close Up!

Isn't this just so pretty?


I added some bakers twine in lemon yellow.


I do love pearls!

Come back soon!

Lis

Monday, May 28, 2012

I Love You HoneyPOP Paper Card!

Hi everyone!  Boy do I have something for you today!

Apparently I was not paying attention last year in February when InkyAntics came out with HoneyPop Paper pads.  I don't know how I missed it but I found them on http://www.franticstamper.com/. I ordered one to see what was up.  Below is the result of my fun! 

You can also click HERE to go directly to the page.

Click HERE to go see the Webisode on HoneyPop Paper. Paper Wishes has some great examples.

HoneyPop paper is actually honeycomb paper.  You cut half a shape, glue it to both sides of the inside of a card, and when you open the card - surprise - you get the whole shape!  It's very light, and only 1/8 inch thick - I was able to run it through my die cutter without any problem.  I used regular steel rule dies.  The thin etched dies won't work with this.  I did use an xacto blade to carefully cut a strip off and that worked too.

So, here is the front of my card (it's actually the inside that is so exciting!)
 (I got that darn tint again!)

Close Up of the Inside of my Card with the Honeycomb Paper!

Is this not too cool?  Remember that when you either hand cut or die cut you paper, all you need is HALF a shape.  When you open it up, you will have the whole shape!

This is a nice side view.  All I did was use glue stick to attach this to the inside of my card.

Here is a great view of the dimension of the heart when it is opened.  The total dimension closed is about 1/8 inch.  So, its ok to mail.


I hope that you enjoyed today's card!  Stop by again for more inspiration!

Lis

Tuesday, August 16, 2011

Clock and Rose Card

Hi everyone!

Here's an easy card to make!

I started with a pretty rose patterned paper.  I backed it in a deep red (bazzill of course).  I added glitter to the roses, following the pattern on the paper.  I let it dry.

While the glitter was drying I created the little timepiece in the upper left hand corner.  I stamped onto a light grey patterned paper (in Tim Holtz's new Distress Stain! - It gives it a watercolor like feel, its not a sharp image when stamped.)  I matted it to some more of the deep red cardstock and added tiny clear gems.


I added green and gold leaves to the lower right with a green heart gem.

Hope you like this 5 minute card!

Lis

Embossed LOVE Card

Hi everyone!

I love heat embossing.  It's elegant and gives a beautiful embossed look to everything when embossing with gold.  But I think sometimes we under utilize it, thinking that we should only emboss small stamped images.  I say GO BIG!  And so for today's card...

This card background is made entirely of embossed stamps.... really LARGE stamps.


I used clear stamps by Fancy Pants.  Their stamps are meant to be used with 12x12 scrapbooks but they are just the right size for my cards!

As you can see below, I started out with a 5x7 card base in black (how I love black and gold!).  I positioned the clear stamps on my acrylic base so that I knew where I wanted the designs to go.

I used Versa Mark for my ink and fine gold embossing powder.


And this is what I got!  Pretty cool huh?  I trimmed the excess black cardstock which left what you see below.


Then all I did was add my sentiment!  Easy, yes?


TIPS:
1. For good embossing results:
-do not wave your heat tool back and forth.
-start at one end and follow the melt
-don't leave your heat tool on one area for any length of time - follow the melt

2. Consider embossing some of the design on the back side of your card. (Open the card up - emboss after folding or you can crack your embossed design.)

Come back soon!
Lis

Thursday, July 7, 2011

Love's Key Wedding Card with Martha Stewart's Scroll Heart Deep Edger Punch

Hello everyone and welcome to another week's experimentation with Martha Stewart's Scroll Heart Deep Edger Punch.  This week has been quite a week of discovery.  I have been working hard coming up with many designs that i hope you will use in your cards and scrapbook pages too!

Today's card:  This card turned out really pretty.  I think it makes a lovely wedding card to congratulate the new couple.  It looks like a set of gates to me and the key to open the gates of love is hanging on a pretty yellow ribbon.  (I chose the yellow ribbon because in the USA it is used to show that we do not forget a loved one when they are far from us.)


I thought about adding the hearts back in but decided not to.


Close up!

In the three images below you can see how I built my card.  The far left image is to show you what two of the punched borders (without the hearts) look like.  The middle image shows how I placed four of the borders onto my card.  The last image shows the card with a mat. (I debated about whether to put in a mat or not because the borders without the mat are just so darn PRETTY all by themselves!)


This is a close up of the borders.  I punched each border (two in yellow and two in black).  I lined up the two yellow borders as you see in the image below.  I know they look like one punched out piece but you are looking at two pieces glued to the mat.  (I used glue stick so that I could slide the punched borders around a little bit to get them to line up exactly.)

I started on the left side of my card when I started gluing down the borders.


I like ruffling ribbon tails. I like the delicate and Victorian feel that it gives a card.


I hope that you enjoyed today's card!

Join me this weekend for more Martha surprises!  I know that many of you like scrapbooking so....I will ahve a few page designs to share with you using this great punch!

Take care, Lis