Pages

Showing posts with label Shabby Chic. Show all posts

Monday, January 18, 2016

Keep Calm and Adjust Your Tiara -a Card

Today's card is a collage card.

 
Items used:
  • Anna Griffin paper
  • Martha Stewart Deep Edger Punch
  • Journaling Card from Bo Bunny
  • Little girl photo from Tim Holtz Found Relatives
  • Silver shimmer ribbon from Really Reasonable Ribbon
  • Paper Flowers from Wild Orchid Crafts
  • White adhesive pearls
I started my card with the journaling card and built my card up from there. I'm still in a pink phase (good for me that the Pantone colors this year are pink and blue pastels -I think?).  I love the ribbon. 

I bought it on a whim and its turned out to be a keeper for me. It is silverfish white with the occasional sparkle in it.  It takes coloring well without giving up anything.

I puncher out two borders and placed them together to get the center band on my card. I layered the rest.  I didn't use any foam tape.

Take care ,
Lis

Wednesday, October 21, 2015

Thank You, a Shabby Chic Card


Today's card has that old timey feel that I like.  I love the soft tones of this card.

Items used:
  • white card stock for card base (card is 4 1/2 x 6 1/2)
  • I wish I could remember where I got the paper from . It was in my stash.
  • pink and ivory card stock used

  • paper roses from Wild Orchid Crafts
  • Wink of Stella in gold and clear (clear was used to add sparkle on rose petals)
  • beige lace (really reasonable ribbon)
  • pink 1mm jute/string (May Arts)
  • Gold word dazzles from Hot off the Press

Thanks for stopping by, Lis
 

Friday, June 19, 2015

I'm back with Three Cards for you!

Hi everyone!

I've been very busy at work - and honestly just plain tired.   Summer is upon us once again.  The temps are rising and the sun is shining.  Time for swimming and the corn season will soon be here , then watermelon (mmm).  I do love summer.
My nephew just graduated from high school.. That's a big step for him. Now he's going to college in the fall (community college). He says he wants to be a aerospace engineer. he's smart so I believe him!  I cant wait to see how he does.  I know my college experiences were really a big adventure.

Now on the other important stuff...cards!!

My first card was more of a doodle than anything else.  I wanted to make windows and used a punch.  Its not my best work but I still like the way it turned out.


The white lacy stickers are called DAZZLES and can be found in great variety on the Hot off the Press website www.paperwishes.com.  I have to say that I'm addicted.  they have so many different kinds.  it's makes it very easy to add a sentiment.  You'll see in my last card I use one and I can shape it into a curve to fit my frame.  How nice!

You'll never guess where I get all my cute little embellishments...EBAY!  There are a number of companies that make these little plastic embellishments and sell them on EBAY.  They are usually not very expensive. The quality is good and what is most surprising is that they come from CHINA and I don't have to wait forever to get them.  They come China Post to USPS and I normally get my orders within 1-2 weeks max. 


My next card is called PINK. (Actually my last card was pink too! LOL)  I've been following a blog from Europe ad this lady does extraordinary work.  One of the things she does so well is cut the flowers from the patterned paper and lifts the petals to create 3D designs.  I had to try it for myself. Yes, I know this is not something new but old is new again sometimes.


I just got this new pad of paper from DCWV.  It's all pink with gold foil.  The pink and colors are matte (like some of the chalkboard papers are).  I really loved the powder pink color and couldn't resist buying it. in the card above the pink flower in the upper right is representative of the color and texture of the pink in this pad.)
 
You can see in the close up below I cut with an xacto some of the petals and curled them.  The card isn't half bad.  I finished the card with black Dazzles.
 

My third and last card for this post is my favorite.  I call it Grandmother.

This card also has some pink in it and purple/lavender.


The card is a bit bulky with the paper roses and stick pins but one extra stamp gets it to its destination.

I used a Dazzle sticker (Hot off the Press) and was able to mold it around the inner edge of the picture. It turned out nice.  I edged the picture in black and also distressed the edges.
 
 For the stick pins:  I found these marvelous plastic beads with a metallic and rough surface to them.  I got lots I a bag for a cheap price at Hobby lobby I  believe.  So I added some to the bottom and glued one on top of the last pearl of these triple pearl pins I have. (And yes, that's a black kitty hair -thank you Miss lovey!)


Notice the background of my card?  It's EMBOSSED RIBBON.  I took some 1.5 inch ribbon (I didn't use satin although you can use any ribbon to emboss.  The kind I used can be torn easily down the center), and ran it through with an embossing folder.(two purple and one gold for the center)

I didn't match up the pattern between the ribbon lengths although you can do that.  The result is a satiny, shiny background with a soft texture to it.  The embossed design holds really well.  (I use Xyron to glue my ribbons down when I amusing them to produce a mat).


I hope you enjoyed these three cards. I hope to post more regularly!  Thanks for sticking with me!


Lis

Saturday, May 2, 2015

Flower Thank you Card

hi everyone!  I am starting to do more stamping of late.  Good thing!  I have so many rubber stamps and many are just beautiful. So, I want to start using them again.

Today's card is using a really pretty flower stamp that I colored with Spectrum Noir colored pencils. (Yes,  couldn't help myself. I bought a set.  I do love colored ANYTHING.  The more colors, the better. I love new tools, new colors, LOL....yikes!)


I used a pink for the overall color of the flowers and then colored the base with a darker red and blended them.  I used a single green for all the leaves. I didn't color the vines.

I used Distress Inks in Tea Dye and Old Paper to color/edge the paper of my stamped piece (which was on ivory card stock).  The THANK YOU is a separate stamp that I got for a dollar at Michaels.

I used a gold pen to add gold splatter to the image once I was done.  I distressed the edges and then mounted to my card base which was also ivory.  You will note that I curled two of the corners (see upper left).

I covered my card base with two papers: red foil and at the bottom a foiled cheetah pattern.  Yes, I sure did go out on a limb with these choices, didn't I?  But I thought they were lovely together.

I added a red/pink striped ribbon/organza as a final touch.  If you look at the right side I cut out two short lengths of the ribbon and cut a "v" in them and added them on top of the ribbon strip as a layer.


This stamp would look good as a circular pattern because of the way the stem is designed.

Take care, Lis

Saturday, June 14, 2014

Thank You Card using Trellis Frameworks Die from Tim Holtz & Sizzix


Hi everyone and welcome to my blog today!
 
I've been so excited about the new Tim Holtz die release with the frameworks designs.  As you can see, my card today uses the one called Trellis.  It's a very pretty design that reminds me of India and Persia.
 
I started out by die cutting the design three times: with grungeboard, purple cardstock and one of Tim Holtz' paper stash patterns.  I used a navy card base.
 
I decided to use the paper stash pattern for my base.  The patterns and colors really give a lot of movement to my card.  I took the grungeboard inner pieces and colored them using the Tarnished Brass Distress Stain.  Then I stamped a writing pattern on them with black Staz On.  It came out really light because the writing stamp I used had a thin font.  If I had to do it over again, I would use a slightly thicker font to make it show up better.
 
I randomly placed the grungeboard into the vacated spaces.  I placed the purple "innies" in the rest of the spaces.  (Of course I attached all of this down with glue.)  I added some blue bling randomly.
 
I took a crinkle ribbon and died it with Tea Dye Distress Stain. I also had some oval chipboard pieces.  I colored one of these the same color as my ribbon and added the Thank You in Gold Dazzles.
 
I really like the way that the grungeboard pieces add some height because of their thickness.  I like the randomness of the pieces also.  It looks fairly balanced.  The blue bling adds a pretty brightness to my card which otherwise would have been really dark.
 
Did you notice that the frameworks piece covers my A2 card?  Because this is geometric, I can put two together and make a larger single one! (I wonder how it would look down one side of a 12 x 12 scrapbook page...hmm.)
 
Lis


Sunday, June 9, 2013

Pink & Brown Shabby Chic Style Card

Today's card is made in a shabby chic style. (It's supposed to be. I looked up shabby chic on google.  I hope I came close!)

I made this card using brown cardstock as my card base and added burlap (such a great texture) and pink suede paper (another great texture).  The suede paper is border punched on one side and on the other I used a Sizzix die (On the Edge Doily) for the other.  The pink suede paper is backed with plain cardstock.

The card opens from the right side.  The brown card that you see on the right is the inside of the card.  The front is the doily only.


Close Up!

I think buttons are an underused embellishment.  I myself don't use them as often as I probably should. The buttons I used on this card are from the French General Collection.  I'm not sure that the pictures do them justice.  They are just beautiful!


Isn't this ribbons cool?  Unfortunately i can't remember where I got it. I bought a yard from someone (possibly SkyBluePink).  I love the wrinkly-ness of it.  The charm was from a pack that was given to me by my girlfriend.  She found them at Tuesday Morning for a buck!


This is a close up of the pink suede paper cut out with the doily die from Sizzix/Tim Holtz.

Thanks for stopping by!
Lis


Saturday, May 18, 2013

Love Thoughts Card

I've seen some really beautiful shabby chic cards and scrapbook pages that have flower sprays.  I've not done a spray so I wanted to do one on a card.  I added a little bit of steam punk to it also.

I like how this card turned out.  There's a lot to see with the flowers and the brass charms I added.  I used some acrylic flowers as well as paper and ribbon flowers.


Close Up!

There;'s a lot of dimension to this card!


I loved adding all the different brass charms.

Most everything was glued to the card using a hot glue gun. I used pop dots (thick glue dots) for the heart, glasses and top hat because the charms were not flat on the back and I didn't think that hot glue would work well.

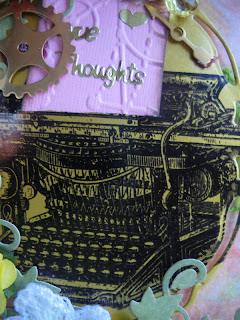
I was going to use an old photo on the gold glossy but decided to use this old typewriter stamp.  I slit the top and added embossed pink card stock with :love thoughts" in dazzles on it. (Isn';t the little gold heart cute?)

I ran across these Roman numerals (I think from Prima).  I love clocks, numbers and gears!

One last look!


I hope you enjoyed my card today!

Lis

Saturday, May 11, 2013

Just a Note Card

I really love the way this card came out.  I used a Spellbinder die and also a Sizzix Sizzlets strip die for the cherry blossoms and branches.  The pink ladies are die cut from pink suede.


Close Up!

I really struggled with whether to use pearls or pink gems on the flowers. I finally decided one pink gem.  I didn't want to draw attention away from the main part of the card.

I used Dazzles for the sentiment and cut out the post card from a piece of 12 x 12 patterned card stock.


I  backed the card with Authentique.    Also, don't you love this gold glossy?  I die cut it from a Spellbinders Fancy Oval set - to die for!

Here is another angle of my card (It's hard to type right now because my kitty Miss Lovely is on my desk trying to sleep on my arm...of course I'm trying not to disturb her! LOL)

Thanks for stopping by!

Lis