Pages

Showing posts with label Victorian Cards. Show all posts

Monday, October 12, 2015

Four Men, a Birthday Card


Today's card can be used for just about any celebration.  I made it to be used for a male birthday though.

The card is an off size being 6  4 1/4.

Items used:
  • Gold Border Dazzles by Hot Off the Press
  • Patterned paper by Bo Bunny
  • Teal blue card stock for base by Cor'Dinations
  • Chipboard by Graphic 45
  • Metal Bird charm by Idea Ology
  • Crinkle ribbon in yellow and blue by Really Reasonable Ribbon (May Arts)
  • Gold shimmer paper


This is a good picture of all the gold thin line border dazzles that I used.  I really like how the word paper turned out.  I wasn't sure if the layering would look good.  I think the gold lines help.  The metal bird helps to give a Victorian feel to the card and coordinates well with the chipboard.


Sorry for such a fuzzy picture. I'm going to blame it on my cat this time....LOL!  This pic is supposed to show the layering that I did.  Also you can see how I used the gold border dazzles.  I didn't place them on top of the edge of my layers but rather next to them.

Two color bow...

Thanks for stopping by!
Lis

Saturday, July 19, 2014

Moustache Birthday Card

 
I am seeing a lot of moustaches and top hats.  I found some thin dies by Sizzix that included these and purchased them 
 
I love how this card came out. the moustaches are so cute!  I attached the moustaches with glue dots just in the center. Then I curled the ends so they would stick out.  Of course I cut them out of black cardstock.
 
The vertical piece on the left is a piece of VERTIGO FILM cut and colored with alcohol inks.  Vertigo Film is this really cool film (kind of a thick plastic) with designs in it that cause it to look 3D.  The films come in different patterns.  The one I have above is called pebbles.  The photo doesn't really do it justice.  It's rather slick.
 
Thanks for stopping by!
Lis


Saturday, June 7, 2014

Steampunk Butterfly Greetings


Hi everyone!  This was an interesting card to make.  I started off wanting a sweet Victorian card. I ended up adding a steampunk element to it.  Quite a mixture!

The unique material that I've just start using is the paper ribbon.  I've used it in pink on this card.  It starts out as paper twine (Maya Road).  I unroll it and the resulting paper ribbon is about 1 1/2 inches wide.  You get a lot on a roll too.

It does take a little patience to get it unrolled but well worth the effort. Its SO pretty.  I am working o another card and I want to ink it before I unroll it to see what tie die effects I can get. So stay tuned!

Do you like my butterfly?  I used a Frantic Stamper solid Butterfly die to cut the card base, the patterned paper mat and a gold glossy butterfly that you can just see on the inside of the card.

I stamped a gear image onto some transparency that I cut a bit larger than the butterfly window on the front of my card.  I used double sided tape to attach it to the front of my card base.  Then I added my mat (made from purple suede paper and patterned Graphic 45 paper on top).  My mat already had the butterfly window cut out.  I matched up the windows and glued it down.  The stamped transparency shows through.  I cut out a gold glossy butterfly to place on the inside of my card. When the card is closed, there is a gold background to the butterfly.

This is not a new technique but one that isn't used a whole lot.  Hope you enjoyed my card today!

Thanks foo stopping by!
Lis


Saturday, May 24, 2014

Happy Father's Day Card


Don't you just love it when the stars align and everything comes together to make a beautiful card?  This was that card for me last night.  I wish that all of my cards would come together so easily but sometimes I really struggle. 
 
Today's card is a pretty one using Prima flowers in burlap, some unusually colored leaves, some lace and a homemade banner at the top.  I even used some washi tape accents at the top and bottom.  I also put inside my card.


Don't you just love the leaf colors? I decided to start using different colors.  I saw that Prima had some different ones and I thought they were just so cool!  They really go well with my flower which a little on the drab side.

I love how my label turned out.  I used the same paper (K and Company) as I did for the mat on the card base.  I matted it on white and cut some white for the center and then stamped in black.  Do you like this tiny saying?  I found a set of Tiny Sayings stamps at Hot Off the Press (Paper wishes.com). I'm always looking for a great set of sayings stamps with interesting fonts and styles that I can use on small tags.


I added some lace that I've had lying around for a while (I won't admit how long!).  Take another look at my tag.   added one piece to it also.

Hope you enjoy this card and make some beauties of your own!

Lis

PS: I bet you may wonder why I've not made any Mother's Day cards.  My mom passed away a few years ago. It's still so hard to get by during any holiday.  I don't have any family of my own and I'm not married so its double hard.  I miss her. We didn't always get along or agree on everything but she was there for me.  She taught me the value of education.  She got a nursing degree and a four year degree in her 50's.  I carry a picture of her and me when I graduated college that I look at once in a while.  She was an amazing person.

Saturday, May 3, 2014

Victorian Birds and Cage


Hi everyone!  I was working on card ideas today and thought I would make a birthday card using some new papers that I got from Graphic 45.  Their papers are so nice, such a Victorian feel.  I decided on lavender as the main color because that seems to emulate the Victorian era to me.  I found this really great lavender stripe paper that reminded me of wallpaper.  I had some purple suede paper and used that as the mat, and used an ivory card base.
 
I have this Martha Stewart punch that is extra large. It's a challenge using this one on my cards because I usually only work in A2 size.  Today I decided I just had to use it!  I cut my card so that it would fit the punch design and punched the side of the card. It came out ok but I decided a second layer of the punch in lavender would be a good idea. 
I also use gold as a secondary color.  (I even used some gold bling!)  I cut out the Frantic Stamper birdcage die and a couple of birds too.  You may not have noticed but the flying bird is actually the negative cut into the lavender pattern paper. It's not layered on top.  The burgundy bird sitting on the cage is a separate piece of paper. I did this to create some dimension.
 
I wanted to have an open bird cage door.  I did it by using one of the die cut pieces, using mounting foam and reattaching it.  It looks very cool! You cn see in the picture below how I engineered it.
 
I left a place on the card for a Happy Birthday Sentiment which I haven't added yet.
Thanks for stopping by!


Sunday, April 20, 2014

Easter Bonnet


I love to use old pictures in my artwork. I came across this picture of a little girl in a bonnet and it reminded me of when I was a little girl at Easter.  Mom always got us a new dress to wear when we visited grandma on Easter Sunday.
 
I used the Heartfelt Creations Paper Pad for my background paper on an ivory card base. 
I also used Prima flowers.  They have these packets of flowers in different sizes and leaves too!  It made it very easy to create my bouquet.  I did use some additional flowers and pieces but not much! 


I cut out the frame in burgundy suede paper and used the same Frantic Stamper die to cut out my picture. 
 
I like using photo corners because they lend themselves to that old fashioned feeling.  I added a white pearl butterfly pin as a last touch (did you spot it?).  Have fun creating your own Easter cards this year!
 
Thanks for stopping by, Lis

Tuesday, March 4, 2014

Shabby Victorian Tag


Shabby Tag with Violet Suede Paper
by Lis Whiting 

I've been having a lot of fun working with suede paper lately.  It's a beautiful paper that actually has a very soft tactile feel - like suede.  It comes in some beautiful colors too!

I started with a Sizzix TIme Holtz die for my tag and used the movers and shapers to add a cut out of a Victorian lady cameo (also Sizzix).  My tag base is ivory cardstock and the entire front is covered in violet suede paper with the cameo cut out.

Following are close ups of the tag in sections with comments.

I used stick pins at the top. It makes the tag a little longer but I thought it needed something.  What better to go with a Victorian cameo than stick pins!


I had a little brass key that I looped the ribbon through.  I also wrapped a single paper flower around the key.

For my cameo, I took some images (color) and basically collaged them to fit behind the opening.  I then cut a piece of acetate to fit.  I glued the acetate to the collage art with Glossy Accents and glued the whole thing to the back of the suede paper so it would show through.  Then I glued the suede paper to my tag base. (I added a single pearl to the "hairpiece" - looks good!)

I have three layers at the bottom of my tag: lace, ribbon and pearls. All three birds are wood, and adhered with mounting tape.

Here is another view so that you can see the dimension of the tag,

Thanks for stopping by!  I hope you try out some suede paper on your next project!
Lis


Saturday, March 1, 2014

Lavender Lace Card with Suede Paper

Hi everyone!

I am so excited about my new laptop!  It's taking some getting used to, especially the typing.  I've not used a laptop very much.  My old computer just is old old old and SLOOOWWW....you know what I mean! So, this will be better I think.  How did you like my very first videos?  I was overjoyed with them - even though they are just beginner!  I hope to start doing videos where I give a card picture, the list of materials and you can watch the video and follow along and make the card.  what do you think? (I am getting better with my camera work and feedback from all of you! So a big THANK YOU! for that!)

I made a card for my mother in law (Ive been divorced for over 14 years now but she was always so nice and I consider her a good friend.  She is the most wonderful person!  So, I made her a card.  I am not the greatest remembering birthdays and anniversaries.  I always seem to be late with holidays too.  I'm trying very hard to change this but its difficult with my lifestyle being so busy.


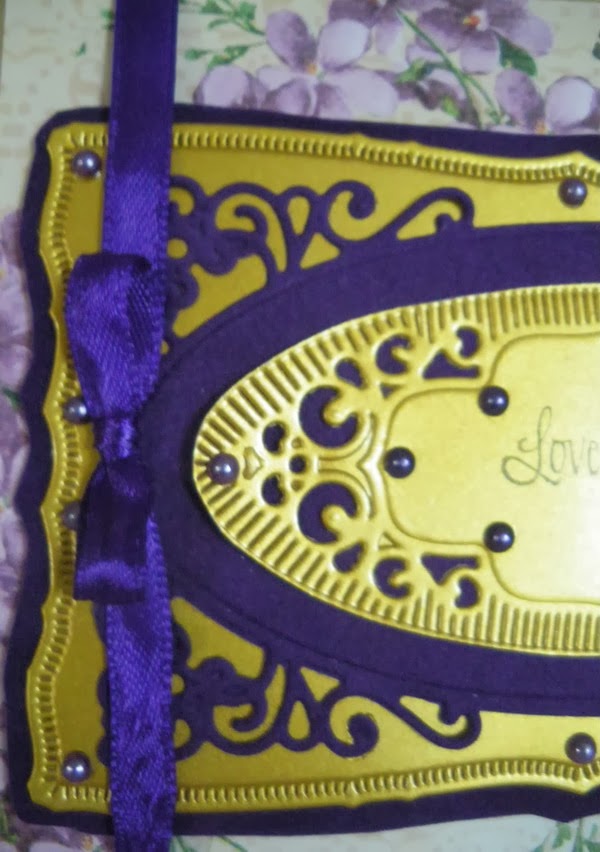
 I chose a very feminine lilac flower design for my base and edged that in gold. This was mounted on a white card base (A2).  I use the fancy rectangles from Spellbinders to cut gold glossy rectangle and purple suede layers.  I used a purple ribbon and two shades of purple pearls to embellish. I also added a lavender heart shaped pearl.


You can see below that I mounted the layers onto my card using mounting tape to give it some dimension.


Thank you for stopping by.  Come back again as I develop my blog with videos!

Lis

Tuesday, February 4, 2014

Pink and White Punched Hearts Card


Pretty Spring Valentine
by Lis Whiting

This month;s challenge is a shape challenge!  And the shape is a heart!  I love making cards so I decided to make some 3-d embellishments in the shape of hearts for my card.  The embellishments are very easy to make.  Choose any heart shaped punch.  Choose your paper and make four (4) punches with it.  This technique works best if the right and left sides are about the same (lop-sided or unbalanced punch-outs will work but it will take a little but more fussiness to put them together).  Take your four punches and put them one on top of the other in a pile.  Fold them in half. You can fold vertically (which is most popular for hearts) but you CAN fold them horizontally or even diagonally if you want to.  Experiment!  Remember that the thicker your paper the more you want to fold carefully.  The goal is to have all folded exactly the same. 

  • Now take the first two punches. Put glue stick on the back side of ONLY HALF of the one punch and match it to the same back side of the second punch.  Glue together.   
  • Take the glued piece in your left hand, and place glue stick on the back of the second punch. Take the third punch and match the back of this to the second one. Glue together.
  • Do the same for the third and fourth punch.
You should now have four punches glued together with half the back of punch one and four without glue. Lay these flat where you want them on your card and fan out.  Add glue to the back and attache to card.


I also used a Frantic Stamper lattice die and die cut the edge or my card and laced some ribbons through it to finish.


Products used:

Friday, January 31, 2014

Victorian Birthday Greetings


Hi everyone and welcome to my blog!  I share all kinds of projects here and how to make them, techniques and so on.  I really love cards so I make a lot of them.  If you are interested in another type of project, let me know and I;ll see what I can do for you!

My card today is one that I made for my sister's birthday.  It turned out so nice!  I used an oval die from Paper Wishes (oval doily) and its so pretty! I cut the doily out of grey suede paper believe it or not!  I thought I had gone a little crazy BUT when it came out it was really nice.  I chose grey because I was looking for a more Victorian antiquey look.  I used an ivory card stock for my card base.

There have been some new dies that have come on the market which die cut bows. The gold one I used on my card is one of them. Although I like it very much, it doesnt really replace a real ribbon bow.
As you can see from the inside of my card, I did cut a window oval in the front so that the inside could show through (this die I used includes a shadow die which is so cool.).  I used Anna Griffin papers to cover the inside and a cute Victorian postcard greeting.


Hope you enjoyed my little card!

Lis

Sunday, May 5, 2013

Thinking of You Cameo Card

I wanted to share this quick card using a cut out cameo die from Sizzix.  The card is simple to make using an ivory card base and a brown card mat.  I used pink suede paper and die cut the cameo image using a Sizzix Movers and Shapers die from Tim Holtz.

I added the sentiment (Dazzles) and a pink ribbon. I did add a tiny white pearl on the cameo as an earring.


Close Up!

I backed the pink suede paper with dark brown card which you can see in the cameo die cut.


Thanks for stopping by!
Lis

Sunday, June 24, 2012

Mona

I love the Mona Lisa.  Everybody does.  She has that mysterious smile, and she fits really well with collage cards of all kinds!

I have several Mona Lisa stamps.  I chose this one because it has an interesting background including some writing. (I am really hooked on writing designs of all kinds).  I even added some patterned paper with writing to carry the design through the card.  Since Mona needs a frame, I decided to use one of the Spellbinder frames.
My main two colors were green and brown.


I really love leaf ribbon.  It's lovely and can be use for so much, accenting punched designs and my card!

Close Up!
Here is a great picture of Mona.


I used a decorative punch for the corners and accented with pearls.


The pearls and the leaf ribbon really add a special feminine delicacy to the card.


I hope you enjoyed today's card.  Create something beautiful today!
Lis

Saturday, June 23, 2012

Lavendar Lily Victorian Card

I love Victorian cards (actually Victorian anything).  It really pulls at my soul.  I wish sometimes I had been there to experience more of it.  I will say that I value my freedom now though.  It was a hard life and women had it hard back then.

I've tried to choose more Victorian type colors when I make these cards.  The one below started off with a muted brown, an ornate dark/light brown pattern paper and finally a pink frame.

I used black photo corners that I gilded with gold foil.  I also used Liquid Pearls on the frame in white pearl.


I love the way that the flowers in the center are gathered up with an organza bow, topped with a brass heart charm embossed with a rose.

Close Up!

Don't you just love the added touch of this little brass heart charm? I love to add charms to my work.  I like to hang them and listen to them tinkle when they hit each other.  This tiny little charm came from http://www.fancifuls.com/


Here you can see the work I did on the pink frame. I used Bazzill.
  • embossed
  • edged with tea dye distress ink
  • Liquid Pearls added in white

I hope this gives you inspiration!
Lis