Pages

Friday, May 20, 2022

Funky Shaker Card

Funky Shaker Card


Hello Friends!

So, the front of THIS card is made with the waste from my other project.


I like to use the waste from die cutting.  I made a paper Cookie Jar for my nephew (he's graduating college in June). I didn't want to just send him a card. (Scroll to the end to see the cookie jar I made.)

You will need:
  • Paper: Tonic Studios Blue Obsidian Satin effect mirror cardstock, white/gold sheen pearlescent cardstock, gold mirror card
    • Cardstock for the sequins: blue mirror, gold mirror, iridescent mirror, blue iridescent mirror
  • Dies: Crafters Companion (CC) Confetti Die (Circles), sentiment die
  • Tools: paper trimmer, scissors, bone folder and scoring board
  • Blue twine
  • Dazzles Gold Lines from Paper Wishes
I cut my white pearlescent cardstock to 8 1/2 inches x 7 inches. I folder this in half the long way and bone folded to create my base slimline card.
To make my shaker card:
  • I took my blue panel (which was already cut with many "windows") and glued a strip of acetate to the back.
  • I added strips of foam all the way around the perimeter, making sure not to leave any space. I did this again as I needed a double layer.
    • I also added several 1 inch strips up the center of the panel so it could be well-supported.
  • I cut my sequins using the confetti die (CC).  I carefully placed the sequins onto my card base, making sure that the sequins were fanned out but not near the edge of my card.
  • I placed the blue panel over my card and adhered it to my card front with the foam strips* that were on the back of the panel.
  • I made a tag from leftover white pearlescent card.  I cut the sentiment from gold mirror and attached it to the tag. I adhered the tag to the card.
  • I tied a bow using some blue hemp twine. I glued the bow to the tag.
  • I added some gold Dazzles to finish my card.
*I just have to say that I didn't cut strips of foam! Scrapbook.com has foam strips. They are 1/8 inch wide x 9 inches long.  This is luxury! Here's the link if you are curious: Adhesive (scrapbook.com) 


Here is the Cookie Jar that I made for my nephew (Tonic Studio Dies). I think it came out pretty good. It's about 5-6 inches tall. All the little pieces I cut for the lid were from that one piece of blue mirror card.


A Welcome Back with a Thank You Card!

 Hi everyone,  

I have been away awhile.  I am going to start posting again! Yea!


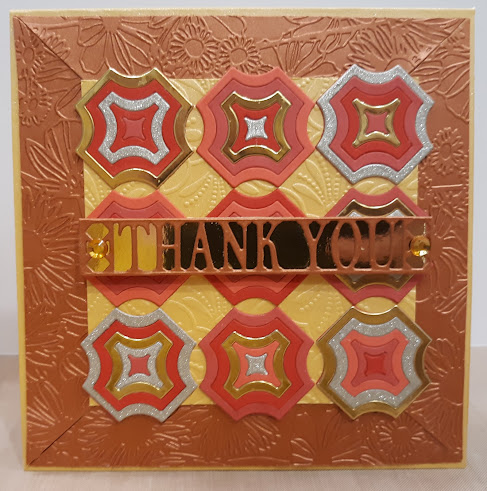
THANK YOU CARD


This card was made with the following supplies:
  • Papers
    • Pearlescent copper, yellow
    • Gold Mirror card
    • Champagne Glitter card
    • Shades of Red (3) cardstock (standard)
  • Glue, Sticky Roll or other adhesive similar to Xyron, and foam squares
  • Spellbinders ColorBlock Mini Die Set (Mini Crosses)
  • Spellbinders Stacked Decorative Edges (THANK YOU sentiment)
  • Paper Trimmer, scissors, die cutting machine, embossing folder


These are such fun dies. There are two dies. One is a die to cut the mat (onto which you adhere the design), and the "design" die. This second die cuts all the nested pieces.

1. I cut each paper with the design die four times to get my pieces. 

2. I cut the mat die out of red. (I didn't use white as I thought the background might show.)

3. I chose different colors for each piece I was going to create.  It helps to have them chosen and laid out in order before beginning to adhere the pieces to the base.  I used glue but I will probably use adhesive next time to make it a cleaner process.

4. I assembled my card:
  • I cut the yellow cardstock to 5 1/2 x 5 1/2 inches.
  • I cut the copper cardstock to 1 1/2 x 5 1/4 inches. I embossed these with an embossing folder.
  • I cut one additional piece of yellow cardstock to 4 1/4 x 4 1/4 inches, embossed it and set it aside.
I adhered the copper card strips to form a square. Then I cut from the outer corner to the inner corner to make my corners mitered. I adhered these to my card, leaving a 1/8 inch border around my card base.

I adhered the smaller yellow card to the center of my card and on top of the copper card.

I positioned nine of my completed pieces in the center of my card. I carefully removed the first piece and added glue, then re-adhered it to my card.  I did the same with all the pieces.

I cut my sentiment from copper card and cut a background layer from gold mirror card.  I added these to the center of my card with foam squares. I added a yellow acrylic gem to either end.


 I hope that you enjoyed this card!

Thanks for stopping by, Lis