Pages

Showing posts with label Frantic Stamper Precision Dies. Show all posts

Tuesday, November 17, 2015

A Thank You Card ...

 
Items used:
  • Frantic Stamper Sentiment Die
  • Rust Card Stock (Bazzill) for card base
  • Dark brown card
  • Patterned paper
  • 3-D bumblebees (K & Co)
  • Secretary Bird Die Cut (Bo Bunny)
  • Corrugated card in mauve (DCWV)
The  card is 5 x 5.  I like to used the corrugated board as it adds interest.  DCWV has come out with a couple different paper pads of these.


I like this secretary bird. It reminds me of Alice in Wonderland.

I added a few 3d adhesive stickers to fill out the card.

Thanks for stopping by!
Lis


Monday, November 2, 2015

French Flourish Card

Hi everyone! 
 
I hope you all had a wonderful and scary Halloween!
 
Today's card is using the negative space from a die cut and some pattered paper.


I was die cutting some flourishes out of gold glossy and ha these leftovers. They looked so pretty I couldn't throw them away - so they went to my special stash.  I finally pulled one out and decided it was time to either use it or throw it away (I was cleaning...)

Items used:
  • Frantic Stamper Precision Die - Eiffel Tower
  • Couture Creations Flourish Die (I used the negative space from it)
  • Gold Glossy
  • purple fleur de lis patterned paper (misc - got it from Hobby Lobby)
  • Viva Décor Pearl Pen in Pink

I like the pearl pens abut don't use hem often enough.  They are great for making different sized "pearls". 


Thanks for stopping by!
Lis


Saturday, October 17, 2015

Thanks... a Thanksgiving Day card

Hi everyone!

I rarely make Thanksgiving day cards.  I don't know why, I really like the day.  So today's card is just that, a Thanksgiving Day card that I made for my sister.

Items used:
  • Martha Stewart Leaf Punch
  • Bo Bunny Papers
  • White card for the card base
  • Frantic Stamper Word Die (this one comes with a shadow also)
  • 1mm jute/burlap string in orange and brown
  • Corner Chomper (rounder in 3/8 inch)
  • Gold foil card used to cut word

What I like most about this card is that when I adhered the leaves, I used only one small glue dot in the center.  Before I placed my leaf down I turned the edges up on the leaf so that It looked more like it was blown by the wind.

I added two leaves under my bow also.

Thanks for stopping by!
Lis

Saturday, July 4, 2015

Liberty, a card

Hi everyone and Happy Independence Day to the USA!


I used the following items for my card:
  • Frantic Stamper Precision Dies (Eagle, the word "America")
  • Chevron design embossing folder
  • Tim Holtz embossed cardstock - Seasonal Pack (pre embossed by company)
  • Red plaid ribbon, red and whit rhinestones
  • Card stock - white (for card base) and gold foil


I really like the font used for America.  Proud and strong.


I used the eagle die to cut a window in the embossed gold foil card.  I sanded the blue embossed card and then positioned it behind the open area so that some of the words showed through.

Thanks for stopping by!
Lis

Sunday, March 8, 2015

A Friendly Hello!

Hi everyone and happy Sunday!


I've used shimmer paper this time around on my card:  a nice light/lime green, and a dark green for my tag.

I used a few different dies to make my card today:

The Paper Bow - Anna Griffin
The Ivory rectangle - Frantic Stamper
The Tag - Spellbinders

The paper:
Lime Green and Dark Green - Stardream paper by Neenah (You can find it at Kelly Paper or online at
     The PaperMillStore.com
     (Note: I have to say that if you love paper like I do, a visit online to the paper mill store will
     have your jaw dropping at the variety!  You can shop for paper by color (of course) or you can
     shop by company (of course) BUT have you ever been able to shop for paper by paper mill? It
     will blow your mind.)
The silver foil patterned cardstock - Its called silver linen paper, comes in 12 x 12 only, is a regular
     cardstock, and you can find it at Paperwishes.com

Directions:
I started out with an ivory card base.  I embossed a lime shimmer paper (Sizzix) measuring 5 1/4 x 4 inches.  I attached his to some silver linen paper and cut a 1/8 inch border with my Perfect Layers Rulers (see under New Tools).  I attached to my card base.
I cut out my ivory rectangle with fancy edge and embossed writing and music on it with silver embossing powder.  I layered this onto silver linen paper and made the same 1/8 inch border.  I attached the ivory rectangle to the silver linen with mounting tape, then attached the two layers to my card.

I added the bow, a paper flower 
 
and my tag. (The HELLO coms from Dazzles at Paper Wishes)

and finished off with some large crystals.

Thanks for stopping by!
Lis

Saturday, January 10, 2015

Round the World...a card for travelers!


I love maps. I love to use them as part of a collage and also for cards. When I saw frantic stamper's Earth dies, I had to have them!  One die is a regular die which cuts out an Earth "map" of the western n eastern hemispheres.  The other die is a reverse die which cuts out the detail within a piece of paper but does not produce a separate die cut.
I chose several papers that would work with my dies including handwriting, newspaper adverts and a pretty collage piece I used for my background.
I cut out the detail of the Earth using the reverse die in the center of my newspaper advert paper.  I used mounting tape to add this to the green handwriting paper, taking care to add mounting tape beneath the continents so they would be supported..  I cut another Earth using the regular die out of embossed gold foil on card stock.  I glued this onto my detail image.
You may have noticed the chain at the top and bottom of my card. I used a Sizzix die for this (Sizzix Original Die - Chained) and used white shimmer paper.
I hope that you will consider these dies for your cards too!


*** Materials for this project are available at www.franticstamper.com. Frantic Stamper Products Used:

Sunday, January 4, 2015

I Heart Paris


I love everything French.  I don't know what it is about Paris but perhaps the romance and history do it for me.  That is what inspires my card today.  I love to use recognizable images in my cards so that the meaning is evident.  The Eiffel Tower is one of those that evokes Paris.  I used the heart lock die from the keys set (love that set!).  Although the lock does have a fancy cut out, I kept that in place for this more solid look.
You will notice that the metallic gold foil background is embossed with a Texture fade from Tim Holtz/Sizzix (Eiffel Tower and French Script Set)  Its a perfect match for the French feel on the card.  I also used Fleur de Lis Rectangles by Spellbinders.  Again, another match made in heaven! 

My card base was white, onto which I matted another piece of plain card stock which I colored with Distress ink in Vintage Photo.  I also distressed it.  You will notice what looks like strip of paper at the bottom.  It is actually washi tape (called POSTAGE) from a company that I cannot remember (sorry about that but it has postage marks randomly on it with a couple in silver foil). Little B Stripes Red/ Blue/ White would also go perfectly with this as these are the colors of the French flag.

At the top of the Tower I added the tip of a snowflake.  It looks like a beaming light! You never know what you can use your dies for!
Thanks for stopping by!  I hope you enjoyed my card!
 
Lis


*** Materials for this project are available at www.franticstamper.com. Frantic Stamper Products Used:

Saturday, January 3, 2015

Americana Rooster


One of the many things I love is Americana.  I love using rustic reds and blues in my work. Today's Americana piece features a rooster, symbol of the farm (my parents families were both farmers).
I chose to use a combination of light blue plaid and blue foil (like a Williamsburg blue) for my card.  I used the sticker foil for the bottom inside and then did a cut away for the front of my card using a scallop edge. I added blue plaid ribbon and two ribbons from French General (EK Success).  Although the line is called "French General" it has some really pretty lace and ribbon that fit perfectly with my Americana theme.  The red buttons are also from the French General collection. 


I cut out my label using the Coved Labels from Frantic Stamper from a red stripe paper I had.  I outlined the label in silver and added it to my card with mounting tape.

I cut my rooster from Wood Veneer paper (by Arc Crafts-paper backed).  It cuts like a charm.  I used Distress Stain in Walnut (Ranger) to color my rooster and also used Vintage Photo (also Distress Stain) to edge it.  I threw water droplets on it and dried it again to create the worn look you see.  I attached it to my red stripe label with mounting tape.


Now my card is all ready to send to my dad in New York!

I hope you enjoyed my card today!
Lis

Thursday, January 1, 2015

Live Love Laugh ... A New Years Card

I actually made this card in November during a pink phase but it speaks to what we all want for the new year: Live Love Laugh.


The die is from  Frantic Stampers' own collection.  One of the really cool thiings about these dies is that often times, they work in little patterns like hearts and start so that one can use even the cut outs.  The pink heart on the bow is such a die cut out.

Don't you love the feathers?  I don't usually incorporate feathers into my cards but I just couldn't resist this one.  I added two feathers that I had (pink, no less!) from some random grab bag I had gotten last year.  I had to glue dot the paper and then add the feathers.

Here's a close up of the word die cut.  It's all one so I don't have to worry about settin each word with the next - very convenient.  Icut this from pink glitter paper that I got from DCWV.  It's really nice stuff; very fine glitter and it doesn't rub off.  This came as a 6 x 6 pad which was even better.
 
I hope your new year is a safe and joyous one!

Lis

Sunday, December 28, 2014

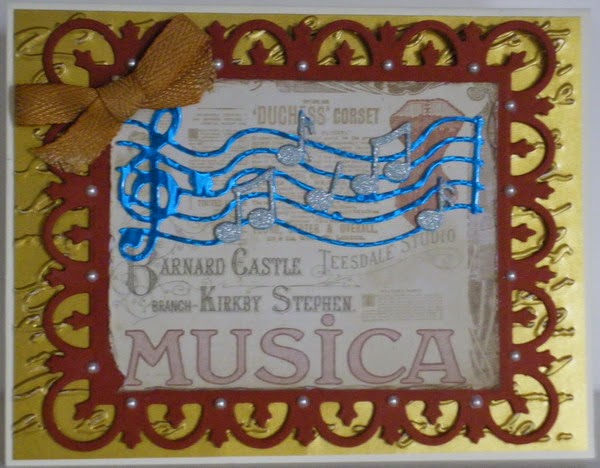
Musica


I had this piece of collage card stock with the word "musica" on it. That is what inspired my card today.  I knew I had some Frantic stamper dies with a music them so I took those out.  Did you know that the small music notes fit the notes on the music score? Awesome!  I cut the music score out of Blue Fireworks holographic card stock by Hot off the Press (When you turn the card side to side, you get a flash.  Its hard to explain but its really neat!)  I cut the music notes out of silver glitter paper and layered the notes onto the score, then glued the score onto my collage paper.


I created a frame for my musica collage with the Fleur de Lis Rectangles by Spellbinders
I added tiny white pearls to decorate the edge.  I also used some gold glossy as the mat for my piece.  I embossed it with a handwriting embossing folder.  It added just the right texture for the background.

I added a grosgrain bow and I was done!

Thanks for stopping by. I hope you enjoyed my card today!


*** Materials for this project are available at www.franticstamper.com. Frantic Stamper Products Used:

Saturday, December 27, 2014

Thank You Very Much Card


I always think about making Christmas cards for the season but I don't often give much thought to making Thank You cards for the season.  That is what inspired this card.  I wanted a "winter  going into Spring" theme.  I grew up in upstate New York. It was a real celebration when the first blades of grass popped through the snow (mind you, winter was 6 months long for us).
 
I used Prima papers (Madeline Collection) for this card.  They are full of Spring-y flowers and designs.  I used one paper and tore it, inking the edges.  I glued it on top of the blue patterned paper.  It reminds me of the spring snow.
 
I used Frantic Stamper Precision dies including the Pussywillow Branch FRA-Die-09180  and the "Thank you very much" word die FRA-Die-09213.
 
The Pussy willow branch comes with one bird. On my card I used two branches, overlaid. I did a small amount of trimming to get the look I wanted.  I cut one of the birds off and glued it back on the other side where I wanted it.  I cut two birds out of red Stardream paper and added these on top.  (Where I grew up, we saw robins and cardinals in the Spring.)
 
 
I added the sentiment on the left without a backing. Beautiful, isn't it?
 
I hope you enjoyed today's card! Thanks for stopping by!
 
Lis

Thursday, December 25, 2014

An Old Fashioned Santa - a Card


I love old fashioned things,, especially Victoriana.  Today's card features a German die cut of an old fashioned Santa Claus.

Materials:
  • light blue card base (A2)
  • dark blue striped foil card (Hot Off the Press, Hunkydory)
  • patterned paper (Bo Bunny-Frantic Stamper)
  • gold foil card
  • light blue glitter paper (DCWV, Michaels)
  • Frantic Stamper Die Blessings and Cross (4 dies)
  • Die from Sizzix (Sizzix has a number of swirly patterns to choose from)
  • German Die cut (Castle in the Air)
Steps: (this card is really easy to put together)
  1. Cut the blue foil to 4 x 5 1/4 inches.  Cut a 1/4 piece also long enough to go across your card (I think mine was 3 3/4 inches long.)
  2. Layer the foil piece onto your card base
  3. Next take the pattern paper and cut to 3 3/4 x 4 3/4 inches. Also cut a strip of pattern paper that is 1/2 inch thick and long enough to go across the card.
  4. Edge your pattern paper with silver paint pen. 
  5. Attach large piece to your card.
  6. Glue the thin blue foil strip to the center of the pattern paper strip.  Edge in silver paint pen.
  7. Cut the strip so that it is long enough to go across your card on the pattern paper only (see picture) (The more I look at my card the more I don't think the strip should be used.)
  8. Add your glitter swirl to the left side of your card.  Let the bottom swirl cradle Santa.

9. Add your sentiment (cut in gold foil) to the right.

Have a great day!

Lis

Wednesday, December 24, 2014

Wonderland...a card


Today's card uses one of Tim Holtz' new Christmas words that have come out this year.
 
Materials:
To make the bow:
  • Cut the solid bow from white card. This will be the base of the bow.
  • Cut the swirl design bow from red glitter paper.
  • Layer the red onto the white.  Be sure to bend them a bit to break the paper fibers and make it easier to form the bows.
  • Use glue dots and glue stick to assemble.
Notes:
1. I embossed my plain white card base first.  then I measured it so that I knew about where to cut out he rectangle on my paper for the word to show through. 
 
2. I added some cut holly leaves in green glitter under my bow.


Have fun!
Lis