Pages

Saturday, March 12, 2011

Vintage Wedding Card

Hi everyone!  Hope you are having a great week!

Today's card is very pretty card I did with weddings in mind. I used a key as the main decorative element and ivory ribbon with green leaf ribbon and roses to accent.


This angled view gives a much better view of the silver embossing that is done on the card.


Embossing with embossing powder can really add an elegant touch to any card whether it is decorative or a greeting.  Below you can see the before and after using silver embossing powder.  It's quite difference, don't you think?


Here you can see the torn paper I layered over the embossed paper to create a"tromp l'oy" effect (french for "fools the eye").  It looks like the embossed paper is torn instead of the patterned paper!


Here is a close up of the kay handle and the roses and leaves that I added. (The leaves were cut from the leaf ribbon I used.


Hope you enjoyed today's card!

Friday, March 11, 2011

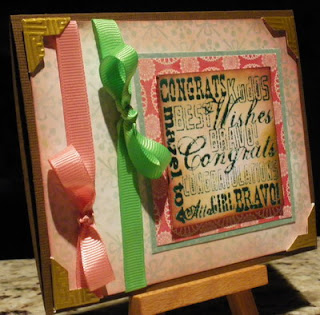
Congrats! Card

There is always a reason to celebrate! A birthday, reaching a goal...all goo dreasons for a card!  So, today I am showing a CONGRATS! card.


 I really like the two grosgrain ribbons here. 


 And you can see my photo corners made with Martha Stewart's photo corner punch (love that).  I ran the gold glossy cardstock through an embossing folder first and then punched out the corners. They really add a nice touch.


 I used an Inkdinkadoo clear stamp and used clear embossing powder over the stamping and embossed it.


I used a few colors to color the edges of the paper to make it look more distressed.


Then I layered it onto more paper and mounted it on my card.


Make someone a Congrats! Card!  I bet they smile!


Thursday, March 10, 2011

Keepsake Box!

Hi everyone and Happy Thursday!

Today I would like to share with you a little keepsake box that I made.  I bought the box from a craft store and it is made from paper mache.  It came with the clear dome lid. All I had to do was decorate it!


I used florentine paper on the sides and some scrapbook paper for the top.  I edged the top of the box with walnut ink too and crinkled the edges a bit.  I had some crochet and used that on the sides of the lid.  It looks a little dark because I used some distress walnut ink on it.

I chose some pretty buttons and glued them on.  There is actually a flat piece of cardboard that fits into the inside of the lid and holds the dome in place.  I lined the box with suede paper in green.  All in all, 20 minutes.
Have a great day!

Tuesday, March 8, 2011

Foiled and Embossed Cards - My Own Technique

Hi everyone!

Well, Today I am going to show you two cards using a technique that I created.  What you are looking at below is a HOT FOIL Technique.  I ironed foil onto the raised embossed designs in the two cards you see below.  I used a commercial Hot Foil (not the foil you use with glue).  I also foiled the letters LOVE with hot foil using the same technique.  Beautiful, don't you think?


The butterflies and dragonflies are punched out using mega punches and shrink plastic (search my blog for a previous shrink plastic project!).  I colored them with chalks and when I shrank them I gently folded the wings up as they cooled.


This next card was foiled using the same technique of HOT Foil.  All I added to this card was some ribbon, a skeleton leaf and a rose.  The picture doesn't do it justice.  It's a beautiful monochromatic yellow.


If you would like to read more about my HOT FOIL Technique, how to do it and what iron to use, please let me know.  Also, if you would like a sample of the hot foil I used, send me an email with your address and I will send you some.  For those of you not living in the United States (48 contiguous states), please email me anyway. I will look into how much it might cost to send you some sample foils.  The foils are very lightweight.

Let me know what you think!

Sunday, March 6, 2011

Mardis Gras Cards

Hi everyone!

Happy Sunday to you all. I hope that you are having a great day.  The weather in southern California today is really nice. I can smell Spring in the air.  The sun is shining and the breeze is warm.  Ike, my kitty is having his afternoon nap. He likes to nap as do all kitties. He knows it's important to save up his energy for those nighttime patrols in the house to make sure nothing is stirring, not even a mouse!

I thought I would share a Mardis Gras card with you.  I love Mardis Gras time.  The colors of purple, green and gold go so well together.

The card I did today uses the Slice and the Spook Alley cartridge.  I LOVE this cartridge. I have a cricut and the only reason I bought a Slice was because of this cartridge. (I have to say that I got a great deal on it also during th sales last december.)  The gothic alphabet is one of the best I've seen.  AND the masks are on this cartridge.  I thought they were just wonderful!

The mask is made from a mylar foil with a sticky back that I attached to some cardstock. (Mirror card is probably too thick for the Slice to cut.)  I ran the finished die cut through my cuttlebug with a diamond embossing folder. (I also did this with the purple core'dinations cardstock mat - then I sanded it to show the core.)  Then I added glitter glue to the mask and let it dry.  I added gold glitter glue fleur de lis to the centers of the gold diamonds. Its a barely there monochromatic design that looks really good.

The stick is actually a stick - one of those shish-ka-bob sticks you get at the grocers.  I covered it with gold foil and then laced red and black ribbon around it. I added the jingle bells at the bottoms.


Details, details:


 When I was making this card, I didn't know which mask I would be using so I cut out all of them in different sizes and used different embossing folders on them.  Here are the ones I did.


Hope you enjoyed these masks and the mask card!