Pages

Showing posts with label Cameo Cards. Show all posts

Saturday, March 1, 2014

Gold Doily on Blue


Gold Doily on Blue (A Color Challenge)
by Lis Whiting

I really love challenges!  It makes me stretch my creative "muscle" so to speak (and it's so much fun seeing what everyone has come up with - I would love to see yours! So don't forget to participate!)
This is a color challenge.  I chose some really pretty blue patterned papers and backed them with a dark solid blue.  I chose Authentique because they have collections in color choices. For yellow, I used a yellow ribbon and some gold (as a different shade of yellow).  I embossed the gold pieces - I was going for a similar design as the background blue paper. Can you tell? Isn't this tiny doily die just too cute!  And I was amazed at the intricacy of it too!  Easy to make die cuts.  I finished with a cameo and a single dark blue crystal. 


Products used:

Sunday, December 1, 2013

Embossing Techniques

Once I figured out how to heat emboss successfully (I took a class), I really loved it!  My article today is where I started looking at the world through powdery eyes!

I am going to show several projects, each with a different "outside the box" technique.  I now label my particular brand of embossing as "freeform embossing" and that means anything goes! (Note: For all embossing I used Versamark)

1. Gilded


The main punch to this card is the background.  It is gold embossed onto black linen card stock and matted onto gold foil paper which is layered onto a black A2 card base.

The Embossing:
  • Background: 
    • I took my versamark pad and swiped the edge of it at an angle across my card stock (5 x 3 3/4 inches).  I used fine gold embossing powder and heated with a heat gun.
  • Flowers:
    • I took paper flowers and dabbed each one against the versamark pad.  (I rolled the tulips on their sides on the pad also.) I then held the flower by its wire stem and dipped it into the gold embossing powder.  I heat embossed all fowers one at a time so that I could carefully monitor each flower to assure it didn't burn.  There was no problem at all.  I would be very careful about trying this with fabric flowers as the fabric may have a lower melting temperature if the fabric is faux.
  • Cameo:
    • I was going to emboss the cameo a little to enhance the face.  I decided not to.  If I had I would have dabbed the cameo onto the pad and used a paint brush with some versamark ink on it to add some highlights to the edges.


2. For Thought


There are actually two kinds of embossing here. 

  • The Background:
    • I did not use any stencils on this card.  I did use bubblewrap (BW).  I folded it up into a square, dabbed the versamark on one side and used the BW like a stamp.  I added gold embossing powder and heat embossed. It worked very nicely.  Remember that BW comes in different sizes.


  • The Hours:
    • If you look at the queen above, she is gazing at a white metal flower inside a cicrle of roman numerals.  The numerals are embossed with clear embossing powder.
    • I think sometimes this method can be a little forgotten.  I know I do because I like to use gold so much.
    • The trick to embossing with clear embossing powder is using colored ink that will not dry too quickly.  Distress ink is really good for this,  especially now that they have some really vivid colors added to the line.
    • Stamp your image onto your paper with colored ink.  Cover with clear embossing powder and heat emboss.  What always thrills me is when the clear embossing powder starts to melt and reveals the beautiful color underneath!


3. Muse


There are technically two kinds of embossing in this card: dry embossing (the yellow background) and the gold lines on the tag (heat embossing). 

My experiment:
I used a piece of card stock (white) and covered that with CROCO in Copper.  This paint works similarly to the Crackle paint that Range sells.  I happened to want to try this brand out so I used it on this project.  I helped out the cracking with my heat gun.  Once dry, I took a Versamark pen and started tracing the cracks.  I added gold embossing powder.  I was able to brush away the excess powder (there was a lot) using a foam brush.  The powder that remained was in the cracks.  I heat embossed the powder until it melted.

Things to remember: The embossing powder was a little thicker in this porject and took longer to melt so I had to be really careful with the crackle paint beneath.  I did end up with a couple of bubbles which I thought added to my piece.

I started with an A2 sized piece of card stock. Once everything was dry, I cut out my tag choosing the section that most appealed to me.


4. Miss You

My last card uses nature as the tool to create some beautiful textures and images on my card.  I went outside and pulled off a couple leaves (one large and one small-I didn't use the small one on this project but you can see the other card I made using the small leaf on my blog: www.madeforpaper.blogspot.com). I also decided to use a piece of branch from a tree (The image is in silver below).


I used my VersaMark pad and did some test embossing first to decide which side of the leaf I wanted to use to get the best image.  I used the back side.  Then I coated the back of the leaf with VersaMark ink and pressed it gently onto my paper.  I learned that if I press with my fingers I get a fingerprint image also.  I tried a papertowel folded up which worked well.  I was worried about getting the ink on my fingers (you know what happens when you then handle the paper) so I was very careful - but in the end I had to use my hands.

Close Up!

I started by applying the fir tree image across the bottom of my paper and then embossing in silver.  Then I embossed my leaves in gold.  The gold is overembossed (my term) onto the silver.


Here is another good look at the leaves. Didn't they turn out good? (Although I wish that I could have gotten more veining to come through. Next time I will choose a more veined leaf.)

I hope that you enjoyed our little journey through some embossing techniques and that you will try some of these in your art!

Lis


Tuesday, August 13, 2013

Gilded Romance Card

Hi everyone!~ I missed last weekend (it was my birthday!) But I have some embossed cards that I did for another ezine that I wanted to share with you this week. Enjoy!

I created the stripes by using a VersaMark pad and swiping it across my card stock (Neenah Classic Linen Epic Black...the richest and most beautiful black...my favorite!)  Then I embossed it with gold embossing powder.  To make the flowers, I started with paper flowers (white) and dabbed them in the VersaMark, then dipped them in embossing powder (gold of course) and embossed them also. 


Close Up!

This is a really good shot of the cameo (Fran's own!) and the paper flowers I embossed.


And another good shot...

A good look at the dimension...

Hope you enjoyed today's card!  Come back soon!  Lis

Sunday, May 26, 2013

Embossed Cameo Card

Hi everyone and happy Sunday to you all.  Today's card is a simple one.
1. embossed gold glossy
2. add a ribbon
3. add embellishments

The embossing folder was a gift from a friend of mine in Florida.  She got it as a free gift in the Australian Simply Cards magazine - Issue 41.  This magazine always has something for free inside. Usually its either papers or cling stamps. When she told me about the embossing folder, I asked (well actually I begged) her to get another one and send to me. And she did! I know that Michaels carries some of the foreign craft magazines.


Close Up!
To view the incredible number of cameo choices go to www.franticstamper.com or click HERE!

I thought the left cameocould be veritcal but I was mistaken.  It's a mermaid lying on her side so it should be horizontal.  I will probably replace her with another cameo.


Thanks for sharing your Sunday with me!  Drop by again next weekend!
Lis


Saturday, May 11, 2013

Just a Note Card

I really love the way this card came out.  I used a Spellbinder die and also a Sizzix Sizzlets strip die for the cherry blossoms and branches.  The pink ladies are die cut from pink suede.


Close Up!

I really struggled with whether to use pearls or pink gems on the flowers. I finally decided one pink gem.  I didn't want to draw attention away from the main part of the card.

I used Dazzles for the sentiment and cut out the post card from a piece of 12 x 12 patterned card stock.


I  backed the card with Authentique.    Also, don't you love this gold glossy?  I die cut it from a Spellbinders Fancy Oval set - to die for!

Here is another angle of my card (It's hard to type right now because my kitty Miss Lovely is on my desk trying to sleep on my arm...of course I'm trying not to disturb her! LOL)

Thanks for stopping by!

Lis


Sunday, May 5, 2013

Thinking of You Cameo Card

I wanted to share this quick card using a cut out cameo die from Sizzix.  The card is simple to make using an ivory card base and a brown card mat.  I used pink suede paper and die cut the cameo image using a Sizzix Movers and Shapers die from Tim Holtz.

I added the sentiment (Dazzles) and a pink ribbon. I did add a tiny white pearl on the cameo as an earring.


Close Up!

I backed the pink suede paper with dark brown card which you can see in the cameo die cut.


Thanks for stopping by!
Lis

Saturday, March 2, 2013

Admit One ...to your heart


Hi everyone!  Today's card was one that I made for my sister.  It's a simple white card stock base with bling.  (I saw this strip of bling and really wanted to try it out.)  The Admit One ticket was embossed on mylar sheet (this is stiff like card stock) and cut out (Tim Holtz embossing folder).  The pink flamingo cameo (I LOVE this!) is from Frantic stamper (if you like cameos you shouldreally check them out. She has a great variety and they are all just gorgeous. Click HERE if you are curious.)


Close Up!

Here's the cameo!


Thanks for stopping by!

Lis

Sunday, October 7, 2012

Owl Be Seeing You!

Today I would like to share a really pretty (and easy) card for all you owl fans out there!

  • Precision Die - Rectangle (Frantic Stamper)
  • Ivory cardstock with Bo Bunny Camp-a-Lot line
  • Burlap ribbon (you can see it in the window - very cool stuff
  • Owl cameo (gorgeous and one of many styles at Frantic Stamper)


Close Up!

Isn't this cameo beautiful?  I love cameos - they make a great addition to any card and I don't mind paying the extra postage!


Here is a picture of the inside of my card.  You get a clear view of the burlap ribbon.  I thought it would be messy when I cut it but I was pleasantly surprised how stable it is.


Hope you enjoyed today's card.  Come back tomorrow as I will be featuring window cards all week!

AND DON'T FORGET THE BLOG HOP STARTING MONDAY!
Lis


Sunday, April 17, 2011

Cameo Cards - A Modern Look -Day Two

Hi everyone!  Did you enjoy yesterday's card?  I had fun making it, that's for sure!

I really like the way that this card came out.  I started with a navy blue card base and added a blue scrapbook paper by K & Company, edging it in gold. It has a soft flower design in it.  I cut three wide strips of paper, used a scallop scissors for the bottom and edged all of it in gold.  I mounted them onto my card, added the ribbon and pearls. and finally added my cameo, a car! (Cameo die cuts are from the Cricut HERITAGE cartridge.)


I hope that you try a cameo card of your own!


Saturday, April 16, 2011

Cameo Cards - A Modern Look

Hi everyone! Today I wanted to do something more with cameo cards. I wanted to give my cards a modern touch.  You may remember that I made some traditional cameo cards (Click HERE to see them).


I used DCWV Four Seasons paper for this but you can use any strips of paper that you like.  The idea is to have a variety of widths and designs.  I punched a design in the bottom, layered it onto darker blue paper and added ribbons and pearls.  I attached my cameo directly onto the card. (Cameo die cuts are from the Cricut HERITAGE cartridge.)


Stay tuned for my second cameo card tomorrow!

Tuesday, March 29, 2011

Cameo Cards

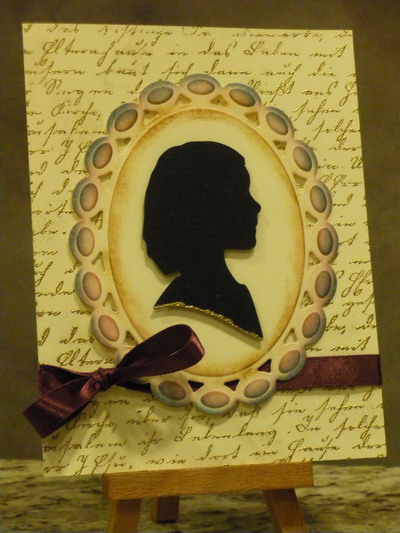
I love cameo silhouettes. I can imagine a Victorian home with a silhouette done in black paper and hanging on a wall in a gilded frame. The Cricut cartridge Heritage has a number of these cameos that can be cut out in pretty much any size you want.  I wanted to use these and thought about making some cameo cards.


First, I want to show you the background that I did for these cards.  I made an ivory base card by folding a piece of ivory cardstock (8 1/2 inches x 5 1/2 inches) in half to make my invitation size card.  I took a writing stamp and embossed the front of my card in gold.  It was so pretty by itself that I decided to share these pictures of it.  This makes a really great card all by itself.  AND it makes a great base card that you can use for so many card styles.


Heat embossing is a wonderful and elegant addition to any card or scrapbook page. It does have its tricky parts though.  If you don't emboss it enough, you get parts of the powder that aren't melted and they look brown. If you emboss too much, the melted embossing sinks into the paper and you don't get the raised relief you want which is the object of embossing in the first place.

Here are a few tips:
  1. FOLLOW THE MELT.  Don't wave your heat gun back and forth over the piece you are embossing.  You won't get an even melt and you will get patches that don't melt.  Start at one corner or edge and follow the melt.  You will find that you will get better results.
  2. Don't go over already melted (embossed) areas. 
  3. If you do miss a spot, turn your heat gun on (point it away from your piece), THEN POINT AND HEAT THE SPOT QUICKLY, see it melt and take the heat gun away.
  4. Emboss in the the light. Use the dull and shiny embossing to guide you to where you need to point your heat gun.
  5. FOLLOW THE MELT.
This is a close up of the embossing. (For those of you who speak German, you will recognize the old Schrift. It's beautiful, isn't it?)


I purchased the Beaded Ovals set from Spellbinders (Wizard dies).  I've been wanting to use them and when I looked at the design, I naturally thought of cameos. So, this is what I used to cut out the backing that I put the cameos on.  For the card below, I used Victorian Violet, Broken China and Vintage Photo Ranger dye inks to color the beaded oval.  Both the oval and the cameo are attached with mounting tape to give depth.


I used a dark Burgundy ribbon because many of the colors of the Victorian era were darker colors. 


I used a smaller cameo and beaded oval for my second card.  I used Weathered Wood and Pine Needles Ranger dye ink for the coloring here.  The ribbon is a hunter green, again dark.  (My Great Aunt Mabel had a sewing machine that my sister inherited. It was a treadle machine - not uncommon.  BUT what WAS so very interesting was that she had all the spools of thread that she used still in there.  My Great Aunt was 94 when she died and that was in 1965 or thereabouts, so she was a young woman in the 1800's.  The spools of thread were dark silky colors - very beautiful.)


You may have noticed that I embossed the bottom of each of the two cameos.  I thought this would be a pretty accent that would tie it in better with the card.  I used the direct to paper technique to accomplish this.  It gives the finished piece a little bit of a rough-edged look which I like.


For my third and final card, I decided to use a smaller beaded oval and add an initial in gold glossy cardstock.  The nice thing about the Spellbinder dies is that they come in sets of 5 or 6 and they are incremental in size. So, making graduated die cuts is easy.


I used a coppery, rusty colored ribbon for this card, It is the only color on this card other than the gold and ivory.


In this close up, you can see how I embossed the edges of the small beaded oval.  I used the same direct to paper technique to accomplish this.  I did not worry about being exact or neat.  I wanted a more worn look.  It is easy to take a paint brush and get a much more finished look if you want one.


I hope that you enjoyed these cards today.  I encourage you to try heat embossing with powder if you haven't and if you gave it up, try it again.  It's a beautiful addition to any card.