Pages

Showing posts with label Stencils. Show all posts

Monday, July 13, 2015

Celebrate the Little Things


This is a 6 x 6 card - white card base.  The technique I am using is a heart stencil with glitter texture paste for the hearts.  After I let it dry overnight, I added the Dazzles red holographic round stickers and the borders.


I chose to use a light red vellum that I cut into three banners.  I used my Xyron to add the glue to the back and then added to my card.  I added the white saying (Hot off the Press) and a couple of white stars tat came with the package.

Thanks for stopping by, Lis

Wednesday, July 1, 2015

Time to Fly ....a Card

Hi everyone,

I love this card!

Techniques used:
  1. Shaker Card
  2. Stenciling with glitter paste
The shaker part of this card was easy to do.  I thought I was going to have trouble cutting the acetate to size and then adhering the foam tape without it showing.

Cutting the acetate:
I cut the clock using a Tim Holtz die.  I used the center die cut from the clock die as my template for the acetate.  I placed the circle on the acetate with temporary tape.  I cut a 1/8 inch border around the circle (cutting it larger than my template).  The acetate was a great fit and slightly large so tat I could glue the acetate to the clock with Gloss Accents.  I cut thin strips of mounting tape. Each strip was the circumference of the inner circle.  The strips were thin and I was ale to bend them around the circle without having to cut infinite pieces.  I made two layers.

So, I have the clock upside down on my craft mat.  I added the small hour hands to the inside and also poured in a little Diamond Dust.  I picked up my card and laid it down on top of the clock to seal it. (If you try this remember to be sure that your card is going to open the right way.  Keep track of your top and bottom!)


I added the large hand to the top of the acetate and added a blue jewel.


The stenciling for the background of my card was interesting. I haven't done a lot of stenciling.  I love the effect I get with the modeling pastes.

I wish that you could see this card in person.  I used a Cosmic Shimmer Texture Paste by Crafters Companion.  It is a glitter paste (not glue).  It is SO sparkly!  The one I used on this card is called Icicle Blue and is a blue interference color - which is why I chose black - because interference colors show very well on black.

I added the kite as an after thought.

Here's a good picture of the shaker box.


Thanks for stopping by - have a great week, Lis

Sunday, July 14, 2013

Fantasy Flowers Part 2


Hi and I hope you are having a good weekend -keeping cool at least!  Here is my second fantasy floral card made with molding paste and a stencil.  Today's card is misted with blue Delusion spray.  The design sits on a dark brown card stock and matted on blue with a white card base.


Close Up!

I added gold pearl swirls under the purple/blue ribbon.  Instead of pearls like my first card, I used baby blue jewels (and a few dark blue) and some lime green for the leaves.

This picture gives you a good idea of the thickness of the molding paste.  It is a little rough around the edges.  Stencils are thin and I wanted to see if I could get a thicker stenciled design by spreading a thicker coat over the stencil.  I was successful...to a point.

Remember that all kinds of things can be used for stencils.  You can punch a design in a heavy cardstock and use that as your stencil.  I've done this and it worked really well.

Hope you liked my cards this weekend!

Lis


Saturday, July 13, 2013

Fantasy Flowers Part 1


I'm having a heck of a time with Blogspot today.  The screen keeps freezing so I'm going to talk about my card today down here.

I am doing a Frantic Stamper project (a frame) and am using molding paste.  Fran carries this and it comes in a number of colors.  I am using white because I wanted to color it myself.

I took a plastic flower stencil and covered my piece of cardstock with it.  I carefully covered the stencil with the molding paste, first spreading it like a frosting about 1/8 inch think.

Then I used a flat surface tool to smooth the molding paste over the stencil. (I used an artist's trowel, you can use one of those fake credit cards they send you in the mail).

I scraped off any excess and placed that back in my jar. I tried to make sure there weren't any lines on what was left, I wanted a smooth surface.

Then I carefully removed my stencil.  I peeled it off from one side to the other but I made sure that I lifted straight up.

What was left was molding paste and design.  I let this dry overnight.

I chose some Delusions sprays (blue, yellow and green).  I went outside for the next step.
  • I placed my card in a box
  • I sprayed the left side with blue, the center with yellow and the right edge with green
  • I chose my colors so that what overlapped would make another color (in this case orange) and that the colors would blend well.
  • I didnt need much spray.
NOTE: I originally used a card base for this project thinking I could get it done on the front of the card itself. BIG MISTAKE.  I had molding paste on the edges that adhered to the inside of my card and it made a little mess.  So, I cut off the front and matted it to another card base in white.

I hope you enjoyed my card today.  It is a lot of fun working with dimensional paste.  I hope you give it a try!


Lis

Tuesday, November 1, 2011

Lace Glitter Technique Card

For today's card I wanted to show a really great technique using lace and glitter.  I saw this being done last year at the Carson Stamp Show. I was very impressed!

Here is the first completed card.  (There is another at the end of this post.) The camera does not do this card justice.  The entire card is solid glitter and is incredibly sparkly.  I added a glittery flower and a jeweled border as accents.


You can really see the lace pattern in the card!

And here is how I did it! 
You will need:
  • Shipping labels
  • two colors of fine or ultra fine glitter (one light and the other dark)
First I purchased white shipping labels.  I got the full page size and cut them up into 4 pieces.  You can also buy them just large enough for your card size.


 Cut up shipping labels into invitation sized pieces.

Peel the backing off the shipping label to expose the sticky side.  Place the label sticky side up on your work surface.

Add a piece of lace to the sticky side of the label.  Press it down. It can be any lace you want BUT lace with larger patterns like the one I used work best.  Tiny patterns or very close patterns don't work too well.

Once the lace is on the sticky side of the label, pour your first glitter color on it.  The first color should be your background color and should probably be light-colored (example: clear or white, or pastel). 

  1. I don't have a picture of the first color. 
  2. After you have poured your first glitter color, place a piece of paper over the glitter and lace and press it in.
  3. Remove the paper and remove all excess glitter.
  4. Carefully remove the lace.


 Pour your second glitter color (should be darker and have a good contrast with the first color). Rub the glitter in as you did before with the first color.

Carefully lift the paper and remove all excess glitter.  You should now see your lace pattern IN GLITTER!  Is this not the coolest?!

Here is the finished card. 

You would think that the glitter would be all over the place but it is surprising that it is not.  The label glue really holds onto the glitter.


I hope you enjoyed this glitter technique.  Think how beautiful Christmas cards would be!

Lis

Sunday, February 27, 2011

The Scroll Heart Punch used as a Stencil(Kaarten met scroll heart punch)

Say what?  Yes, as a stencil.  I used shrink plastic and punched a border. I used this as my stencil.  I didn't use regular transparency plastic because it is thinner and won't punch well at all.  You can use paper as a stencil but for this technique, we have to wash it and shrink plastic works well.

So, what did I stencil, you ask?  Well, take a look at project #1.


Here is how I created the border at the bottom of my card.
  1. I placed my stencil (made from the border punch) on a black piece of cardstock.
  2. I used Molding Paste and a spreader tool. (Artists and cake decorators use it.  It is bent at the handle)
  3. While holding the edge of the stencil on my paper, I spread molding paste over the stencil and paper, covering them both.  This is a little like icing a cake.
  4. I carefully removed the stencil and let the molding paste design dry. (This Molding Paste dried white and matte. It is also flexible and doesn't crack easily.  It does take color so I could have stamped it, or even used inks on it.)
  5. I replaced the stencil (now I used it as a mat to cover up the design).
  6. I sprayed Radiant Rain on the entire piece.
  7. I removed the stencil again and the result is what you see below.
(You will notice that part of the design has some spray on it.  This was not the fault of the stencil. The stencil worked perfectly and no spray got on the black paper.  I wanted to add some color on the right and sprayed without putting the stencil down first....duh!)

 I took this shot to give you an idea of the effect that Molding Paste has.  There is a depth to this design and creates a 3d effect.
 This is the Molding Paste that I used. Golden is well known among artists ans has great quality in all their materials.  While a CHA I took a class that used Speedball Molding Paste which seemed a little airier.  Liquitex also makes a Molding Paste I believe.

What ever Molding Paste you use, you should probably get the LIGHT one.  This means that its less heavy (less dense) than the others.
 Here is the Radiant Rain that I used.

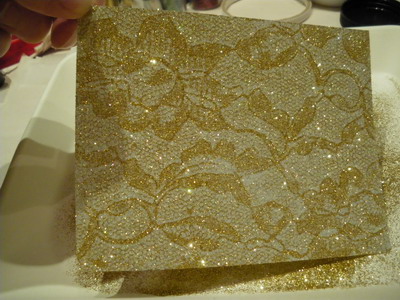
Here are a couple of detail shots of Project #1.

For this part of the card, I used an embossing folder (Cuttlebug) and some gold glossy (The Paper Cut).


If you think about it, you have probably got MANY punches that you could also try this with.  Just think how many stencils you could have!


Thank you for stopping by.  I hope you enjoyed this card.

I was hoping to complete the second project but I ran out of time.  So, I will post tomorrow.  See you then!