Pages

Saturday, October 29, 2011

Last Halloween Cards for the Season!

Hi everyone!  I hope that you have had as much fun making Halloween cards this year as I have!  I've  made so many that I have lost count!  I have had a lot of fun sharing them with you also! 

Here are my last two cards for the season!

First up - Scary Tree

This card was done with a Tim Holtz die (Branch Tree).  I used the negative as a stencil to spray on some copper Perfect Pearls.  When I mounted my tree, I moved it to the right of the sprayed on pattern so you could see it on the left.  This made my tree a little more dimensional.

Below is the true color of the card.  The other pictures after this one are a bit more yellow.  That is because I had to retake the picture because it was blurry and I took it with a different light at my back. 


Close Up!

I punched out a tag and then punched out a smaller version with one of Tim Holtz Seasonal stickers.

Ah yes, what would a scary tree be without a bat?


I used silver glossy for my moon.  Here you can clearly see the perfect pearl "shadow" next to the branches.


My second card is called "The 31st".  This is a project that I did for http://www.franticstamper.com/.


 These are the materials I used.


Close Up!

I love the silvery moon just over the tops of the houses and the contrast with the "glow" from the windows.


This was from the Seasonal Stack from Tim Holtz.

Thank you for joining me in my Halloween cards!  Come back again because next it's Christmas!!

Lis

Friday, October 28, 2011

Halloween Cat

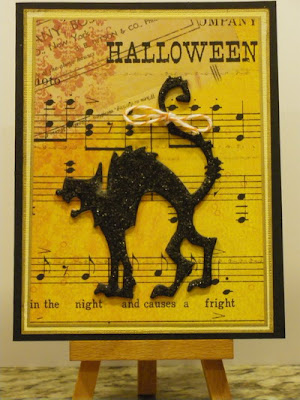
Hi and welcome to my blog and to another Halloween card!  Today's card uses the Tim Holtz Scaredy Cat die from Sizzix.  I really like this cat because he (maybe she?) is a little rough around the edges.  A very cool cat!


Close Up!

I used orange bakers twine for the bow around the tail.  Too cute!


This was a lucky accident.  I like the way the cotton swab cotton turned out.  It looks a little cobwebby.
I accidentally created this look by using liquid glue on the back to glue down my cat.  I placed the glue to the edge of the back. When I pressed down it came out the side.  I used my cotton swab to wipe up the excess and the cotton naturally stuck to the edge.


I hope you liked my card!  Stop by tomorrow for another (and I think final) Halloween card!

Lis

Wednesday, October 26, 2011

31 - A Halloween Card

I have made the last of my Halloween cards before starting on Christmas!  I think this card (that I made for my sister in New York) turned out really well!.  I love the contrast between the orange in the numbers and the silver glossy in the background.  I love the clean lines and simple elegance of the card.


I used  Tim Holtz embossing folder.

Close Up!

I covered the chipboard numbers in white gesso and then painted them orange with acrylic paint.  I covered them with distress stickles glitter glue and let them dry.  The larger sized glitter really makes this!

I used some acrylic gems to accent the top design.  The colors are blue, green and a purple one.


I hope you try today's card!
Thanks for stopping by and come back soon as I will be showing the rest of my Halloween cards this week.

Thanks,Lis

Bling Witch

Hi everyone!

Well, it's almost Halloween!  My sister loves this holiday and I can't blame her. It's full of fun and lots of candy to be had!

Today's card uses a Tim Holtz die that is a wonderful witch on a broom.

I die cut the witch from chipboard and painted it with white gesso and then purple acrylic paint.  The witch was VERY purple and I wanted to do something to make her more interesting.  (Im not sure I accomplished this!)  I added some bling to the center of the witch - after all it's magic!  And I added so glitter glue and a black hat.


I embossed the background with an embossing folder on gold glossy.


 Close Up!
I roginially painted the entire witch purple but I wanted to accent it with another color (too much purple....LOL) so I painted the hat black.  I think it turned out pretty good.


I like the way the distress stickles glitter looks over the background purple of the broom.

I hope you enjoyed today's card.  Come back again for more inspiration!

Lis

Tuesday, October 25, 2011

31 Boo Halloween Card

Hi everyone!  Hope that you are having a great week, eating candy corn and getting your costumes ready for Halloween!

Today's card turned out to be a neat kind of card for me! 

I used one of the Tim Holtz Kraft Resist Halloween papers.  I colored each section using distress inks in the sponge top bottles (red, milled lavender, peeled paint and weathered wood).  I edged the paper in gold and mounted it on a lighter orange piece of cardstock.  My card base is black.  I mounted the tag onto my card using mounting tape.


Close Up!

I love the way the bling curls around the tag and the BOO!


Do you have any bakers twine? I think I have a little bit of every color!  I haven't used it much in my cards yet but this is one card that I thought it would really look great in!  The twine is wrapped around the card twice.  I punched two holes in the tag and laced the twine through it before tying.


This turned out so cool!  I used the negative of the Sizzix die cut (31) and sprayed a copper perfect Pearls using the negative space as a template.  It turned out really great!  You can see the number as you turn the card. (It looks much better in person and you can clearly see the "31" on the card.  The picture is not that clear above.)

I hope that you will give this one a try!  Thanks for stopping by!

Lis

Blinged Out Boo Cards

Hi everyone!  Well, we are getting closer to the "big" event. I mean Halloween, of course.  These past few years I have been delighted to experience Halloween through the eyes of my nephew.  What fun!

Today's cards are variations of the Gothic Boo die from Sizzix and Tim Holtz.  The die cut really needs to be center stage on a card. As you can see with the pictures below, its big.  I really love old gothic alphabets so this die appealed to me.

For all my die cuts, I cut them using chipboard.  Then I painted them with two coats of white gesso and two coats of black acrylic paint. I let each layer dry before I painted on the next layer.

For the card below, I sprayed green metallic Perfect Pearls to color it.  The bat is coated with Distress Stickles in red.  I edged the card with dots of lime green glitter.


 Close Up!


For this next card, I used distress stickles glitter glue in Walnut Stain and Milled Lavender. Remember that this glitter glue has bigger chunks of glitter in it.  It has a more old fashioned feel.


The spider web that hangs off the word BOO is part of the die cut.

Close Up!

I hope you enjoyed today's cards.

Lis