Pages

Friday, January 4, 2013

A Little Birdhouse - A Home Decor Project

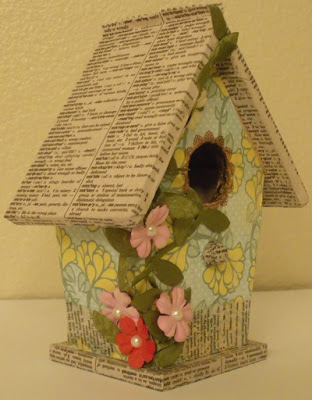
Today I would like to share with you a cute Birdhouse that I decorated with the new Authentique Renew Collection. 


I purchased a plain wood birdhouse from Michaels for a dollar (can you imagine!).  The birdhouse stands about 6 inches tall by3 inches deep by about 3 inches wide depending on where you take your measurements.
Materials:
  • Authentique Renew Collection papers
  • Dictionary pages
  • Mod Podge
  • Foam brush
  • Green Leaf Ribbon
  • Paper Flowers
  • White Pearls
Steps:
  1. I started with the roof.  I painted a thin layer of mod podge then added my dictionary pages.  I added another layer of mod podge over the dictionary paper. (Note: I added my pages from the bottom up.  The two pages met at the top of the roof where I glued them together with the mod podge - rather than cutting them off.  After I dried the roof with my heat gun, I took some decorator scissors and cut the roof top paper about 1/4 inch above the point of the roof which gave it a neat patterned edge.
  2. I proceeded with the base and the underside of the roof, using the same process as I did for the roof.
  3. I measured each side of the birdhouse and cut pieces of Renew (I love the pretty yellow flowers!). I used mod podge on each side of the house and then added the paper. I did NOT add a layer of mod podge on top of these papers.
    • The front piece was a little tricky because of the hole and perch.  I used an xacto blade to cut out the hole and a hole for the perch to pop through.
    • Once the front piece was attached, I used the Stella and Rose Gertie Clear Stamps and Archival Ink in Coffee to stamp a doily pattern around the birdhouse entrance. Click HERE to see the stamps. 

          1. I took some clear scotch tape and put it on some dictionary pages. I pulled off the scotch tape which now had the dictionary pages.  I added this decoration around the base of my birdhouse.


          I added green leaf ribbon and flowers with a hot glue gun.  I added adhesive pearls to the center of the flowers.


          This little birdhouse will be decorating my office at work.  It is a great Spring project.  I hope you will try it!
          Thanks for stopping by!
          Lis


          Thursday, January 3, 2013

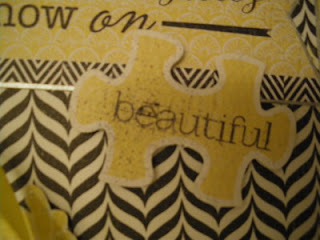
          Beautiful...a card with Authentique Renew Collection


          I love how this card turned out. It is so cheery.


          This is a really simple card to make.
          1. I outlined the banner and puzzle piece in silver, also the mat.
          2. I cut out the yellow flowers from a 12x12 paper and attached with mounting tape.
          3. Added the bow and done.


          Close Up!

          All the papers and die cuts have a slightly distressed look to them.


          I added a splatter of silver to the flower cut out before I attached it.

          Thanks and stop by tomorrow!

          Lis

          Wednesday, January 2, 2013

          Bloom Card

          I got the Circles and Scallops die cuts along with the Renew papaers.  I decided to make ornaments with them (just coming off the Christmas season you can see where my mind was...LOL)
          Making the balls was easy. All I did was fold each circle in half and then glue the halves together.  There was a little glue on the edges so I dusted them with glitter.  It doesnt show well in these pictures but in person its very pretty!

          I added some dazzle flowers randomly over the patterned paper.


          Close Up!


          Don't these pearls look like they were strung on gold chain?


          Hope you enjoyed today's card. Join me tomorrow for another!

          Lis

          Tuesday, January 1, 2013

          Joy Card using Authentique Renew Collection Papers

          Hi and welcome to Day 2.  I call today's card JOY. 

          Don't you just love banners?  I know I do!  I attached the outer banners with mounting tape and the middle one with a glue dot.  I added some gold dazzles at the top to simulate string and added the flower stickers at the bottom.


          Close Up!

          I really love to use flowers on my cards.  I try to keep the flower size small so that I can send my cards through the mail without a problem but these were too tempting not to use.  These are white satin surrounded by white tulle lined in gold.  Just too pretty!

          I took each rose and wound one around the ribbon right behind the bow to hide the wire. I put a piece of red line tape on my card and attached the bow and flowers that way for security.


          Thanks and stop by tomorrow for another card!

          Lis

          Sunshine Card

          Hi everyone and Happy New Year.  It's been dreary around here the last couple of weeks with rain and clouds - which I normally don't mind.  I decided to put a little spring into my life and create some cards.

          I will be featuring cards for the next five days using the Authentique Renew Collection papers that I just got.  These are lovely papers with soft powdery blues and sunny yellows.  There is even a couple of newspaper print papers which I really love.

          Sunshine:
          • cardbase - white cardstock
          • mat - powder blue
          Authentique also made these cute jigsaw puzzle pieces with words and pictures on them, as well as some tabs.


          OK. Who has trouble making bows, raise your hand (I know mine is raised).  It seems all my friends make the most beautiful bows - not me.  I found this cool gadget that I use now to make bows.  It's easy and they all come out great. (Did I mention that I can use any size ribbon and make any size bows?)   You can pick one up HERE if you want one.


          I've become a fan of making double loop bows. Easy.


          So that my puzzle pieces would show better, I outlined them in silver. The paper colors are light enough that the silver isn't glaring.


          More close ups!


          Come back tomorrow for another card!

          Lis

          Happy New Year!

          Wishing you 
          a great    
          new year !


           (full of great crafting of course!) 


          Lis

          Sunday, December 30, 2012

          Butterfly Card

          I've been doing some coloring projects lately and wanted to share one that I did with patterned paper.  Usually coloring porjects are done with stamped images.  I've been playing around with patterned papers though and my cardss have been coming out well.

          The card below is like a similar technique where the background is stamped in black and white and then stamped again on another paper.  One piece is cut out and colored and then overlaid onto the first stamped image to create a focal point.

          In my card below, I used distress markers to color one butterfly in the patterned paper.


          Close Up!

          I added some glitter glue.


          Lis