Pages

Showing posts with label Heat Embossing. Show all posts

Monday, October 5, 2015

This Way , a Halloween Card


Today's card includes:
  • Rubber stamp (Michael's - two potion bottles)
  • Silver embossing powder
  • black crinkle ribbon May Arts
  • Dazzles from Hot off the Press (Red dots and black sparkle border)
  • Skull - Idea Ology - Tim Holtz
  • Border Punch Martha Stewart - Skulls
  • Paper Tole - from Hot off the Press
  • Bazzill Orange for card base
  • patterned paper
  • Kraft Core card stock in black crackle design (Cor'dinations)
Close Ups!
The skull went nicely over the center knot on my bow. I used glue dots to attach.


Thanks for stopping by!
Lis

Sunday, March 8, 2015

A Friendly Hello!

Hi everyone and happy Sunday!


I've used shimmer paper this time around on my card:  a nice light/lime green, and a dark green for my tag.

I used a few different dies to make my card today:

The Paper Bow - Anna Griffin
The Ivory rectangle - Frantic Stamper
The Tag - Spellbinders

The paper:
Lime Green and Dark Green - Stardream paper by Neenah (You can find it at Kelly Paper or online at
     The PaperMillStore.com
     (Note: I have to say that if you love paper like I do, a visit online to the paper mill store will
     have your jaw dropping at the variety!  You can shop for paper by color (of course) or you can
     shop by company (of course) BUT have you ever been able to shop for paper by paper mill? It
     will blow your mind.)
The silver foil patterned cardstock - Its called silver linen paper, comes in 12 x 12 only, is a regular
     cardstock, and you can find it at Paperwishes.com

Directions:
I started out with an ivory card base.  I embossed a lime shimmer paper (Sizzix) measuring 5 1/4 x 4 inches.  I attached his to some silver linen paper and cut a 1/8 inch border with my Perfect Layers Rulers (see under New Tools).  I attached to my card base.
I cut out my ivory rectangle with fancy edge and embossed writing and music on it with silver embossing powder.  I layered this onto silver linen paper and made the same 1/8 inch border.  I attached the ivory rectangle to the silver linen with mounting tape, then attached the two layers to my card.

I added the bow, a paper flower 
 
and my tag. (The HELLO coms from Dazzles at Paper Wishes)

and finished off with some large crystals.

Thanks for stopping by!
Lis

Sunday, October 26, 2014

A Midnight Dreary, a Halloween Card


This is a very easy card to make and SO beautiful because of the die I used. 
I love birches ad the Frantic stamper birch die is wonderful!  It is a card panel so it will cover an A2 card.
 
To make my card, I first cut the birch panel out of plain white card stock.  then I used Versa Mark and silver embossing powder to change my birches to silver.  I had some blue glitter and some blue chunky glitter and reheated (melted) parts of the embossing and added the glitter to it.  This causes the glitter to stick to the melted embossing powder.
(I had in my mind a full moonlit night and the birches would be silver in the moonlight and also give off this blueish light...spooky, yes?)
 
After I added glue to the back of my trees, I placed a white shimmer moon (cut from shimmer paper) behind the trees.  I glued my trees to a black mat and again to a silver glossy mat to finish my card.
I have several ideas to share on this card for variations:
  • instead of a moon, use a skull out of red glitter
  • cut out a bat to lay on top of the trees with a Happy Halloween greeting in red or white
  • take an alcohol pen and color one tree t stand out from the group
  • add an owl to one of the branches
  • You can use this die for Christmas and add snow at the base or on some of the branches.
There are so many ways to use this birches die.  I hope you will give some of them a try.

Lis
 

Saturday, July 26, 2014

Le Chat Noir


I love the art-poster type rubber stamps. Frantic Stamper has a really nice collection of them.  I have one called Chat Noir (black cat) that I wanted to use on a card.  Instead of stamping my image in black ink, I used VersaMark and white embossing powder on a dark purple card stock.  The white embossing powder was able to capture ev ery little detail of my stamp, even the tiny writing!  I colored the cat with Distress Stickles Glitter in Walnut Stain. 
I mounted my image on black suede paper and attached to my card base.


Thanks for stopping by!


Saturday, March 8, 2014

Leaf Embossed Thank You Card


Today's card uses nature to emboss and decorate.  The gold and silver embossed designs are from leaves that I picked up outside.  All I did was to pick out the leaves and foliage that I wanted, use Versa Mark on them, then press them onto my paper (in this case black card) and then use gold and silver embossing powder and a heat gun.  I finished with a sentiment in gold glossy and some pearls.

 
Thanks for stopping by!
Lis


Sunday, December 1, 2013

Embossing Techniques

Once I figured out how to heat emboss successfully (I took a class), I really loved it!  My article today is where I started looking at the world through powdery eyes!

I am going to show several projects, each with a different "outside the box" technique.  I now label my particular brand of embossing as "freeform embossing" and that means anything goes! (Note: For all embossing I used Versamark)

1. Gilded


The main punch to this card is the background.  It is gold embossed onto black linen card stock and matted onto gold foil paper which is layered onto a black A2 card base.

The Embossing:
  • Background: 
    • I took my versamark pad and swiped the edge of it at an angle across my card stock (5 x 3 3/4 inches).  I used fine gold embossing powder and heated with a heat gun.
  • Flowers:
    • I took paper flowers and dabbed each one against the versamark pad.  (I rolled the tulips on their sides on the pad also.) I then held the flower by its wire stem and dipped it into the gold embossing powder.  I heat embossed all fowers one at a time so that I could carefully monitor each flower to assure it didn't burn.  There was no problem at all.  I would be very careful about trying this with fabric flowers as the fabric may have a lower melting temperature if the fabric is faux.
  • Cameo:
    • I was going to emboss the cameo a little to enhance the face.  I decided not to.  If I had I would have dabbed the cameo onto the pad and used a paint brush with some versamark ink on it to add some highlights to the edges.


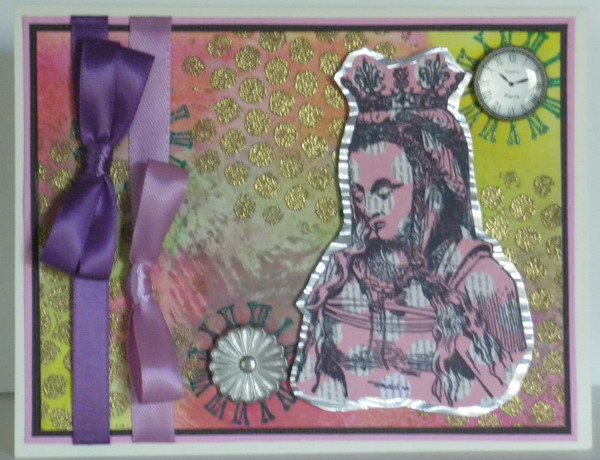
2. For Thought


There are actually two kinds of embossing here. 

  • The Background:
    • I did not use any stencils on this card.  I did use bubblewrap (BW).  I folded it up into a square, dabbed the versamark on one side and used the BW like a stamp.  I added gold embossing powder and heat embossed. It worked very nicely.  Remember that BW comes in different sizes.


  • The Hours:
    • If you look at the queen above, she is gazing at a white metal flower inside a cicrle of roman numerals.  The numerals are embossed with clear embossing powder.
    • I think sometimes this method can be a little forgotten.  I know I do because I like to use gold so much.
    • The trick to embossing with clear embossing powder is using colored ink that will not dry too quickly.  Distress ink is really good for this,  especially now that they have some really vivid colors added to the line.
    • Stamp your image onto your paper with colored ink.  Cover with clear embossing powder and heat emboss.  What always thrills me is when the clear embossing powder starts to melt and reveals the beautiful color underneath!


3. Muse


There are technically two kinds of embossing in this card: dry embossing (the yellow background) and the gold lines on the tag (heat embossing). 

My experiment:
I used a piece of card stock (white) and covered that with CROCO in Copper.  This paint works similarly to the Crackle paint that Range sells.  I happened to want to try this brand out so I used it on this project.  I helped out the cracking with my heat gun.  Once dry, I took a Versamark pen and started tracing the cracks.  I added gold embossing powder.  I was able to brush away the excess powder (there was a lot) using a foam brush.  The powder that remained was in the cracks.  I heat embossed the powder until it melted.

Things to remember: The embossing powder was a little thicker in this porject and took longer to melt so I had to be really careful with the crackle paint beneath.  I did end up with a couple of bubbles which I thought added to my piece.

I started with an A2 sized piece of card stock. Once everything was dry, I cut out my tag choosing the section that most appealed to me.


4. Miss You

My last card uses nature as the tool to create some beautiful textures and images on my card.  I went outside and pulled off a couple leaves (one large and one small-I didn't use the small one on this project but you can see the other card I made using the small leaf on my blog: www.madeforpaper.blogspot.com). I also decided to use a piece of branch from a tree (The image is in silver below).


I used my VersaMark pad and did some test embossing first to decide which side of the leaf I wanted to use to get the best image.  I used the back side.  Then I coated the back of the leaf with VersaMark ink and pressed it gently onto my paper.  I learned that if I press with my fingers I get a fingerprint image also.  I tried a papertowel folded up which worked well.  I was worried about getting the ink on my fingers (you know what happens when you then handle the paper) so I was very careful - but in the end I had to use my hands.

Close Up!

I started by applying the fir tree image across the bottom of my paper and then embossing in silver.  Then I embossed my leaves in gold.  The gold is overembossed (my term) onto the silver.


Here is another good look at the leaves. Didn't they turn out good? (Although I wish that I could have gotten more veining to come through. Next time I will choose a more veined leaf.)

I hope that you enjoyed our little journey through some embossing techniques and that you will try some of these in your art!

Lis


Friday, August 30, 2013

Miss You - a card embossed using leaves

Today's card uses nature as the tool to create some beautiful textures and images on my card.  I went outside and pulled off a couple leaves (one large and one small-I didn't use the small one on this project but you can see the other card I made using the small leaf on my blog - I will post soon. I also decided to use a piece of branch from a tree (The image is in silver below).


I used my VersaMark pad and did some test embossing first to decide which side of the leaf I wanted to use to get the best image.  I used the back side.  Then I coated the back of the leaf with VersaMark ink and pressed it gently onto my paper.  I learned that if I press with my fingers I get a fingerprint image also.  I tried a papertowel folded up which worked well.  I was worried about getting the ink on my fingers (you know what happens when you then handle the paper) so I was very careful - but in the end I had to use my hands.

Close Up!

I started by applying the fir tree image across the bottom of my paper and then embossing in silver.  Then I embossed my leaves in gold.  The gold is overembossed (my term) onto the silver.


Here is another good look at the leaves. Didn't they turn out good? (Although I wish that I could have gotten more veining to come through. Next time I will choose a more veined leaf.)

I hope that you enjoyed our little journey through some embossing techniques and that you will try some of these in your art!

Lis

Saturday, August 17, 2013

Muse and For Thought...Two Embossed Cards

Hi everyone! Today's cards feature different embossing techniques. I really love embossing. Once I learned how to do it correctly, I've been a fan. This first card uses small bubblewrap as my "stamp". If you look at the second picture, you can clearly see the gold embossing. It makes a great background. I folded up the bubblewrap, tapped it on my VersaMark pad and then onto my paper. I added gold embossing powder and heated it. Simple!

This second card includes a tag on the front. I used crackle paint first. Then I added VersaMark (using their pen) and traced the cracks. I added the embossing powder and heated. Its a different look. My original thought was to have graceful lines. This didn't turn out and the lines are thicker than I wanted but still look ok.
Thanks for stopping by!

Lis

Tuesday, August 13, 2013

Gilded Romance Card

Hi everyone!~ I missed last weekend (it was my birthday!) But I have some embossed cards that I did for another ezine that I wanted to share with you this week. Enjoy!

I created the stripes by using a VersaMark pad and swiping it across my card stock (Neenah Classic Linen Epic Black...the richest and most beautiful black...my favorite!)  Then I embossed it with gold embossing powder.  To make the flowers, I started with paper flowers (white) and dabbed them in the VersaMark, then dipped them in embossing powder (gold of course) and embossed them also. 


Close Up!

This is a really good shot of the cameo (Fran's own!) and the paper flowers I embossed.


And another good shot...

A good look at the dimension...

Hope you enjoyed today's card!  Come back soon!  Lis

Tuesday, May 28, 2013

Technique for using the Doily Stamps

I wanted to share soemthing I've been experimenting with.  I really am into a doily phase.  I love all the doily dies, punches and stamps that are out.  I love using gold doilies that you can buy.

So, I have these doily clear stamps.  These are unique to Frantic stamper.  Fran got these remade and is the only company that has any left.  They are gorgeous!

This is the My Mind's Eye Stella and Rose Gertie Clear Doily Stamps.  Click HERE if you want more information. Remember that My Mind's Eye is not producing these anymore. You can only find them at Frantic Stamper.


I took some blue card stock (plain) and, using Versa Mark, stamped a large and small doily all over the paper.  Then I used fine gold embossing powder and embossed the stamped images.

Look at the detail of these stamps!  WOW! (This would be a great back ground for a card all by itself.)

I cut my paper down to 2 x 5 1/2 inches. 

I used one of my corner chompers (any corner punch will do) and added the corner design.   Now I had a tag or embellishment piece for my card ready to go.

Lis

Thursday, December 27, 2012

A Serendipity Paper Christmas Card!

Hi everyone!
What is Serendipity Paper you might ask?  It's paper you make from scraps! 

Have you ever wondered what to do with all those pieces of beautiful papers and cardstock that just aren't good for any project but you can't bear to throw them out?  This technique will show you how to make a new sheet of paper using all your scraps.

Rules:  Well...there are no rules!  Take any of the papers that you want, cut them into strips, tear them into pieces, and paste them on a piece of cardstock.  Although you can choose to keep within a color family or coordinate between basic colors and pattern mixes, you don't have to.  Somehow this always works out!  It's a little like paper magic!

Let's make some Serendipity paper!

1. As you can see, I chose a Christmas theme in red, white and green for a color theme.  I normally don't do this but it's the season. 
  • patterned paper
  • solid cardstock
  • solid cardstsock Co'ordinations kraft


I embossed the solid cardstock. I've never done this before and I wanted to see how it would come out.  I'm a mad scientist sometimes.


2. I ripped the papers into strips with torn edges on both sides.


3. I started gluing my strips randomly onto my piece of cardstock.  Cardstock can be anything, even a scrap itself.  The color doesn't really matter because we are going to cover it with our pieces of paper.  (Note: Since I have strips, they naturally lend themselves to gluing either vertically or horizontally.  I try not to follow a pattern when I'm attaching my pieces.  I also use a glue stick.  For me, torn paper seems to look better when glued down with a glue stick.)


4. Here is my finished piece of cardstock with all my pieces glued down.


5. I used several different sizzix dies to cut out some shapes with my paper.


6. And here is my finished card!  What do you think?


Close Up!


I hope that you have enjoyed learning about this technique.  And that you try it out too!

Lis

Saturday, October 13, 2012

You Are Special...a gold leaf embossed card

Hi and Happy Sunday to you all! 

I am still so excited about the Precision Dies!  I have gone nuts making cards this weekend to send out to family!

Today's is about a 4 on the difficulty scale (1-5).  You may want to get adventurous and try it out for yourself!


There are a few techniques on this card.

To create the inside of the card (what shows through the square windows):

1. Take an embossing folder and the paper you intend to emboss.  Select an ink (I used Distress Ink in Crushed Sapphire.) (I learned this from Tim Holtz!)
  • Find the side of the embossing folder that has the debossed pattern.
  • Take your ink pad and using the direct to paper method, cover the folder with ink
  • working quickly, lay your paper carefully on the embossing foler and close it, being careful not to move the paper once it's been placed down.
  • put the embossing folder and paper through your chosen machine and dry emboss the paper.
  • take out the paper carefully and set aside (you can let it air dry or if you have no patience like me, you can use a heat gun to dry it)
  • rinse your folder out immediately (which is why I use dye ink - it comes right off)
2. Take your dry embossed and colored paper, and either a versa mark pad or ranger embossing pad (perfect pearl pads work as well) - have gold embossing powder ready, and a small to medium brush (I used one without stiff bristles) and your heat gun
  • wipe the versa mark (or whatever) pad gently over the top of your paper - try to only hit the embossed raised sections.  Expect to get some in the non raised - but thats what the brush is for!
  • Holding your card by the edge (no fingerprints), pour on (or spoon on) your gold embossing powder.
  • working with your brush, whisk away any embossing powder that is sticking to the background color part of your card
  • using your heat gun, heat the embossing powder until it melts. working along (follow the melt!) until all embossing powder has melted.
  • do not touch the heated embossing pwder - let it cool before touching
  • do not reheat melted embossing powder if you can - it will eventually melt into the paper - heat embossing should be raised off the paper
Front of Card:
3. The squares for the front of my card were cut using a 6-square Precision Die by Frantic Stamper.  I cut one side and then the other

4. I dry embossed the front after I cut out my window panes.


Close Up!

Here you get a really good look at the heat embossing done to the top of the dry embossed leaves.


The label


Hope you try some of these techniques out for yourself!

Take care and see you next time!
Lis