Pages

Showing posts with label New Tools. Show all posts

Monday, May 30, 2016

Three Flowers Card

Items Used:
  • Tonic Verso dies
  • Spectrum Noir Sparkle Pen-green
  • Green gems
  • Drab green organza ribbon
  • White card
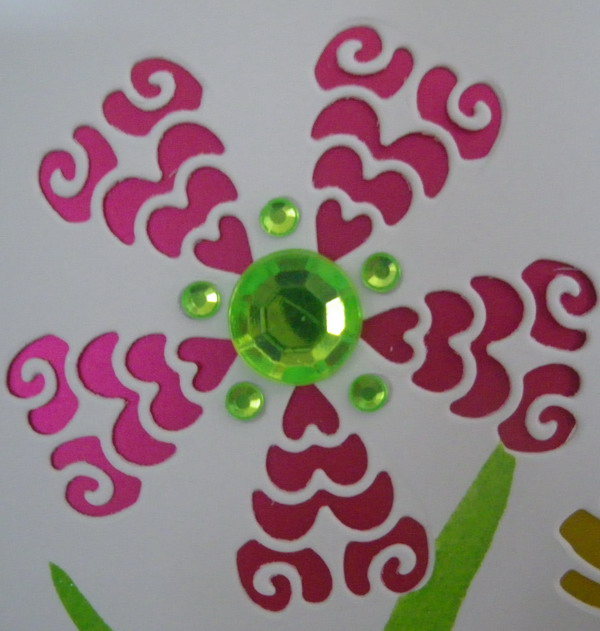
This is actually a brightly colored card.  I think I didn't get enough light on my card to get a decent picture.

I just got some "verso" dies from Tonic.  These are dies that can cut into the paper or cut out something from paper.  I was really intrigued by the former so I got a set from Create and Craft (my new favorite channel to watch).

I cut the flowers into the card and backed them with silk foiled card in different colors. (Tonic gives you an outline die in case you want to cut the flower out and have a die cut.  The dies are fairly intricate.  They cut very nicely.


I didn't do a very good job making leaves though...LOL.  I should have cut some out instead of trying to paint them on.  I have a pretty picture in my mind of what I want to do  - sometimes the hands don't follow the mind!

A last look...

Thanks for stopping by!
Lis

Saturday, February 15, 2014

Perfect Layers Part 3 of 3: Grandmother - A Scrapbook Page

Hi and welcome to another project using the Perfect Layers rulers!  If you want a set, CLICK ON THE LINK PERFECT LAYERS!  Fran carries them!

I am a bit of a tool junkie BUT the Perfect Layers layering rulers are one tool that I would recommend to everyone.  They are sturdy, easy to use, save time and help me to have beautiful results when I do mats.

I decided to do a scrapbook page today.  I found this cute picture of a child that I wanted to use.  I edged it in gold.  The picture is in black and white so I wanted to have muted colors, if any.


I chose a collection of Authentique paper called Autumn.  I matted it the same width on three sides but matted it much wider on the bottom.  As you can see in the picture below, I used the width of the ruler itself to create my very wide mat.  By doing this I created a perfect place for journaling.
 And here is the result.  Cool, yes?

The Authentique paper I used is really pretty. If you are interested you can find it here: Authentique: Autumn Collection - Autumn Three

 I used a piece of dark brown suede paper and matted the picture on it using my Perfect layers rulers.


Then I took some word stickers and journaled on the extra wide mat at the bottom.


I felt that my finished piece should not have a lot going on as I wanted to really accentuate the picture.  I added a single strip of gold glossy that I embossed with some flowers.  I used a border punch to make the ends fancy.

If you look at the photo, you will see that I created an additional mat using my Perfect Layers rulers, using the same papers.  This mat is only done to three quarters of the photo piece.  I thought it looked quite good.  I added some Bakers Twine with a bow and done!

The 12 x 12 paper that I chose for my base page is from Pebbles.  It has wonderful writing about voyages and Ireland. It makes a great background for a page about families coming to the new world.

If you are interested, it is Pebbles From Me to You Collection and the sheet is called Parcel.  You can find it here:  Pebbles From Me to You Collection: Parcel

Please stop by for more projects and ideas using the Perfect Layers rulers!

Lis

Friday, February 14, 2014

Perfect Layers - Part 2 of 3: A Happy Brthday Card

Hi everyone!  Hope that you are all having a great week!  I am very excited to announce that Frantic Stamper is carrying Perfect Layers, a great set of rulers used to create mats with measuring - honest!

If you are interested in looking at them (or picking up a set...:-)  go to PERFECT LAYERS!


I've had a set of these rulers for many years and use them daily on my projects.  It save me a lot of time and my mats look clean and professional.

Today's project is a card that I made for my dad. He's going to be 96 years old in February (not a typo...96). 


I started with a Happy Birthday stamp that I embossed in white detail powder on dark brown cardstock.  I trimmed this up manually.


I wanted a thin gold border around my greeting so I chose some gold ripple holographic cardstock and attached my sentiment with tape.

 I used my perfect layers ruler and created an even and precise mat around my greeting.

I created a second mat around my piece of maroon card.  I stamped "wish" around the border and embossed again in white.

 I added a final layer of brown ripple holographic cardstock, again in a different width.


I mounted the entire thing onto my card (card base is dark brown) with a pattern paper mat. 

The various sizes of mats make the card interesting and fun.

Stop by tomorrow for a scrapbook page!
Lis

Thursday, February 13, 2014

Perfect Layers - a Must Have Tool for Crafters! Part 1 of 3

Hi everyone!  Lis here with an awesome bit of news for you! 
Frantic Stamper is carrying  PERFECT LAYERS! (Click on the link to see them!~)

What is Perfect Layers?  It is a set of "rulers" with which you can make pretty much any size mat you want without measuring!  That's right, no measuring.  I've had a set of the Perfect Layers rulers for more than 8 years now.  I love them, they are very sturdy and easy to work with.

To begin with:  you can get a set of either the 12 Perfect Layers rulers or the brand new "mini" Perfect Layers rulers (these are about 6 inches and the company made them for smaller projects.


Each ruler is made of clear plastic and is labeled on each end with the widths of the mats it makes.  You can use your favorite cutting instrument.  I prefer the orange roller blade but an xacto works fine too.  You will also need a self healing cutting mat.


If you look at the end of the ruler, you will see these edges.  These are what make cutting mats so easy.  You use the ruler by putting it against your photo. The edge of the ruler catches the edge of your paper.  Then cut. Perfect mat.  I have several projects below.


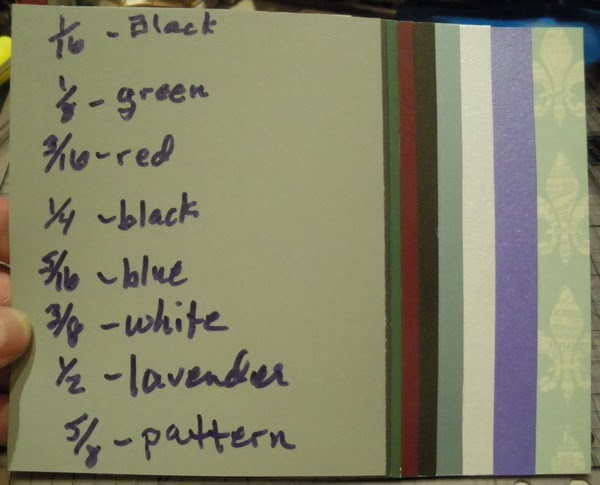
Here are the 8 widths that the two ruler set offers.  Actually there is a 9th - when you use the whole ruler width.

Project 1: Heureuse Fete

I started with an old fashioned picture that I liked.  I decided to create a very thin mat around my picture.  I attached my picture to some gold ripple holographic paper.


I chose the thinnest mat which is 1/16 inch.  If you look at the picture below, you can see that my ruler is against the picture with a 1/16 inch space of gold.
 I held the ruler firmly and cut the gold with my roller blade.

The result is a perfect layer of 1/16 inch.

I cut all four sides of the gold around my photo. A perfect mat - no measuring.

Next I wanted to mat the piece onto pink to match the roses in the picture.  I wanted a larger mat and chose 1/2 inch. 
 I used the same technique as above and voila! A perfect mat, no measuring and I was able to complete the mat easily and in very little time.
 I wanted to add a fancy border so I used a large border punch and added this to my picture.
 For my final layer, I wanted to add some mirrorcard gold.  The rulers work the same with this fancy edge as they do with a plain edge. The trick is to "catch" the edge of the last layer with the ruler - and then cut the next layer.
 Here is the piece cut.
 I decided to cut the corners - and used the perfect layer ruler again for this.

I decided to fussy cut a 1/8 inch border around my finished piece instead of leaving the gold there.  Below is my finished piece.  I will be using it on a scrapbook page.

I have two additional projects using the Perfect Layers rulers. Stay tuned!

Lis

Friday, January 31, 2014

Victorian Birthday Greetings


Hi everyone and welcome to my blog!  I share all kinds of projects here and how to make them, techniques and so on.  I really love cards so I make a lot of them.  If you are interested in another type of project, let me know and I;ll see what I can do for you!

My card today is one that I made for my sister's birthday.  It turned out so nice!  I used an oval die from Paper Wishes (oval doily) and its so pretty! I cut the doily out of grey suede paper believe it or not!  I thought I had gone a little crazy BUT when it came out it was really nice.  I chose grey because I was looking for a more Victorian antiquey look.  I used an ivory card stock for my card base.

There have been some new dies that have come on the market which die cut bows. The gold one I used on my card is one of them. Although I like it very much, it doesnt really replace a real ribbon bow.
As you can see from the inside of my card, I did cut a window oval in the front so that the inside could show through (this die I used includes a shadow die which is so cool.).  I used Anna Griffin papers to cover the inside and a cute Victorian postcard greeting.


Hope you enjoyed my little card!

Lis

Saturday, December 14, 2013

Merry Christmas Trees Card


I just couldn't resist just one more Christmas card with the Frantic Stamper die.  I just love this die. The tree looks so realistic.
I decided on silver glossy and blue snowflake holographic papers for my trees.  The background is a simple splatter design of white and yellow - I forget which brand it was. 
The RIBBON is the next thing I want you to notice.  This is from a DIE.  It is actually a two die set and it cuts ribbon designs. I cut one set in gold glossy and the other set in red suede paper and then layered them. didn't it come out nicely!
The greeting was a dollar stamp from Michaels.

I am just starting to get ready for Christmas. I am just so busy at work (I work full time) when I come home I dont usually want to do much.  My card making is a great stress relief!

Take care, Lis

Monday, September 2, 2013

American Red White and Blue Card with Frantic Stamper Precision Dies


With Labor Day coming, I wanted to create some cards with the new Frantic stamper Mix and Match USA die set.  I love the set. It includes a Bald Eagle, a star, "America", a flag and USA with stars in a block. Just super!

I started out with a bright red card base ( 5 1/2 x 4 1/4 inches) in card stock (of course).  I added a navy blue piece of card stock (5 1/4 x 4 inches). I used the eagle die and cut out my eagle on this card stock.  I also cut out one in gold and one in silver.
To make my eagle:
  1. I turned my blue card stock over to the back side.
  2. I placed the gold eagle die cut in the space and taped it (kind of like iris folding with the folds)
  3. I used the silver cut out pieces from the silver eagle die cut I made to fill in the cut out spots in the gold eagle.  I taped these down too.
NOTE:  I took a brown Sharpie pen and colored the one silver piece over the nose (nares)

Once everything was taped down, I turned over my blue cardstock and there was my eagle! (I wanted to make my eagle stand out so I used gold, and the silver was to imitate the white feather on the head of a bald eagle.)

I cut a piece of Anthem Peace about 1 1/2 x 5 1/4 inches and added it to the bottom of the blue card stock.  Then I added some gold glitter photo corners to the top corners only. I adhered the blue card stock to my card base.

For my stars:
  1. I die cut three stars on a navy blue piece of card stock. (Note that these are shapes cut into the paper and not die cuts in the sense that they are little squares - yet!)
  2. I got out my 1 1/2 inch square punch and turned it over to the back side.
  3. I slid each of the cut out stars into my punch one at a time and punched them out.  I got about a 1/8 inch border.


  4. I edged the outside borders in gold. And I edged the inside star edges in gold also so they would stand out better.

I mounted my stars onto my card using a single square of mounting tape inthe middle of each star. (The card stock was stiff enough that I did not need to add any other mounting tape.)
I finshed my card by adding the word "America" (Included in the die set!) die cut in red foiled card stock to the bottom center of my card.

I hope you enjoyed my card today!

Lis

Tuesday, May 28, 2013

Technique for using the Doily Stamps

I wanted to share soemthing I've been experimenting with.  I really am into a doily phase.  I love all the doily dies, punches and stamps that are out.  I love using gold doilies that you can buy.

So, I have these doily clear stamps.  These are unique to Frantic stamper.  Fran got these remade and is the only company that has any left.  They are gorgeous!

This is the My Mind's Eye Stella and Rose Gertie Clear Doily Stamps.  Click HERE if you want more information. Remember that My Mind's Eye is not producing these anymore. You can only find them at Frantic Stamper.


I took some blue card stock (plain) and, using Versa Mark, stamped a large and small doily all over the paper.  Then I used fine gold embossing powder and embossed the stamped images.

Look at the detail of these stamps!  WOW! (This would be a great back ground for a card all by itself.)

I cut my paper down to 2 x 5 1/2 inches. 

I used one of my corner chompers (any corner punch will do) and added the corner design.   Now I had a tag or embellishment piece for my card ready to go.

Lis

Sunday, April 14, 2013

French Country


I am a fan of Graphic 45. I just love their style.  Today's card uses their newest collection, French Country.  I also used Epiphany Crafts Hexagon punch and epoxy bubbles to create the design below the ribbon.

My girlfriend gave me one of the Epiphany Crafts small round punches and epoxy domes last year I think.  I didn't use it at first and put it aside for quite a while. One day I pulled it out (I don't know why) and started playing with it.  I think I got hooked!  Epiphany also came out with a banner punch which I just love and now a hexagon.  I like that I can use just the punch if I want to.

Close Up!

When I punch, I can see what my punch is going to look like before I punch it (I don't have to turn these punches upside down).  I chose a mix of solid colors and patterns.


I love the lettering here.

Thanks for stopping by.

Lis