Pages

Saturday, December 7, 2013

25


I am all for making things simple during this busy time of year.  My card above took me about 3 minuts to make.  I chose a patterned paper (this one had red glitter on it as accents).  I used a white card base, rounded the corners and added the patterned paper as my card.  The only other thing I did was to cut out a matching piece and mounted it with foam tape to my card (it's the "25").  This worked out really well because the paper had the "25" edged with blue or red.  I cut the red option down so that the blue would show behind it.

Take care!
Lis

Friday, December 6, 2013

Paper Tole Christmas Cards


I wanted to share some paper tole Christmas cards. I don't normally do paper tole (I don't like cutting out all the little pieces).  But companies like Anna Griffin and Hot off the Press are now offering paper tole that is die cut.  All I have to do is punch them out, stack and attach them with mounting tape.  What I like most about paper tole is the three-dimensionality of the piece when I am done.  It's quite beautiful!

Paper Tole starts out with the full image as the bottom layer. There are usually 3-5 layers, each layer is a copy of part of the full image and each next layer is smaller.  As you adds each layer using mounting tape or foam dots/squares, you develop a 3-D design.

The first three designs come from paper tole that I bought at Paper Wishes (aka Hot off the Press).  Paper Wishes offers these foil paper tole which are just gorgeous.

This first card turned out to be my favorite.  I used silver glitter card and tore some white pearl design paper for the "snow hills".  The paper tole snow people are so cute!  The silver glitter card worked out extremely well and looks like its snowing!


My next card is really simple.  I used a white card base, red shimmer paper and white glitter card (fine).  I added the Santa paper tole and that was about it.  It came with its own greeting!

The third paper tole I made was Santa's sleigh.  You would think it would be an easy card but for me it wasn't.  I had trouble visualizing how best to create my card around this one.  I finally settled on what you see below - with Santa pointing toward the greeting which I added.  I think the gold glitter card really helps the sleigh stand out.


My last paper tole card is a little different (and much less sparkly).  Both the paper tole and the background paper are from Anna Griffin.  (HSN sold a package of Anna Griffin Paper Tole - and when they said it was die cut, I jumped on it! LOL!  I really love Anna Griffin's classic style and I knew that her paper tole would be great.)

The only thing I added to my card was a silver star (Tim Holtz Idea-Ology).

I hope that you enjoyed my paper tole today!
Thanks for stopping by!

Lis

Monday, December 2, 2013

Homemade Gift Wrap with Lumiere Paints - Just in time for Christmas!

I would like to show you all a technique that I learned years ago that turns an ordinary paper lunch bag into beautiful gift paper.


First we need to gather our supplies:
  • rubber gloves (not critical but recommended)
  • foam brush
  • 1-2 paper lunch bags
  • a couple of popsicle sticks (to stir the paint)
  • Lumiere Paint by Jacquard in Bright Gold
    • Lumiere Paint can be found at your local art supply store and sometimes at Michael's
  • Neopaque Paint by Jacquard in Black
    • Neopaque has no shimmer or pearl.
  • Spray bottle with water (any kind)
  • scissors
  • a flat place to work & a flat place to let your paper dry

     1. Cut the bottom off your paper bag and cut the side to open it up into one sheet.
    2. Crumple your paper up into a ball.
     3. Open up your paper and smooth it out again. Then lightly spray the front and back with your water spray. Do not get it dripping wet.  A light mist to cover the paper is fine.  It should be enough to get the paper damp.

     4. NOTE:  An interesting thing about paper: the wetter paper gets, the weaker the fibers (conversely the drier paper gets the stronger the fibers). SO - be careful with your paper now - it's wet. Crumple your paper up again after you've sprayed it.  Smooth it out again. (By doing this you are breaking the fibers of the paper.  It makes the paper softer so that when you start using it to wrap your gift or make a card, it will be more pliable.)
    5. Mix up your Lumiere paints with the popsicle sticks.
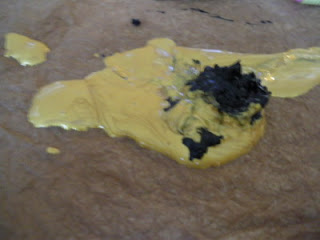
    6. Pour out first one color and then pour out the other color onto your paper. (As you can see here, my black paint is clumpy.  Actually it was really thick when I opened my jar - old jar.  Not to worry, I sprayed some water and stirred it up.  Good as new.
     7. Take your foam brush and spread the paint over your paper.  The colors will mix.  I added some more gold on top of the first coat to add some streaks.
     8. Here is another look at the paper after I finished painting it. After I finished painting my paper, I used a heat gun and dried it (front and back). I'm a little impatient!  You can also let the paper air dry over a few hours. (Once dry, I trimmed the paper edges. Now the paper is ready to use.)
     9. I decided to do two different mixes.  I used bright gold and pearl magenta for the paper below.
     10.  I also took a kanji stamp and placed my dry stamp on the paper to reverse stamp.  With this process, I removed some paint from my paper.  What you see below is the brown kraft color.   I used this stamp to create a design on my pink paper.
     11. And here are my homemade papers, wrapping gifts for my sister's birthday, ready to go! (Although the kanji design is faint, you can see it on the wrap.) The crumpled paper patterns really add to the sheen and texture of this paper.
     12.  Here is a close up of both the black/gold and the magenta/gold papers.
I hope that you enjoyed my homemade gift wrap technique!

See you later!  Lis

Sunday, December 1, 2013

Embossing Techniques

Once I figured out how to heat emboss successfully (I took a class), I really loved it!  My article today is where I started looking at the world through powdery eyes!

I am going to show several projects, each with a different "outside the box" technique.  I now label my particular brand of embossing as "freeform embossing" and that means anything goes! (Note: For all embossing I used Versamark)

1. Gilded


The main punch to this card is the background.  It is gold embossed onto black linen card stock and matted onto gold foil paper which is layered onto a black A2 card base.

The Embossing:
  • Background: 
    • I took my versamark pad and swiped the edge of it at an angle across my card stock (5 x 3 3/4 inches).  I used fine gold embossing powder and heated with a heat gun.
  • Flowers:
    • I took paper flowers and dabbed each one against the versamark pad.  (I rolled the tulips on their sides on the pad also.) I then held the flower by its wire stem and dipped it into the gold embossing powder.  I heat embossed all fowers one at a time so that I could carefully monitor each flower to assure it didn't burn.  There was no problem at all.  I would be very careful about trying this with fabric flowers as the fabric may have a lower melting temperature if the fabric is faux.
  • Cameo:
    • I was going to emboss the cameo a little to enhance the face.  I decided not to.  If I had I would have dabbed the cameo onto the pad and used a paint brush with some versamark ink on it to add some highlights to the edges.


2. For Thought


There are actually two kinds of embossing here. 

  • The Background:
    • I did not use any stencils on this card.  I did use bubblewrap (BW).  I folded it up into a square, dabbed the versamark on one side and used the BW like a stamp.  I added gold embossing powder and heat embossed. It worked very nicely.  Remember that BW comes in different sizes.


  • The Hours:
    • If you look at the queen above, she is gazing at a white metal flower inside a cicrle of roman numerals.  The numerals are embossed with clear embossing powder.
    • I think sometimes this method can be a little forgotten.  I know I do because I like to use gold so much.
    • The trick to embossing with clear embossing powder is using colored ink that will not dry too quickly.  Distress ink is really good for this,  especially now that they have some really vivid colors added to the line.
    • Stamp your image onto your paper with colored ink.  Cover with clear embossing powder and heat emboss.  What always thrills me is when the clear embossing powder starts to melt and reveals the beautiful color underneath!


3. Muse


There are technically two kinds of embossing in this card: dry embossing (the yellow background) and the gold lines on the tag (heat embossing). 

My experiment:
I used a piece of card stock (white) and covered that with CROCO in Copper.  This paint works similarly to the Crackle paint that Range sells.  I happened to want to try this brand out so I used it on this project.  I helped out the cracking with my heat gun.  Once dry, I took a Versamark pen and started tracing the cracks.  I added gold embossing powder.  I was able to brush away the excess powder (there was a lot) using a foam brush.  The powder that remained was in the cracks.  I heat embossed the powder until it melted.

Things to remember: The embossing powder was a little thicker in this porject and took longer to melt so I had to be really careful with the crackle paint beneath.  I did end up with a couple of bubbles which I thought added to my piece.

I started with an A2 sized piece of card stock. Once everything was dry, I cut out my tag choosing the section that most appealed to me.


4. Miss You

My last card uses nature as the tool to create some beautiful textures and images on my card.  I went outside and pulled off a couple leaves (one large and one small-I didn't use the small one on this project but you can see the other card I made using the small leaf on my blog: www.madeforpaper.blogspot.com). I also decided to use a piece of branch from a tree (The image is in silver below).


I used my VersaMark pad and did some test embossing first to decide which side of the leaf I wanted to use to get the best image.  I used the back side.  Then I coated the back of the leaf with VersaMark ink and pressed it gently onto my paper.  I learned that if I press with my fingers I get a fingerprint image also.  I tried a papertowel folded up which worked well.  I was worried about getting the ink on my fingers (you know what happens when you then handle the paper) so I was very careful - but in the end I had to use my hands.

Close Up!

I started by applying the fir tree image across the bottom of my paper and then embossing in silver.  Then I embossed my leaves in gold.  The gold is overembossed (my term) onto the silver.


Here is another good look at the leaves. Didn't they turn out good? (Although I wish that I could have gotten more veining to come through. Next time I will choose a more veined leaf.)

I hope that you enjoyed our little journey through some embossing techniques and that you will try some of these in your art!

Lis