Pages

Sunday, February 24, 2013

Jouer! (Play!)

It is possible that I've put this on my blog before. If I have, sorry!  It's such a fun little card to make -I wanted to share it (maybe again.LOL).

Jouer is the French word for play...someting we should all do now and then.
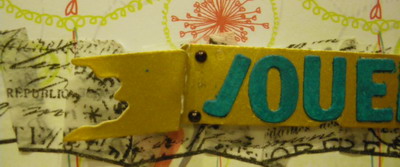
I used some grungeboard scrolls, painted them with broken china distress ink and coated them with Glossy Accents.  I used a fun double sided paper and matted it against glossy gold.  You'll notice that I used some tissue tape across the bottom of my card like ribbon.


Close Up!

I saw the little fold technique in a magazine I think.  Using double sided paper and this technique really adds interest to this card.


I love Tim Holtz's die (who doesn't?).  This is from the banner die.

Thanks and stop by again!
Lis


Saturday, February 23, 2013

Carte Postale

Today's card features a window that I made using Frantic Stamper Precision Dies (Click HERE to find out more).   I like these dies because its so easy to make windows. I don't have to measure too much! And thats always good.


Close Up!

I really like the gold embossing against the dark brown cardstock.  I used to really struggle with embossing - I didnt really know what I was doing.  Then I took a class and Im much better at it now!


I hope you enjoyed my card. Come back again for more inspiration!

Lis


Sunday, February 17, 2013

White on White Valentine's Day Card

Who said Valentine's Day cards had to be red?  I had just gotten a Martha Stewart punch and was dying to try it out.  I was participating in a Reader Art Quest for white on white cards and decided to try my hand at a white valentine.


Close Up!

I added the clear crystals to the punched hearts.  It looks like it took a long time but it really was easy and fairly quick.

The hard part was adding the mounting tape on the backs of the hearts so that I could lift them off the card (I wanted the pretty checkerboard pattern to show well.) Yikes!  That was something. Once I figured out how thin to cut the strips it was faster.  I love 3M!  It's the easiest mounting tape to cut and my scissors never get gunky,


I hope you enjoyed today's card. Stop by next week for more inspiration!

Lis

Saturday, February 16, 2013

White on White Cards

Today I would like to share with you some more photos of my white on white card that is on Unruly Paper Arts.  Enjoy!


Close Up!

The flowers are from thin dies from www.paperwishes.com. I used mounting tape to give them more dimension.  I added Liquid Pearls in the center (White Opal). 


I wanted a lot of texture so I embossed two layers then added the swirls and flowers.

You can see both layers of embossed white cardstock.  Don't you just love this ribbon? I'm normally not a fan of dotted ribbon but this was so pretty.


I hope you enjoyed my pics. Come back to morrow for a white on white valentine's day card.

Lis

Wednesday, February 13, 2013

Carte Blanche - White on White Cards

As a columnist at Unruly Paper Arts, we have Reader Art Quests.  The Moderator chooses a topic and we provide some samples and then readers also add their creations.  Today it is Carte Blanche or white on white cards.  You can join me this weekend as I share another white on white card!
You can click HERE to see all the wonderful creations at Unruly Paper Arts including my card.

Here is a close up of my card.


See you at Unruly Paper Arts!

Lis

Sunday, February 10, 2013

23 Degrees West - An Embossed Ribbon Card

(How I love steampunk) I used the same embossing folder for my card as for the purple ribbon at the bottom of my card.


Close Up!

You can get a good look at the embossed pattern on the purple ribbon.

  (I used Vintaj Patina paints on my brass charms - from Ranger)


Well, there you have it. My take on ribbon.  I've only just scratchecd the surface.  I hope that I've inspired you to try your own ribbon style!

Lis

Saturday, February 9, 2013

Le Chat Elegant - an embossed ribbon card

Le Chat Elegant (the elegant cat)

The cat was punched out of black glitter cardstock.  The embossed ribbon just makes this card. (Please see yesterday's instructions for ribbon embossing technique).


Come back tomorrow to see another card project with embossed ribbon.

Thanks for stopping by,

Lis

Friday, February 8, 2013

Embossed Ribbons - a Technique for Ribbon Junkies

Cards with Embossed Ribbon

Yes, you read right, embossed ribbon.  First let me take you through the steps to this very easy way to "decorate" your ribbons.

1. Get an embossing folder.
2. Put your ribbon in the folder (remember the Tim Holtz trick of cutting the top middle out? You can do this and feed the ribbon through embossing lengths of it if you need more tha the length of the folder itself.)
3. You will need probably 2 pieces of cardstock as shims.
4. When you are turning your crank and sending your sandwich through your machine, turn the crank slowly and make sure to go through twice (I go up and back).
5. You will end up with some really pretty embossed ribbon.

I tried this with a thicker ribbon, organza, and a cheap (reallly cheap) thin (and cheap) ribbon I got (you guessed it) CHEAP.

Here are the amazing results.

I used a clock embossing folder here.  Its easy to see the difference between the unembossed left side and the middle ribbon. The right side - organza ribbon is also embossed with the same pattern. It was hard to get a good picture so that you could see the embossing.  It is there, I promise you. I really didnt think that the organza would work because its so thin. Im glad that I tried it!

 This is another pic of the organza far right not embossed and the organza 2nd from the right embossed.

Here is another pic of the embossed organza.  You can pick out details of the embossed clocks.

 This was a plastic ribbon.  The right one is embossed with swirls.


 This is the SO CHEAP ribbon (Its in the Guiness Book!).  The middle ribbon is the unembossed piece.  The ribbon turned out beautifully.


Drop by again tomorrow as I share the first of two cards with embossed ribbons.

Lis


Tuesday, February 5, 2013

Rose Ribbon Card

This card is made entirely out of ribbon.  The card base is kraft cardstock.  To make my card I coated the cover of my card in xyron glue.
  • The rose ribbon I'm using is 3 inches wide.  I cut the wire edges off and laid the ribbon down, trimming as needed. The rose ribbon is very satiny feeling so my card will have a neat feel to it.
  • I added
    • 3/4 inch red line tape about midway on the card.
    • the lace ribbon to the lower half of the red line tape.
    • the mauve ribbon to the upper half, creating a fold as I went.
  • I chose to fold the end to the back but trimming at the edge would work too.

To make the bow:
You will need:
  • 1/2 inch and 1/4 inch ribbon
  • 1 x 6 inch length of the 1/4 inch ribbon
  • 1 x 12 inches of each 1/2 and 1/4 inch ribbons
  1. 1. Take a length of 1/2 inch ribbon, leave a tail about 3 inches long pointing toward the floor. Wind the ribbon about 3 times around three fingers (I used my right hand) and allow the second tail to point up to the ceiling.  Now here's the trick - you have to set it down so that you can make the second part of the bow - so set something on it heavy to hold it, use a clip or a husband. 
  2. Follow the same procedure with the 1/4 inch ribbon.
  3. Put the thinner ribbon on top of the thicker ribbon.
  4. Tie them together with the piece of 6 inch thin ribbon.
  5. Fluff and arrange as needed.
 Close Up!

Love the red on black faux cameo (I'm in a cameo phase...)


I hope you enjoyed today's card.  Stop by next weekend for another ribbon project!

Lis

Monday, February 4, 2013

Scrapbook Page with Lattice Ribbon

Hi and welcome!

Today I'd like to share a scrapbook page with ribbon accents.

I found this pink lattice ribbon at Costco of all places (you never know what you're going to find).  I really loved the pink color and the lattice design.


Close Up!
I love the butterflies and flowers as embellishments on this ribbon.  For a different look, you could weave leaf ribbon through the lattice (or just attach with hot glue or glue dots) on a card.  Wouldn't ladybugs look cute?


Note: I broke a cardinal scrapbooking rule making this page as the ribbon is not acid free.  I will use only photos after 1980 on this page.


Come back tomorrow for more Ribbonry!

Lis


Sunday, February 3, 2013

Ribbon - Some Information

Ribbon....wow...where do I start?  Well, I love ribbon, as I am sure many of you do.  We all make bows to add to our projects.  I decided that I would share some ideas on how I use ribbon and share tips and supply suggestions along the way.

Ribbon comes in all kinds of materials these days. Satin, sheer, lace, crochet, grosgrain, burlap, felt....it's amazing. 

 Supply:
1.Fabric Barn. 
They have an incredible selection of ribbons for incredibly low prices.  You might want to see if there is one located near you. It's worth investigating.  Take a friend who can drag you out of the store. 

2. Costco/Sam's Club
You would be amazed at the variety of ribbon you can get here. Most of this is 2 inches + wide and wired BUT there is amazing variety of color, material and texture.  Get a group together and share the cost and split the rolls.  Think about using this extra wide ribbon to use for die cuts and mats.

3. Online! These are my three favorite places.
www.franticstamper.com has a large selection of ribbons from May Arts (my FAVORITE - check out the crochet trim) and Maya Road. She also carries bakers twine.  Again, have a friend who can push the off button on your computer after the first couple of hours.
  • What makes this site so great is that Fran carries pretty much all the different colors of each style so that I'm not limited to a single color.  Also, if I really really want a lot, I can get a quote for a whole roll which is great.
  • Also where I got my cameos.
www.skybluepink.com is a great site to buy ribbon for "non fancy prices" (that's their motto).  They don't carry everything but there's always a good buy.

www.reallyreasonableribbon.com has a great variety of ribbon and has a ribbon club. You get a monthly assortment of ribbons in this club.  It's great to be able to try out new ribbons without a big commitment.

4. Alternatives
There are all kinds of supplies in our stashes that can be used for ribbon. Paper strips, tissue or washi tape, suede paper, scotch tape (put it on some paper, pull it off and voila - ribbon!), fabric strips, even paper towels (dyed of course) - I could go on and on.

Stop in tomorrow for a scrapbook page with ribbon accents.

Lis


Saturday, February 2, 2013

Karma ... an ATC


I really like ATC's. They are such little works of art. I am always surprised by how unique each piece is that I see when Im online or at a trade.

Today's ATC is called Karma.

I used some sticky canvas from Ranger as my base.  I used distress ink (kind of looks like this atc has been in the mud!).  Under the star pin and the infinity sign (actually an "8" sideways....well I was desperate~!) you can kind of see a hand.  I have this hand stamp with symbols on it.


Close Up!

I really like Tim Holtz' brads that you can make.  I love the designs.  I actually used Halloween letters to spell out Karma.


I'm always looking for unique pins.  This one is a plastic star...very pretty.


I love keys and key holes.  This is a small stamp but very ornate.  It's not very clear because I stamped it onto canvas.


Thanks for stopping by!

Lis


Friday, February 1, 2013

Beautiful Valentine


Hi everyone!  Today's card is a Valentine Card.  The paper I used comes from BoBunny Love Letters.  I got the 6x6 pad so the patterns are quite a bit smaller than the 12x12 version and just right for my cards!

I normally use satin ribbon for my bows but I decided to do something different this time and went with brown netting ribbon.  I think it goes perfectly with the old timey papers.


Close Up!

I really love the Archival ink in Crimson.  The colors are muted and seem to hint at Victorian times.  I also really like the label (Hero Arts). The size is perfect for my A2 card.  And lastly, don't you think these two love birds are just too cute?


I bet you are making cards for your loved ones on Valentines Day!

Lis