Pages

Sunday, January 27, 2013

Love Banner


Hi everyone! Happy whatever day you are in!

Today's card is a simple card using washi tape as banners. (To get the perfect cut, I folded the non sticky sides together and cut a "v".)

My base card is a mauve cardstock from Kelly Paper (You should try them sometime.  You'd be surprised as what you can find there.)  I added a mat of K&Company patterned paper outlined in silver.

I added the washi tape banners to the left. (Can you believe these are from Michaels?)  The banner on top of everything is from BoBunny.  It was a sticker that I cut out. So cute!


I used two ribbons on my card. The first one was a black striped ribbon which I laid flat and attached with glue dots.  I added an ivory ribbon with a bow on top of it.


Thanks and see you again next week!

Lis

Saturday, January 26, 2013

My First Valentine Card of 2013!

Hi everyone and Happy Weekend to you all!  Today's card is a white on white card that I will be sending to my sister (she's already asking if Ive started making valetine cards already....).

Everything is on white cardstock (Sorry about the color in my pictures. I know it looks more ivory but the card is white...LOL).

I wanted to do a layer on layer card so I started out with an embossed white background and added my punched hearts.


Close Up!

Don't you just love this heart punch?  It's a Martha Stewart.  I added another heart behind the big one.


Go to Unruly Paper Arts on Febraury 13 (click HERE) for a Reader Art Quest called Carte Blanche.  Also come back to my blog on Febraury 16 and 17 to see a couple more white on white cards!

Lis

Sunday, January 20, 2013

Perfumerie

This was such a pretty card to make.  Although it took some time to color and cut, it was worth the time.

I used FranticStamper's French stamp line ALADINE (click the name to take you there) "Perfume".  Although the stamp is a long one, I cut the stamped image and layered it as you see below.


Close Up!

I colored the bottles with two different colors of distress markers. 


I added the "98" in gold pen.


Come again soon!

Lis

Saturday, January 19, 2013

Pink Paris

I love to use non traditional colors on cards.  I'm not sure if pink is non traditional for a Paris card but here goes! LOL

Almost everything is pink on pink:  pink card base, pink mat, pink pearls.  I layered an image of the Tower without matting it first and layered the other images on top.


Close Up!

I love the way the pink pearls turned out! I used three different sizes. (The 2mm pearls are hard to find!)


Come again soon! Lis

Friday, January 18, 2013

A Door in Paris

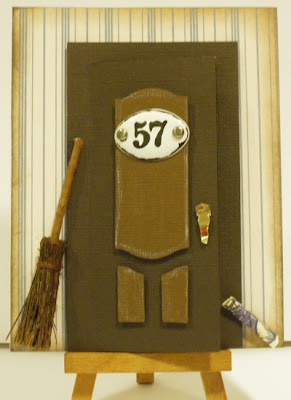
Today's card uses a Sizzix die that I discovered. A door!  I really love it!  One tip - only run through one piece of cardstock at a time or you will end up cutting where you want to crease.

I wanted the front of my card to look like a door in a hallway.  I added a broom and a rolled up paper.


Here is the inside when I open the door- the Eiffel Tour.  The inside of the card has a greeting.

Close Up!

The broom was originally purchased for Halloween and had an orange tie around it.  I dyed this with walnut stain and it came out really well.

The white you are seeing is from the Picket Fence distress marker.

I hope you enjoyed this door card. It was fun to make.

Lis

Thursday, January 17, 2013

Une Poire de Paris

Bonjour Mes Amis!  Bienvenu a l'edition Parisienne!


I was looking through my inks the other day and ran across my Luna Lights Paints.  I thought this would be a nice tutorial.  Luna Lights are metallic shimmer paints. (This technique can be used with other paints also as long as they are not too thick.)

This technique creates a background that can then be used on cards or whatever you desire.

First, the materials!
  • I am using glossy white cardstock.  The glossy has a slick surface that helps the process.
  • Luna Lights Paints
  • A painters brush and a metal spreader (scraper thingie....not sure what the correct term is.)


1. I used two white glossy sheets, each 5 1/2 x 4 1/4 inches.  I dripped the colors onto one piece of cardstock (shake the bottles first!).

2. Take the clean cardstock and put it on top of the first one.  Rub them together swirling around (not too tightly though as you want to move the paint around, not mix it together or squeeze it out the sides).
3. You can either slide the top piece off the bottom piece or pull one off the other. Each gives you a different pattern.
 4. Dry with a heat gun.
 5. Add a large drop of the third color (blue in my case). Spread it from right to left with the spreader metal thingie.
 6.  Dry again with a heat gun. (Not to hot otherwise it will bubble - unless that is what you want - another interesting pattern/texture).
 7. I put a large drop of silver on my craft sheet and used a brush to paint swirls.
 8. Done!
 9. I stamped a pear image with StazOn black onto the background and then cut out my pear.
 10. Now for my card - I punched out three of these borders in gold foil.

11. I attached them with glue stick to an ivory mat which had been embossed.  I attached my pear with mounting tape.  I added blue pearls and a gold tassel to finish.


I haven't tried this technique with Lumiere paints yet but plan to.  I hope you try this!

Take care and see you next time!

Lis

Sunday, January 13, 2013

Letters Home - a Collage Card

I really love collage.  I think sometimes its so tempting to go too far adding things...LOL! 

I like the lines of this card.  Some of the papers I used had these zebra lines on them.  I kept them and also added a couple of lines of jewels.
I tried to tell a story with this card of travel and discovery.


Close Up!

These are letter brads.


I really love maps. Its hard to see but I added some small jewels here.

Thanks for stopping by!  Come again soon!

Lis

Saturday, January 12, 2013

"2" - a Collage Card

I wanted to do another collage card and picked out some scraps of papers from my stash.  I wanted to use some brass charms also and picked out an angel wing and glasses. 

The card came together easily (I wish they all did).  I used one of Tim Holtz' sizzlits strip dies to make the flourishes.  They really turned out nice in gold foil.


Close Up!

I lvoe these little brass charms!

Grungeboard and grungeblocks.


Thanks for stopping by!

Lis

Friday, January 11, 2013

Elegant lady in Washi Card

As you know, washi tape continues to be hot.  Personally I LOVE it! 

The card has two layers of washi tape. 
  • The first layer I used different patterned colored tapes on a mat.  For my second layer I used a black and white translucent tape.
  • I added the torn washi paper in the middle.
  • I added a punched circle of light blue stardream paper behind the head of the woman because the pattern was swallowing her up.
The Lady:
  • I stamped the lady onto white cardstock in StazOn black. (Take a look at Fran's own stamps - www.franticstamper.com - she has a number of Erte images.)
  • I colored in Spectrum Noire
  • Then I carefully cut out the image and attached it to my card with mounting tape.


Close Up!

I love Erte (accent on the last "e").  He was a French artist.  Once you are familiar with his work, you will recognize the style.  It's unique.

I added the pink pearls using a Viva Decor paint pen.


You can really see the two layers of washi tape.

I hope that you are inspired to try two layers of washi on your next card!

Lis

Sunday, January 6, 2013

NEWS: A Little Journal using Authentique Renew Collection

Don't you just love little journals that you can put pictures and little memorabilia in? (Yes, I own a smashbook!)

Today I'm sharing a little journal that I made for the new Year. It's called NEWS.   I wanted something that I could have to fill up each month and send off to my dad so that he can keep up with all the news about me.  So often things happen and time flies so quickly that I never make mention of them . This way I;ll be sure to have a little news for my dad each month. He will enjoy leafing through the journal and discovering what I've been up to!


Close Up!

I love the index folders that Authentique gives you.  It's a nice place to scrap some pics or write a thought.


These are also cute - they are like recipe cards with tabs, double sided.


There is one sheet of nothing but numbers.  The numbers are darling - giving variations of each from the number to spelled out to stylized, like "one" below.


This is one of the cameos that Frantic Stamper carries.  Just beautiful!


There is a sheet of sayings and the "four" below is from the number sheet.


I hope that you enjoyed my Authentique cards, home decor and journal.  Have a great day!


Lis