Pages

Thursday, February 13, 2014

Perfect Layers - a Must Have Tool for Crafters! Part 1 of 3

Hi everyone!  Lis here with an awesome bit of news for you! 
Frantic Stamper is carrying  PERFECT LAYERS! (Click on the link to see them!~)

What is Perfect Layers?  It is a set of "rulers" with which you can make pretty much any size mat you want without measuring!  That's right, no measuring.  I've had a set of the Perfect Layers rulers for more than 8 years now.  I love them, they are very sturdy and easy to work with.

To begin with:  you can get a set of either the 12 Perfect Layers rulers or the brand new "mini" Perfect Layers rulers (these are about 6 inches and the company made them for smaller projects.


Each ruler is made of clear plastic and is labeled on each end with the widths of the mats it makes.  You can use your favorite cutting instrument.  I prefer the orange roller blade but an xacto works fine too.  You will also need a self healing cutting mat.


If you look at the end of the ruler, you will see these edges.  These are what make cutting mats so easy.  You use the ruler by putting it against your photo. The edge of the ruler catches the edge of your paper.  Then cut. Perfect mat.  I have several projects below.


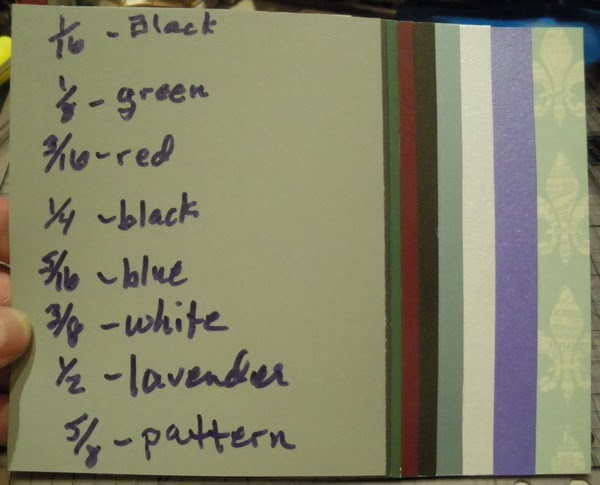
Here are the 8 widths that the two ruler set offers.  Actually there is a 9th - when you use the whole ruler width.
Project 1: Heureuse Fete

I started with an old fashioned picture that I liked.  I decided to create a very thin mat around my picture.  I attached my picture to some gold ripple holographic paper.


I chose the thinnest mat which is 1/16 inch.  If you look at the picture below, you can see that my ruler is against the picture with a 1/16 inch space of gold.
 I held the ruler firmly and cut the gold with my roller blade.

The result is a perfect layer of 1/16 inch.

I cut all four sides of the gold around my photo. A perfect mat - no measuring.

Next I wanted to mat the piece onto pink to match the roses in the picture.  I wanted a larger mat and chose 1/2 inch. 
 I used the same technique as above and voila! A perfect mat, no measuring and I was able to complete the mat easily and in very little time.
 I wanted to add a fancy border so I used a large border punch and added this to my picture.
 For my final layer, I wanted to add some mirrorcard gold.  The rulers work the same with this fancy edge as they do with a plain edge. The trick is to "catch" the edge of the last layer with the ruler - and then cut the next layer.
 Here is the piece cut.
 I decided to cut the corners - and used the perfect layer ruler again for this.

I decided to fussy cut a 1/8 inch border around my finished piece instead of leaving the gold there.  Below is my finished piece.  I will be using it on a scrapbook page.

I have two additional projects using the Perfect Layers rulers. Stay tuned!

Lis

Tuesday, February 11, 2014

Elegant Blue Valentine


Elegant Blue Valentine (February Challenge)
by Lis Whiting

I've been using a lot of suede paper in my work lately.  Today's challenge card uses a royal blue suede paper and gold accents for a dramatic and elegant card.
I started with my base card which was white card stock. I thought this would really show off the blue suede paper.  Since I am working with an A2 card, I cut my suede paper to 4 inches x 4 3/4 inches. Then I used the Dazzling Diamond Border die from Frantic Stamper to die cut the border design at the bottom.  Then I used another die (also Frantic Stamper) to cut the window.  I really love this die!  I don't have to worry about making sure everything is straight because this one die cuts out all four windows with no problem! 
First, I turned over my blue suede paper and used Red Line Tape in 1/8 inch thickness (it fits perfectly between the window panes) to adhere a 3 inch x 3 inch piece of transparency to the back of the suede.
I used Bo Bunny and Carta Bella papers and punched 1 inch pieces (four) that I then glued to the back of the transparency - the pieces show through the front window. (I used the red line tape again). 
I attached the blue suede paper to my card and embellished with gold Dazzles stickers and a fleur de lis punch in gold foil.


Products used: