Pages

Thursday, March 31, 2011

Visions and Dreams Book

I love to make little journals and books. I think it's exciting to turn each page and see what is on the next page.  I like to add little doors to open, little cubbys to put stuff in, little drawers to pull out.

The little book I made for today does not have all the extras that you might find in one of my bigger books, but it has some very pretty pages that I decorated with Alice in Wonderland papers from Graphic 45.

I started with a pre-made book that had a scalloped design. 


I glued two inner pages together for strength and ended up with 4-5 total pages to decorate.  To cut the papers to fit onto the pages, I made a template from one of the inner pages and used it to trace the page shape onto the papers that I was going to use.

Here you can see that I used a lot of ribbons for the spine of the book, weaving them in and out of the wires.


This is the front of my book.

 And this is the back of my book.  I covered the back with Tim Holtz tissue tape.  That's all I used.  Looks good, doesn't it?

Here is another look at the front and back together.


Here are the pages to my little book.  I did leave the centers undecorated.  I may put ribbons on the inside rungs also.  My books tend to be a work in progress.


I used miniature classic art stickers and framed them.

 And I decorated with punched out Fleur De Li's in blue glitter paper.  I edged all the pages and covers with a gold paint pen for a finished look.

I added a french page and even added a white feather!  The purple shield with the Eiffel tower and "PARIS" is actually a paper clay mould I did.

I used little acrylic gems here.

I left the last pages blank.  I just liked the way they were.


Here are a couple of close ups of some of the details.


I hope that you enjoyed today's little book of mine!


Tuesday, March 29, 2011

Cameo Cards

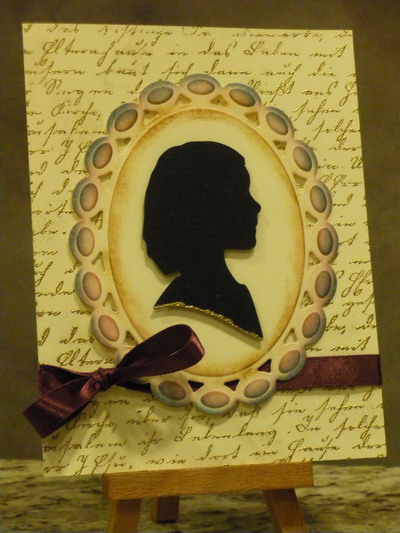
I love cameo silhouettes. I can imagine a Victorian home with a silhouette done in black paper and hanging on a wall in a gilded frame. The Cricut cartridge Heritage has a number of these cameos that can be cut out in pretty much any size you want.  I wanted to use these and thought about making some cameo cards.


First, I want to show you the background that I did for these cards.  I made an ivory base card by folding a piece of ivory cardstock (8 1/2 inches x 5 1/2 inches) in half to make my invitation size card.  I took a writing stamp and embossed the front of my card in gold.  It was so pretty by itself that I decided to share these pictures of it.  This makes a really great card all by itself.  AND it makes a great base card that you can use for so many card styles.


Heat embossing is a wonderful and elegant addition to any card or scrapbook page. It does have its tricky parts though.  If you don't emboss it enough, you get parts of the powder that aren't melted and they look brown. If you emboss too much, the melted embossing sinks into the paper and you don't get the raised relief you want which is the object of embossing in the first place.

Here are a few tips:
  1. FOLLOW THE MELT.  Don't wave your heat gun back and forth over the piece you are embossing.  You won't get an even melt and you will get patches that don't melt.  Start at one corner or edge and follow the melt.  You will find that you will get better results.
  2. Don't go over already melted (embossed) areas. 
  3. If you do miss a spot, turn your heat gun on (point it away from your piece), THEN POINT AND HEAT THE SPOT QUICKLY, see it melt and take the heat gun away.
  4. Emboss in the the light. Use the dull and shiny embossing to guide you to where you need to point your heat gun.
  5. FOLLOW THE MELT.
This is a close up of the embossing. (For those of you who speak German, you will recognize the old Schrift. It's beautiful, isn't it?)


I purchased the Beaded Ovals set from Spellbinders (Wizard dies).  I've been wanting to use them and when I looked at the design, I naturally thought of cameos. So, this is what I used to cut out the backing that I put the cameos on.  For the card below, I used Victorian Violet, Broken China and Vintage Photo Ranger dye inks to color the beaded oval.  Both the oval and the cameo are attached with mounting tape to give depth.


I used a dark Burgundy ribbon because many of the colors of the Victorian era were darker colors. 


I used a smaller cameo and beaded oval for my second card.  I used Weathered Wood and Pine Needles Ranger dye ink for the coloring here.  The ribbon is a hunter green, again dark.  (My Great Aunt Mabel had a sewing machine that my sister inherited. It was a treadle machine - not uncommon.  BUT what WAS so very interesting was that she had all the spools of thread that she used still in there.  My Great Aunt was 94 when she died and that was in 1965 or thereabouts, so she was a young woman in the 1800's.  The spools of thread were dark silky colors - very beautiful.)


You may have noticed that I embossed the bottom of each of the two cameos.  I thought this would be a pretty accent that would tie it in better with the card.  I used the direct to paper technique to accomplish this.  It gives the finished piece a little bit of a rough-edged look which I like.


For my third and final card, I decided to use a smaller beaded oval and add an initial in gold glossy cardstock.  The nice thing about the Spellbinder dies is that they come in sets of 5 or 6 and they are incremental in size. So, making graduated die cuts is easy.


I used a coppery, rusty colored ribbon for this card, It is the only color on this card other than the gold and ivory.


In this close up, you can see how I embossed the edges of the small beaded oval.  I used the same direct to paper technique to accomplish this.  I did not worry about being exact or neat.  I wanted a more worn look.  It is easy to take a paint brush and get a much more finished look if you want one.


I hope that you enjoyed these cards today.  I encourage you to try heat embossing with powder if you haven't and if you gave it up, try it again.  It's a beautiful addition to any card.