Pages

Sunday, April 21, 2013

Painted Flowers on Suede Paper


Today I'd like to share a technique that I used on the above card.  (Please also look for another card using suede paper on Frantic Stamper's Blog.)  The centerpiece to my card is the purple suede paper.

Suede paper is really luxurious!  It is soft and "suede" feeling to the touch and comes in all kinds of colors. I love the jewel tones best of all.  I embossed my suede paper first and then used Twinkling H2O's to color the leaves and petals.  I used Pink Azalea and Irish Mist in Twinkling H2Os.

To create my card I also embossed a small print flower pattern on purple and pink card stock.  I cut both pieces down to 5 1/4 x 4 and then cut those from corner to corner. I matched two different colors up to make this card (and I have another set for another card!).  I edged both the suede paper and the outer edge of my card base (which is in blue) with gold line dazzles.

Close Up!

Here is a close up of the painted flowers. This doesn't do them justice.  The shimmer of the Twinkling H2O paints shows quite nicely on the suede paper.  I used an Opal Paint Pen from Viva Decor for the center of my large flower.

Here you can see how I put my card layers together and the gold edging.


And another shot of my card.

I hope you enjoyed my card today.  I hope you try out some suede paper. Frantic Stamper has sampler packs.  If you do, I bet you use it a lot!

Lis

Saturday, April 20, 2013

Gems and Rose Card


I was at a scrapbook show last year and saw these really neat gem sheets (real dazzlers!).  So of course I had to get a couple for myself.  I've saved them for just the right card and here it is.

The sheet was really easy to cut down with scissors and it has a sticky back so all I did was peel off the protective sheet and lay it down. It was very simple.  I added the rose because I thought the front was a little plain (can you imagine with all that bling?)


Close Up!

You can really see the gems in this shot. They are all faceted across the top, very pretty.


 This is the inside of my card. I had an extra piece and so I decided to use it this way.
 Do you like the rub ons and the label I made? The little accents are Dazzles.
Thanks and come back again soon!
Lis

Sunday, April 14, 2013

French Country


I am a fan of Graphic 45. I just love their style.  Today's card uses their newest collection, French Country.  I also used Epiphany Crafts Hexagon punch and epoxy bubbles to create the design below the ribbon.

My girlfriend gave me one of the Epiphany Crafts small round punches and epoxy domes last year I think.  I didn't use it at first and put it aside for quite a while. One day I pulled it out (I don't know why) and started playing with it.  I think I got hooked!  Epiphany also came out with a banner punch which I just love and now a hexagon.  I like that I can use just the punch if I want to.

Close Up!

When I punch, I can see what my punch is going to look like before I punch it (I don't have to turn these punches upside down).  I chose a mix of solid colors and patterns.


I love the lettering here.

Thanks for stopping by.

Lis

Saturday, April 13, 2013

Lost - an ATC

Sometimes it takes very little to make an ATC.  It's really all in the message.

I started with a piece of black cardstock which I ran through my corrugator.  I added a border punch and a label with a single word.  The only other thing I added was the letter. (Oh yes, and the single bling in the lower right.)


Close Up!

I love this little letter embellishment.

Thanks for stopping by.
Lis

Tuesday, April 9, 2013

Journey and Discover - Metal Accents


First, I love metals.  Gold, Silver, copper, brass, bronze, aluminum, colored foils, shiny, sometimes mat or frosted - I love it all.  And I especially love to make my own metal accents for my cards.

The biggest supply of metal that I have is in my refrigerator (no, I'm not talking about melting it down...)... It's my soda cans.  These beautiful aluminum marvels can be converted into the perfect thickness aluminum to be used in art. 

There are many other sources of metal including:
  • At your hardware store - aluminum tape - and it's even adhesive on the back
  • In your kitchen drawer - aluminum foil
  • At the craft store under stained glass and jewelry making (wire and copper tape)
So back to my soda cans: (sorry Pepsi people)

 Look what a nice inside I have!
  1. I used my regular large scissors to pierce the side of the can near the top, then cut around the can to remove the top. 
  2. I cut vertically down the can's side until I got to the bottom, where I cut around the can again to cut away the bottom. 
  3. This metal is very sharp.  Be careful - and you may want to use gloves.
 I used Tim Holtz Tattered Flowers Sizzix die to cut these.  I only cut only sheet at a time but I found you can easily cut two sheets at a time too.
 It's easy to mold these metal flowers with your fingers, a pen, whatever.

 So, what to use to color these pretty flowers?
  • Ranger Distress Paints (It looks like old enamel when dry.)
  • Ranger Alcohol Inks
  • Stamp with Staz On or Archival inks
  • If you are into encaustic wax, you can melt colored wax on them.
  • Don't color them, emboss them!
 Close Up!

The flowers and leaves are metal. 
  1. The leaves have been embossed using a gears embossing folder, then colored using the Ranger Distress Paint.
  2. After I coated the leaf, I used a paper towel to wipe off the excess. 
  3. You can either use a heat gun to dry the colored metal (again, be careful =- remember you are working with metal - when you heat it, it gets hot.
    • OR - you can let the pieces dry overnight. (It doesn't take this long to dry naturally - I just left it overnight because I didnt have any more time that evening.
    • I did both and there is no difference. 
  4. The color stays in the embossed parts and colors the metal overall.
  5. After the flowers were dry, I was able to bend them with abandon!  No chipping or breaking of the paint! Yea!

I used glue dots to adhere the acrylic gems to the flowers and also to adhere the flowers to the card.

 I used a silver foiled cardstock for my banner.

I hope that you try your own cards with metal accents made from soda cans!
Thanks for stopping by!
Lis


Sunday, April 7, 2013

Two ATCs: Mom and a Buffalo

I have some handmade papers and wanted to use them in some ATCs.  The paper I used for my first ATC is a burnished gold with a small flower detail.  I added the purple cardstock (it's glimmer) as an accent.

I added an embossed hexagon with a steampunk element and a tag with a buffalo on it (What can I say? I like buffalo.)


Close Up!

I used a rub on to add to my background.  I also used the new Viva Decor Pearl Pens for the pearl dots.

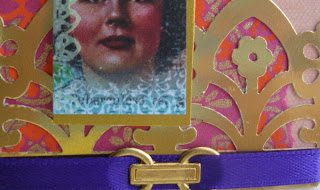
This is my second ATC.  My mom passed away a couple of years ago.  This collage picture reminds me of how she looked when she was younger.

I used a pale pink cardstock and some handmade paper in bright colors.  I added the gold punched border and a small embellishment at the top.

I like the way the brass ribbon slide looks against the royal purple.

Come back again next week for some more ATCs.

Lis

Saturday, April 6, 2013

Time Flies - a Steampunk Card

I've been working with embossing folders and metals lately and wanted to use them in a card. I also had some odds and ends and wanted to challenge myself to make a card using them. 


Close Up!

I've had this die cut label for months. (It was blank and cut out of white.) I decided to stamp it with  a pocket watch and then with newspaper print. I wanted part of my dial to be blank so I made a mask to block off part of the clock face.  I have these large acrylic bubbles and I used one on the clock face which magnified it.
The label looked too busy when I finished stamping so I outlined it in silver to tone down the type.

Instead of covering my card completely with the metallic tape, I used two strips, one at the bottom and a thin strip at the top.  I then embossed the whole card.  I used the new Ranger Distress Paints on them, wiping away most of the color except what stayed in the embossed parts.

This angle really shows the dimension of the card.


I hope you enjoyed my card. Come back again soon.

Lis


Wednesday, April 3, 2013

Flower Pot Cards


If you are interested in how I made these cards, please see my tutorials.  You can access them by clicking on the tabs at the top of my blog. Thanks!  Lis

Monday, April 1, 2013

Easter Hare ATC

I have an ATC for Easter that I would like to share. 


Close Up!

I added some little flowers behind the grass and a big red heart! I hand cut the grass.


Happy Easter everyone!
Lis