Pages

Sunday, March 6, 2011

Mardis Gras Cards

Hi everyone!

Happy Sunday to you all. I hope that you are having a great day.  The weather in southern California today is really nice. I can smell Spring in the air.  The sun is shining and the breeze is warm.  Ike, my kitty is having his afternoon nap. He likes to nap as do all kitties. He knows it's important to save up his energy for those nighttime patrols in the house to make sure nothing is stirring, not even a mouse!

I thought I would share a Mardis Gras card with you.  I love Mardis Gras time.  The colors of purple, green and gold go so well together.

The card I did today uses the Slice and the Spook Alley cartridge.  I LOVE this cartridge. I have a cricut and the only reason I bought a Slice was because of this cartridge. (I have to say that I got a great deal on it also during th sales last december.)  The gothic alphabet is one of the best I've seen.  AND the masks are on this cartridge.  I thought they were just wonderful!

The mask is made from a mylar foil with a sticky back that I attached to some cardstock. (Mirror card is probably too thick for the Slice to cut.)  I ran the finished die cut through my cuttlebug with a diamond embossing folder. (I also did this with the purple core'dinations cardstock mat - then I sanded it to show the core.)  Then I added glitter glue to the mask and let it dry.  I added gold glitter glue fleur de lis to the centers of the gold diamonds. Its a barely there monochromatic design that looks really good.

The stick is actually a stick - one of those shish-ka-bob sticks you get at the grocers.  I covered it with gold foil and then laced red and black ribbon around it. I added the jingle bells at the bottoms.


Details, details:


 When I was making this card, I didn't know which mask I would be using so I cut out all of them in different sizes and used different embossing folders on them.  Here are the ones I did.


Hope you enjoyed these masks and the mask card!

Saturday, March 5, 2011

Show What You Think by Voting on My Posts with a Single Click!

Hi everyone!

In order to get some feedback on the projects that I am posting to my blog, I have added a quick and easy way for you to vote instantly by clicking on a choice at the end of each post.

Feedback is important to me.  Feedback tells me what YOU would like to see and what doesn't interest you.

To make it easier for you to leave feedback, I have added a Voting box.  There are three choices:
  1. Not for Me:  This means that you really don't like what you see in the post, it's not your style or taste.
  2. OK:   This means that while you may have looked at or even liked what you saw, it wasn't something that drew your attention or got you excited. The post didn't offer you a style, choice or information that you would go back and see again if you thought I would post something similar the next time.
  3. Love it!:  This means that you really liked what you saw.  The style of the piece was really good.  The information was interesting and not boring.  You would look for other projects on my blog that were like this one!
Each post has its own voting boxes.  Just click in the box that you feel represents your thoughts on the project or post.  My blog will count up the votes and I get to view the total number.

Easy!  (And thank you for taking the time to leave feedback!)

Four Simple Cards to Make

Hi everyone!  I wanted to share some cards that I made this week.  All are simple to make and require very little time and materials.

First up - my Dad's birthday Cards.  My dad just turned 94!  I made two cards just for him.


The base for this first card actually came from a pad that K& Company puts out.  The pad is already cut at the bottom and has a variety of papers in it including the one you are seeing below.  All I did was fold it in half, trim it a little and add some ribbon and bling.  Simple!

 The construction of the second card has only three parts to it.  First I embossed the sentiment in copper.  Then I used a corner punch to cut the corners (front and back).  I used Martha Stewart's Leaves on Branch Trim. This punch actually punches out a trim, not just a border.  I used glitter glues to color the cardstock.


For my next card, I used a beautiful flocked red damask paper from Doodlebug.  I punched the corners with a decorative corner punch fron Fiskars, added a silk ivory ribbon and bow and a chipboard butterfly from Dove of the East. The card took me about 5 minutes to make. (I took a couple of pictures because the flocked damask pattern is difficult to see.  But take my work for it, it's gorgeous!)


For my fourth card, I used Tim Holtz's Rosette die to create the rosette you see below. I used another Martha Stewart punch to create the border. To create the key embellisment, I used another of her punches (it has two little keys on it) to punch out some keys. I glued them one on top of the other and added a brad. the card base is pale blue and really allows the other paper to really pop.

So, a simple card: a base, a border (or a mat), an embellishment, you're done!

Friday, March 4, 2011

A Note About Faux Wax

If you decide to buy some faux wax, be sure that you are buying faux wax glue sticks and not just colored glue sticks.  There is a difference.

A Scrapbook Page! Lazy Day Ike

You may know that I have a kitty named Ike.  I took pictures one day of him (almost) sleeping in his favorite sunny spot.


I printed his picture a few times and then cut out strips with his eyes.  I used these as part of the border.  The strips also hid the saparations with the embossed border pieces (I could only emboss 5 inches at a time so I had to cut three strips to have one 12 inch long border strip.)


This is a trick I learned.  Take a ruler (or in this case I use a clear package) and put your letters on it.  Now you can move it around until you get the title where you want it.  When you are happy with the positon, press the letters down.  Be careful when taking away your ruler though or you may pull a letter out of position.

I hope you enjoyed this. Take care!~

Thursday, March 3, 2011

Just Shop! Card

Hi everyone!  Happy Thursday to you all!

Today I thought I would post a card using a finished chipboard embellishment. 

I always find it harder to use the finished pieces. I never seem to know where to fit it in.  I decided to use two different colors of ribbon, ivory and mauve.  I lined the outer edge of the chipboard with gold glitter glue.  The Tim Holtz tissue tape makes a great background on ivory cardstock.  It looks just like it was the paper, doesn't it?  Hope you enjoy this cute card!


PS: I am working on a COPIC post/project for next week so watch for it! (I have some silk ribbon ideas to share!)

Wednesday, March 2, 2011

Projects Coming Up: Copic Markers & Moulds and Moulding!

Hi everyone,

I thought I would let you all know what is coming up in the next week or two.

COPIC MARKERS:
I received a request to do some things with Copic Markers.  Copics have become really popular in the past year or so.  I have taken a copic class and will share with you what I know about these fabulous markers in my next post.

MOULDS & MOULDING:
This coming week I will be playing around with moulds, making moulds, using different materials for moulds and creating some cards with the moulds.

If there is something you would like to see, leave a comment!

See you next week! (how exciting!)

Scroll Heart Punch Embossed and Faux Sealing Wax(Kaarten met scroll heart punch)

Hi everyone!

Today's project:

As you can see, I used the scroll heart punch on gold glossy that was embossed.  The wider design allows the embossing to really show. I used a smaller design which also helped.


Now for something old but new:  Faux sealing wax

Did you notice the center of the card?  It is made from a hot glue gun faux sealing wax that is actually colored hot glue.

The faux sealing wax comes in sticks as you can see below.  There are many colors to choose from including metallic colors like gold and silver.
 I used a Krafty Lady Mould and my glue gun to add the faux wax (hot glue) to my mould. I let it cool and voila! ( I have added the Krafty Lady site to my favorite websites in case you want to look at her moulds.)

 You will notice that there are some pits in this result.  this comes from bubbles. I liked the look so I didn't do it over.  You have to be careful when adding the glue to the mould because it is very thick and so any bubbles do not easily rise to the top.

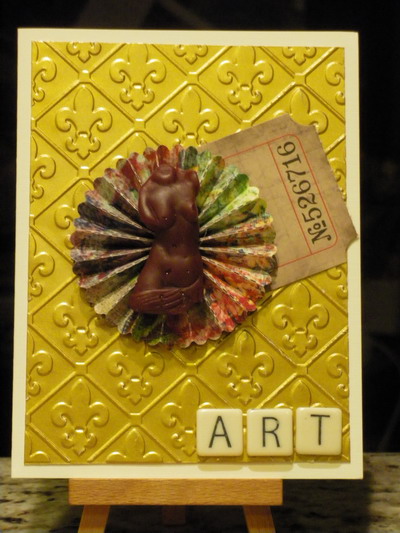
I added my moulded torso to the card below. I used Tim Holtz Rosette die also.  It came out very nice.


See you next week!