Pages

Thursday, March 31, 2011

Visions and Dreams Book

I love to make little journals and books. I think it's exciting to turn each page and see what is on the next page.  I like to add little doors to open, little cubbys to put stuff in, little drawers to pull out.

The little book I made for today does not have all the extras that you might find in one of my bigger books, but it has some very pretty pages that I decorated with Alice in Wonderland papers from Graphic 45.

I started with a pre-made book that had a scalloped design. 


I glued two inner pages together for strength and ended up with 4-5 total pages to decorate.  To cut the papers to fit onto the pages, I made a template from one of the inner pages and used it to trace the page shape onto the papers that I was going to use.

Here you can see that I used a lot of ribbons for the spine of the book, weaving them in and out of the wires.


This is the front of my book.

 And this is the back of my book.  I covered the back with Tim Holtz tissue tape.  That's all I used.  Looks good, doesn't it?

Here is another look at the front and back together.


Here are the pages to my little book.  I did leave the centers undecorated.  I may put ribbons on the inside rungs also.  My books tend to be a work in progress.


I used miniature classic art stickers and framed them.

 And I decorated with punched out Fleur De Li's in blue glitter paper.  I edged all the pages and covers with a gold paint pen for a finished look.

I added a french page and even added a white feather!  The purple shield with the Eiffel tower and "PARIS" is actually a paper clay mould I did.

I used little acrylic gems here.

I left the last pages blank.  I just liked the way they were.


Here are a couple of close ups of some of the details.


I hope that you enjoyed today's little book of mine!


Tuesday, March 29, 2011

Cameo Cards

I love cameo silhouettes. I can imagine a Victorian home with a silhouette done in black paper and hanging on a wall in a gilded frame. The Cricut cartridge Heritage has a number of these cameos that can be cut out in pretty much any size you want.  I wanted to use these and thought about making some cameo cards.


First, I want to show you the background that I did for these cards.  I made an ivory base card by folding a piece of ivory cardstock (8 1/2 inches x 5 1/2 inches) in half to make my invitation size card.  I took a writing stamp and embossed the front of my card in gold.  It was so pretty by itself that I decided to share these pictures of it.  This makes a really great card all by itself.  AND it makes a great base card that you can use for so many card styles.


Heat embossing is a wonderful and elegant addition to any card or scrapbook page. It does have its tricky parts though.  If you don't emboss it enough, you get parts of the powder that aren't melted and they look brown. If you emboss too much, the melted embossing sinks into the paper and you don't get the raised relief you want which is the object of embossing in the first place.

Here are a few tips:
  1. FOLLOW THE MELT.  Don't wave your heat gun back and forth over the piece you are embossing.  You won't get an even melt and you will get patches that don't melt.  Start at one corner or edge and follow the melt.  You will find that you will get better results.
  2. Don't go over already melted (embossed) areas. 
  3. If you do miss a spot, turn your heat gun on (point it away from your piece), THEN POINT AND HEAT THE SPOT QUICKLY, see it melt and take the heat gun away.
  4. Emboss in the the light. Use the dull and shiny embossing to guide you to where you need to point your heat gun.
  5. FOLLOW THE MELT.
This is a close up of the embossing. (For those of you who speak German, you will recognize the old Schrift. It's beautiful, isn't it?)


I purchased the Beaded Ovals set from Spellbinders (Wizard dies).  I've been wanting to use them and when I looked at the design, I naturally thought of cameos. So, this is what I used to cut out the backing that I put the cameos on.  For the card below, I used Victorian Violet, Broken China and Vintage Photo Ranger dye inks to color the beaded oval.  Both the oval and the cameo are attached with mounting tape to give depth.


I used a dark Burgundy ribbon because many of the colors of the Victorian era were darker colors. 


I used a smaller cameo and beaded oval for my second card.  I used Weathered Wood and Pine Needles Ranger dye ink for the coloring here.  The ribbon is a hunter green, again dark.  (My Great Aunt Mabel had a sewing machine that my sister inherited. It was a treadle machine - not uncommon.  BUT what WAS so very interesting was that she had all the spools of thread that she used still in there.  My Great Aunt was 94 when she died and that was in 1965 or thereabouts, so she was a young woman in the 1800's.  The spools of thread were dark silky colors - very beautiful.)


You may have noticed that I embossed the bottom of each of the two cameos.  I thought this would be a pretty accent that would tie it in better with the card.  I used the direct to paper technique to accomplish this.  It gives the finished piece a little bit of a rough-edged look which I like.


For my third and final card, I decided to use a smaller beaded oval and add an initial in gold glossy cardstock.  The nice thing about the Spellbinder dies is that they come in sets of 5 or 6 and they are incremental in size. So, making graduated die cuts is easy.


I used a coppery, rusty colored ribbon for this card, It is the only color on this card other than the gold and ivory.


In this close up, you can see how I embossed the edges of the small beaded oval.  I used the same direct to paper technique to accomplish this.  I did not worry about being exact or neat.  I wanted a more worn look.  It is easy to take a paint brush and get a much more finished look if you want one.


I hope that you enjoyed these cards today.  I encourage you to try heat embossing with powder if you haven't and if you gave it up, try it again.  It's a beautiful addition to any card.

Monday, March 28, 2011

Fancy Love Card

Hello everyone!  I hope that you enjoyed yesterday' vintage card.  Today I have another card with a vintage feel for you.

TIPS:
  • You don't always have to use vintage items or images to get a vintage feel.
  • Use colors associated with the era you are trying to get.  Colors are a very strong part of your card or art piece.  If I say "red and green, you think of Christmas. If you see orange, you think of Halloween.  So, you can use color to get a "feel" for a certain period of time as well.
  • Use ivory cardstock.
  • If you are trying to get an old fashioned feel to your card, try using lace or crochet instead of ribbon.
The card today turned out really nice.  I used copper embossing powder (fine).  You will notice below that I have layered a green card with embossing on it on top of what seems to be a copper piece of paper.  Actually this is also a piece of cardstock that I embossed the edges of in copper.  It brings out the copper embossing on the top sheet.

To emboss edges, take your cardstock and rub the sides onto versa mark. Then coat with embossing powder and heat emboss.  Remember that you don't need to always use a stamp when you are embossing. My favorite thing to do is to "Freeform Emboss".  I use just the paper and a direct to paper technique to apply the embossing ink or the versa mark.  This gives my result a rougher edge.  The bow is crochet from Really Reasonable Ribbon.


If you look at the copper embossed edges of the second layer, you will notice patterns in it.  This is the patterned paper showing through the embossing.  (I didn't think that it would show up in a picture because it's so subtle. But there it is!)


Below you can see my "fancy" love!  This die cut came from the Heritage Cricut cartridge.  I used gold glitter on the swirls.  I wove a beiger ribbon through the word and then attached it to the card.  
I hope that you enjoyed today's card. Stay tuned for tomorrow's card!  Another old fashioned one!

Sunday, March 27, 2011

Two Women

Hello everyone!  Hope you are all having a good day. I am in a victorian state of mind lately. I love the old fashioned feel, the ornateness, the stateliness of the era.  There are such wonderful qualities to all the different decades. 

For the card below I used the Heritage cartridge from Cricut.  It really is a wonderful cartridge!  It has lots of old fashioned designs for cards, wagons and houses. What I like most about this cartridge is that it has shadow profiles for people.  I really like the look of them.  So stay tuned!  In a couple of days I will be posting a card with just this style!  For today though I thought I would use a fancy rectangle with pretty swirls in it, in two different sizes, and my 30s-40s women for a card.  I used papers from Basic Grey's Curio Line (simply gorgeous). You may also recognize the backgroun I used for my photo.  It's from Tim Holtz Paper Stash.


I used Ranger Sticky Backed Canvas in white to print out the images of the women using my inkjet printer. (The canvas feeds in just like paper. The print does not run or bleed.  One thing to remember is that canvas has a pretty big texture to it.  You will not get ultra fine details to look good here.)  I matted the pictures to black cardstock.


This is a close up of the flower and center. I like the unexpectedness of the center of the flower.

Hope you liked today's card.  Come back each day to see the other old fashioned cards I have made for you!

Saturday, March 26, 2011

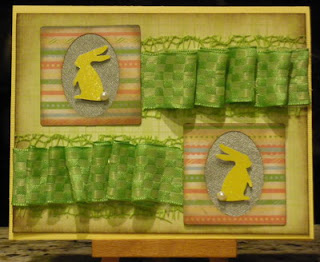
Easter Cards - #4

This one card is a green monochromatic Easter card.  You will notice the yellow rabbits.  These are
Martha Stewart punches.


The detail on these little guys is really nice. I added a white pearl for the little tail!


I hope that you are enjoying these pretty Easter Cards.  Come back tomorrow for another pretty card!

Remember to Leave Your Requests!

Remember to leave your requests!  I am happy to post instructions on my blog for specific techniques that you are trying to find or are interested in.

If you leave a request, I can respond within 1-2 days! 

So, if you are interested in specific:
  • Embossing or debossing techniques
  • Punch techniques
  • Better ways of using papers (have you tried serendipity paper using your scraps?)
  • How to make designs and placing them in your artwork (cornerwork, basework)
  • Using inks (solvent, alcohol, dye, pigment, hybrid) and sprays
  • Folding techniques
Let me know.  I can help!

Lis

Friday, March 25, 2011

Easter Cards - #3

This Easter card was inspired by a song I used to sing at school when I was a child.  "Here comes Peter Conttontail, Hoppin' down the bunny trail..."


I hope that these Easter Cards inspire you to make your own!  Happy Easter!

Thursday, March 24, 2011

Easter Cards - #2

This Easter Card features ribbons, ribbons, ribbons!  I really love ribbons.  I don't think we use them enough on cards. There is such a variety and some truly spectacular companies  that produce some of the most beautiful ribbons I have seen (Mays Arts to name one).  Prima Flowers has some new selections in ribbons and many companies that make scrapbook papers also sell matching ribbons.

To add the ribbons below:
  1. Take two ribbons and join them at one end.
  2. Put a glue dot between the two ribbon ends and attach them together (this will make it easier to work with)
  3. Take the one end and attach it with a glue dot to the back of your card front.
  4. Twist the ribbons loosely around each other.
  5. Trim the ribbons so that you have about one inch overlapping the edge of the card front.
  6. Take another glue dot and attach the ends of the ribbons together.
  7. Fold the ribbon ends to the back of your card front and attach to the back with a glue dot.
  8. Make two bows - one of each ribbon.
  9. Attach each ribbon with a glue dot on top of the twisted ribbons.
  10. (You will notice that I attached the lighter ribbon on the top and the darker on the bottom.  I also matched the bows to the twisted part of the two ribbons that showed the most at each end. I hope this makes sense.)


Stay tuned for more Easter Cards!

Wednesday, March 23, 2011

Collage Card

This is truly a collage card!  I think I added everything but the kitchen sink.

Starting from the top and working our way down the front of the card:
  1. A photo or film holder or slide holder.  This is a reproduction of orignals used with negatives.  Mine was painted with dye inks and has gold beads glued to it.  There is a picture of a rabbit in the center.  Did you know that you can buy a punch and punch out as many as you want?
  2. A wooden bingo chip "N40".  I like using these as little embellishments. You can turn them around, paint them and stamp on them too!
  3. A layered nameplate with a key on it.  Eyelets fasten the ends together and add to the golden decoration. The center is empty so that you can look at the papers behind it.
  4. A little glass bubble that magnifies what is under it.  Although I used glass, you can find plastic ones that weigh much less.
  5. A door handle made from shrink plastic and colored brown. On the door handle is a miniature door hanger  saying "hello".
  6. Paper pieces of flowers, stamps, and other items that I cut out of various pieces of scrapbook papers.


Although I had to use a slightly larger envelope (because of the photo holder), it was a fun card to send and for my friend to receive.
I like this card because it is a feast for the eyes.  Each time I look at this card I see something else!


TImeless Christmas - Stampscapes Technique Card


Hi everyone!  Today I want to introduce you to Stampscapes!  Stampscapes are rubber stamps that create scenes when you put them together.  There is a website http://www.stampscapes.com/ where you can look at many samples, look for classes and instructors (I am one!)

I used four stamps to complete this picture. (Yes, I know it's a Christmas card, but I really like it)  The coloring on this card is a layering of colors which is the techniques stampscapers use.  These cards have a very typical "glow" to them.


There are a number of stampscapes techniques including using a foam applicator and airbrushing with copic markers or alcohol inks.  This is in addition to the traditional applicator with dye inks.  Most if not all stampscape cards are done on glossy white cardstock. The stamps are stamped in StazOn black.

If you are interested in seeing more of this kind of card or are interested in learning more about Stampscapes, let me know!


Seize the Day Lace Technique Card

Hi everyone! How are you today? 
Today I wanted to introduce you to yet another interesting technique called Lace (pronounced lay SAY).  The beautiful cutwork on the front of the card is done using a template where slits are cut into the cardstock (I use two-sided, two color cardstock for this technique).  After the slits are cut, the open work is then folded and woven into each other to create these beautiful designs.


If you would like to learn more about the lace technique or see more of this style of card, let me know!

Tuesday, March 22, 2011

Spirit

I love making cards using a letter of the alphabet.  Although there isnt much room to write a message on the inside, these cards are stunners and have great impact.  This card does open and fits nicely in an invitation envelope. 
To cut the "S", I used an accucut die. The letter is about 4 inches.  Sizzix also makes an alphabet about the same size in block lettering.  You can buy just one letter.  Depending on the one letter, you can use it for many , many meanings!


Faith

HI everyone! Hope that you are having a great week so far!

The card that I am doing today is called Faith.


Monday, March 21, 2011

Tick Tock Domino Clock Pin!

Hi everyone, I hope that your week is going smoothly.

I wanted to share another passion of mine.  DOMINOS!  Dom inos come in all shapes and sizes (including hexominos with six sides) I like to use mahjong tiles too!  I thought I would share a domino pin today with a time/clock theme.


To make this pretty pin all you need is a regular sized domino.  Stamp some clock images on the back (use a solvent based ink like StazOn).  Add some wire and brass charms.  Glue on some clock hands. And finish off with some glass beads attached to the sides of the domino.  Then wear your pin proudly!

A Domino Card! (Invitation to an Artist's Wedding)

Hi everyone,  I thought that I would share a couple of domino pieces this week.

You will notice that I used three mahjong tiles.  I stamped them, accented them with a gold paint pen and adhered them to my card.  I used sections of a single collage stamp for all three of my tiles.


If you make a card with heavier embellishments, be sure to add enough postage for them and maybe even place your art in a padded envelope to protect it.