Pages

Monday, February 28, 2011

Final Martha Stewart Scroll Heart Punch tomorrow...

I will be posting my final project for the Martha Stewart Scroll Heart Punch Tomorrow.  Have you guessed what the other picture was yet?

If you would like to see something in particular, please leave me a comment.  It doesn't have to do with what is posted on the blog.

If you would like to know more about

  • all about embossing techniques ...
  • rubber stamping techniques and constructing a scene...
  • using different designs in different ways (like the scroll heat punch)...
  • image transfer techniques
  • designing cards
  • scrapbook page layouts
  • tools and machines you have and what they can do
  • materials like inks, papers, ribbons, metals & what you can and can;t do with each (paper is incredibly interesting) 
Designing and stamping with...
  • Stampscapes
  • Outlines
  • Some Assembly Required Stamps
  • Holly Berry House
Using popular images in new ways:
  • locks and keys
  • gears
  • houses and dolls
 And so much more....

Let me know!  I can come up with a post and a design that will be interesting and informative.


See you tomorrow!

Sunday, February 27, 2011

The Scroll Heart Punch used as a Stencil(Kaarten met scroll heart punch)

Say what?  Yes, as a stencil.  I used shrink plastic and punched a border. I used this as my stencil.  I didn't use regular transparency plastic because it is thinner and won't punch well at all.  You can use paper as a stencil but for this technique, we have to wash it and shrink plastic works well.

So, what did I stencil, you ask?  Well, take a look at project #1.


Here is how I created the border at the bottom of my card.
  1. I placed my stencil (made from the border punch) on a black piece of cardstock.
  2. I used Molding Paste and a spreader tool. (Artists and cake decorators use it.  It is bent at the handle)
  3. While holding the edge of the stencil on my paper, I spread molding paste over the stencil and paper, covering them both.  This is a little like icing a cake.
  4. I carefully removed the stencil and let the molding paste design dry. (This Molding Paste dried white and matte. It is also flexible and doesn't crack easily.  It does take color so I could have stamped it, or even used inks on it.)
  5. I replaced the stencil (now I used it as a mat to cover up the design).
  6. I sprayed Radiant Rain on the entire piece.
  7. I removed the stencil again and the result is what you see below.
(You will notice that part of the design has some spray on it.  This was not the fault of the stencil. The stencil worked perfectly and no spray got on the black paper.  I wanted to add some color on the right and sprayed without putting the stencil down first....duh!)

 I took this shot to give you an idea of the effect that Molding Paste has.  There is a depth to this design and creates a 3d effect.
 This is the Molding Paste that I used. Golden is well known among artists ans has great quality in all their materials.  While a CHA I took a class that used Speedball Molding Paste which seemed a little airier.  Liquitex also makes a Molding Paste I believe.

What ever Molding Paste you use, you should probably get the LIGHT one.  This means that its less heavy (less dense) than the others.
 Here is the Radiant Rain that I used.

Here are a couple of detail shots of Project #1.

For this part of the card, I used an embossing folder (Cuttlebug) and some gold glossy (The Paper Cut).


If you think about it, you have probably got MANY punches that you could also try this with.  Just think how many stencils you could have!


Thank you for stopping by.  I hope you enjoyed this card.

I was hoping to complete the second project but I ran out of time.  So, I will post tomorrow.  See you then!

Friday, February 25, 2011

More Scroll Heart Punch Delights to come!

Hi everyone!  I am working third shift (last night and tonight) and haven't been able to complete my two last projects for you using the Scroll Heart Punch.  I am really sorry about that because I know you look forward to seeing what I've done!

Well, the wait will be worth it!  I will be posting twice tomorrow evening (USA; Pacific Time) with two different projects and ideas. Hmmm....wonder what they could be?  Shall I give you a hint? 

Project 1:


 Project 2:


See you tomorrow!

Wednesday, February 23, 2011

Scrapbook Page with Scroll Heart Frame

Hi everyone!  I hope that you are enjoying this week's creativity with Martha Stewart's Scroll Heart Punch.  Today I wanted to do a scrapbook page.  I chose Graphic 45's Renaissance Faire papers.  I thought they would match the elegant scrollwork of the punch.


First thing I asked myself was "how do I make a corner punch out of a border punch?"  Many of the punches that Martha Stewart makes do have corner punches that go along with the borders (they are called Punch Around the Page punches.)  The Scroll Heart Punch doesn't have any of that so I had to improvise.


First, here is the result of what I did.


Here is how I did it:
 I flipped the punch over so I could see the actual punching surface.  Any of you who use punches routinely is familiar with this.  I don't think many people have used this technique on the MS punches because they are so well done that you really don't have to.  For this result, you do though.

I put the corner of a 12 x 12 paper in the punch, lined it up and punched once.


This is a scrap piece of paper but I wanted to show you what it looks like.


Next I put the long side of the paper in the punch (looking at it from the back side again).  I lined it up using the punched corner as a reference. (How I lined it up and how you may line it up are purely personal preference.)  You can see in the picture below that I had enough paper in the punch to get everything including the top of the heart punched out.  BUT you can also see that there is a small space between the bottom of the paper and the bottom of the punch.


After I punched this once on each side, it looked like this.

I continued to punch a border but I did NOT use the guides on the front.  Remember that my border is about 1/8" off from the guide.   I continued to punch from the back side, lining up each punch as I went along. I punched a couple of times until I got to where I thought my frame would be big enough. (I didn't measure.)


OK.  Here is the trick.  As you can imagine, punching the first corner was easy.  Punching any of the other corners was impossible because I had no reference and a big ol' piece of 12 x 12 with some punched edges...LOL.  So, I improvised.  I cut a piece of cardstock and punched a corner in it with the same pattern I was using for my frame.


I matched it up with the corner that I punched in my 12x12.  I noticed that the paper covered up the heart.


So, I looked at the border where I wanted to stop and make a corner.  There was the heart.


I took my scrap piece and placed it so that the heart was covered and the corner on the piece of paper was in about the right position for a corner.


I cut my 12x12 right at the edge of the corner.


Now I have a corner, AND a reference, so I can punch my corner.

I used this technique with the other corners and as you can see, it worked really well.


More details:
After I finished punching the frame, I embossed it using copper super fine EP.  I used a writing stamp and versa mark and embosssed the writing design on it.  I added a center paper 4x4 and edged that in copper EP as well.  The four corners are actually pieces I cut from the cover of the paper stack from Graphic 45 (waste not, want not).  I back it all on a mocha cardstock.

I did a little paper tearing and added Aged Mahogany distress ink to the edges. I finished it off with some pearls.  I didn't put a picture or a title on this page.  The picture would go in the middle on top of the green cardstock.  The title can be place either at the top or bottom.  I left room for other embellishments and journaling also.


I hope you enjoyed looking at this project and how to solve the corner punch problem.  Take Care!

Monday, February 21, 2011

Scroll Heart Jewelry!

Hi everyone! Happy President's Day!

As usual I started out to create one thing and ended up with something else!  Isn't that just like life?  Anyway, today I have jewelry made from shrink plastic and the scroll heart punch.

Shrink Plastic has been around for a long time.  It is a great material to use to make charms, jewelry, embellishments and so much more. 

Shrink Plastic comes in 8 1/2 x 11 inch sheets and comes in clear, white and black.  I used clear for my project.

To use shrink plastic, you need to prepare it.  Simply sand one side with a fine or semi fine sandpaper (I use one of those white rectangular nail buffers.) The reason you want to sand it is so that the color will stick to the plastic.

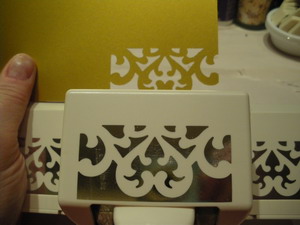
Once prepared, I used my punch and punched out an 11 inch border.  I cut out two hearts for my earrings and used a strip about 5 inches long for my pin. (I wasn't sure if my punch would go through the shrink plastic but it did very well.  Remember that the more detailed a punch is, the less likely you can use it on thicker material.)

After you punch or cut out your shape, all you do is use your choice of colored chalks.  Use a q-tip to apply the chalk to the plastic.  It's very forgiving so you don't even need to be exact.  One thing to remember: the plastic shrinks so the color gets a little darker.

Craf-T Chalk has come out with several series of beautiful colors.  With names like "Summer Sea", Earthly Wonders" and "Butterfly Kisses/Dragonfly Dreams" how can you resist getting one of everything!
I used Garden Blooms and the newest addition to the line Photo Tinting Chalks.

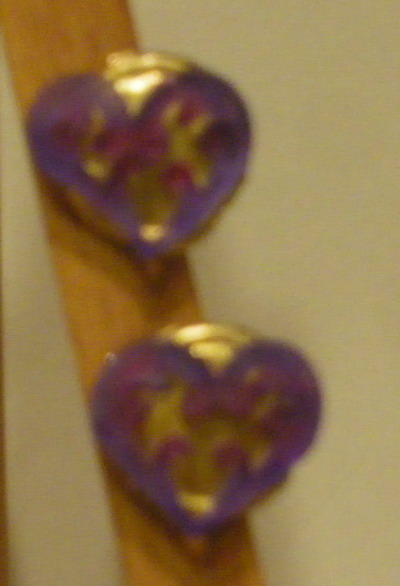
First I want you to see how I colored my hearts.  First I colored the whole heart in lavender. Then I used red to accent the insides of the heart.  I gently blew off the excess chalk (there is really very little chalk dust).
 I used pink and green on the border.
Once the shrink plastic was colored, I used a heat gun and a pair of tweezers (to hold the shrink plastic down while it shrinks).  The shrink plastic will shrink quickly.  Keep your heat gun on it so that you can be sure it completely shrinks and falls flat again.  You have about 3 seconds (really, 3 seconds) to make any final adjustments like curving it or forming it or flattening it before it dries hard as a rock.  You can keep it soft for a short while by continuing to keep it heated. 
Remember that it is HOT HOT HOT.  So, use your tweezers.  If you've never used shrink plastic before, it would be good to find a store that can demo it for you or provide you with hands on teaching.  Its easy to do, you just need practice the first time you do it.


Here you can see my heart earrings and the start of my bar pin at the top already shrunk.  Below the ruler is the original punched out border.  This gives you an idea of how much it shrinks.

 And here are the results!

I added some paper roses and brass charms to my pin.  I love things that dangle. I love the way they tinkle when they knock against each other. To complete the jewelry I added a pin back to the bar pin and posts to my heart earrings. You can get both at any craft store in the bead section.


Scroll Heart "I Love Paris" Bar Pin 


Scroll Heart "Wear Your Heart on Your Ears" Earrings

(sorry for the blurry image - I am trying to figure out how my camera can take better pictures)
 I really hope that you give shrink plastic a try.  It is a versatile material that will make anything special.

Sunday, February 20, 2011

Scroll Heart Tabbed Tag Book (Buch met scroll heart punch)

Hello and Happy Sunday to you all!  I hope that you find today a wonderful day.

I was playing around with the scroll heart punch and thought "wouldn't this make a pretty design on the end of a tag for a book?"  I went through a few trials before I ended up with what you will see below.  I love taking pieces of a design and using them in different ways. Because the scroll heart design is larger, it's easier to cut away pieces of the design to get a new look.

The tabbed hearts are actually from the punch design. 
  1. I used thinner patterned paper for my tags.  I cut the tags out from a Tim Holtz Tag die from Sizzix first.  I used the heart in the center of the design as my center point.
  2. Then I punched the ends of the tags.
  3. I punched once for each tag:  once on the left for the first tag, once in the middle for the second tag and once on the right for the third tag.
  4. I cut away the parts of the design I didn't want which left the heart design.


 Here are pictures of the Tag Book Cover and pages.


Details, Details...closeups of some of the details of my Tag Book.


 The punched border makes a nice accent here.  I glued the border on each tag so that when the page is opened, it creates some unity between the two pages, left and right.


This little tag book makes a great Brag Book for the scrapbookers.  You don't have to stop at three tags.  You can add more, just alternate the tabbed hearts!


Saturday, February 19, 2011

Scroll Heart Collage Card(Kaarten met scroll heart punch)

I promised one more card for the first installment of how I am going to use the Martha Stewart Scroll Heart punch.  Here it is! 

I took portions of the mirrored border design and cut them out, placing them on my card.  You will notice that on the left side it is a portion of a strip, one of my favorite things to do.

Its interesting how the gold foil from the heart (on the hanger) picks up the colors of the ribbons.


I cut out the heart below from the border design and added it as a separate piece to my design.  These would also make great:
  • photo corners
  • ribbon slides
  • tile designs


So, I used a punch to make a mirrored border and used it in three different ways on a card:
  1. As the mirrored border
  2. As a shadow and border to create a 3d effect
  3. As pieces to complement a card.
I wonder what we'll do tomorrow??

Thanks for stopping by.  Please leave a comment with what you would like to see!

One Punch, Many Looks...A Week of Experimentation

Hi everyone and Happy Friday to you all!

This week I just got too excited to wait until Sunday to post!  I have selected a punch and will be making cards, tags (and who knows what else) using the one punch.

This is not a new idea but I am always intrigued by tools.  I ask myself "what else can I use this for"? Punches have SO MANY design opportunities.  Its very exciting to discover a new way to use a punch.  (Actually, a friend once told me that her "house weights" would be helpful in a tornado...LOL!)  But I digress...

So, without further ado I would like to introduce you to the punch I have chosen for this week.

Scroll Heart

This is one of Martha Stewart's new designs in her Deep Edger punches.

So, start with a piece of gold glossy (or other paper) and punch the design in one side. (the pattern on each side or "wing" of the punch guides you so that you make a perfect border each time.


Now measure the width of the design.  This one is 1 1/4 inches wide.  That means I need at least 1 1/4 more inches of gold glossy because.....I'm going to punch the same design on the other side creating a mirrored effect.

 So, I cut my cardstock to a total width of 2 1/2 inches.


I turned my paper over to the BACK SIDE.  I lined up the pattern and began to punch again.


Very nice.  As you can see, my punched design is not exactly perfect.  But handmade is rarely perfect.  You will also note the thin lines of paper running through the middle of the design.

I used an x-acto blade and cut them off.

Here are two cards I made with this design.

The first card has a classic feel.  I simply added the design to the right of the card and added some pearls. (Paper is from DCWV.)


The second card is a bit different.  I punched the design in the blue background.  I overlaid the gold design onto the blue and overlapped it.  It created a nice 3-d effect.  I added ribbon and jewels.


(I am working on a 3rd card for this design, As soon as I finish I will post.  Its a collage card.)